1. Getting Started
NEXGIA DRIVE is a dedicated launcher app for installation on an AIBOX (Android device for in-car use). This chapter covers supported devices, installation steps, and the setup needed the first time you launch the app.
1.1 Supported Devices
NEXGIA DRIVE is an app made exclusively for AIBOX (an in-car Android device running Android 13 or 15). It will not work correctly if installed on a regular commercially available smartphone or tablet.
- It only supports AIBOX units in which the manufacturer has built in special (system) privileges.
- On Android 16 devices, please use the dedicated A16 Edition instead (see 1.2).
1.2 Installation
- Download the latest APK file from the link below.
Latest version download: NEXGIA DRIVE latest APK (Google Drive) - Transfer the downloaded APK file to the AIBOX unit, then open the file to install it.
- Launch the app once installation is complete.
Once installed, later version updates are applied automatically (see 2.7 Checking for Updates for how to check manually).
Note: If you're installing on a device that already has another launcher app installed, watch out for conflicts at startup. In particular, if the other launcher is set to launch automatically, its display may conflict with NEXGIA DRIVE. If switching between them doesn't work well, see "5. Troubleshooting."
For Android 16 (A16 Edition)
Because the regular version cannot be installed on an Android 16 AIBOX, we've prepared an "A16 Edition" for Android 16. It has the same features as the regular version, and automatic updates are supported as well.
- Download the A16 Edition APK file from the link below.
A16 Edition download: NEXGIA DRIVE A16 Edition APK (Google Drive) - Transfer the downloaded APK file to the AIBOX unit, then open the file to install it.
- Later version updates are applied automatically from then on.
Things to note:
- If you're using another launcher app, uninstall it first before installing the A16 Edition. Installing over it without uninstalling may make that launcher app unusable.
- Dual-screen display requires firmware support on the AIBOX unit itself. There are cases where a firmware update enabled it; on units that don't support it, only single-screen display is available.
Do not install the A16 Edition on a device that already has the regular version installed (Android 13 / 15).
1.3 First-Time Setup
Because NEXGIA DRIVE runs with system privileges, most permissions are automatically granted all at once during installation. Normally, you don't need to manually grant permissions yourself.
Items granted automatically:
- Accessibility (needed for the on-screen "Back" action)
- Notifications
- Location (GPS)
- Bluetooth
- Calendar
- Display over other apps (overlay display)
First Launch Flow
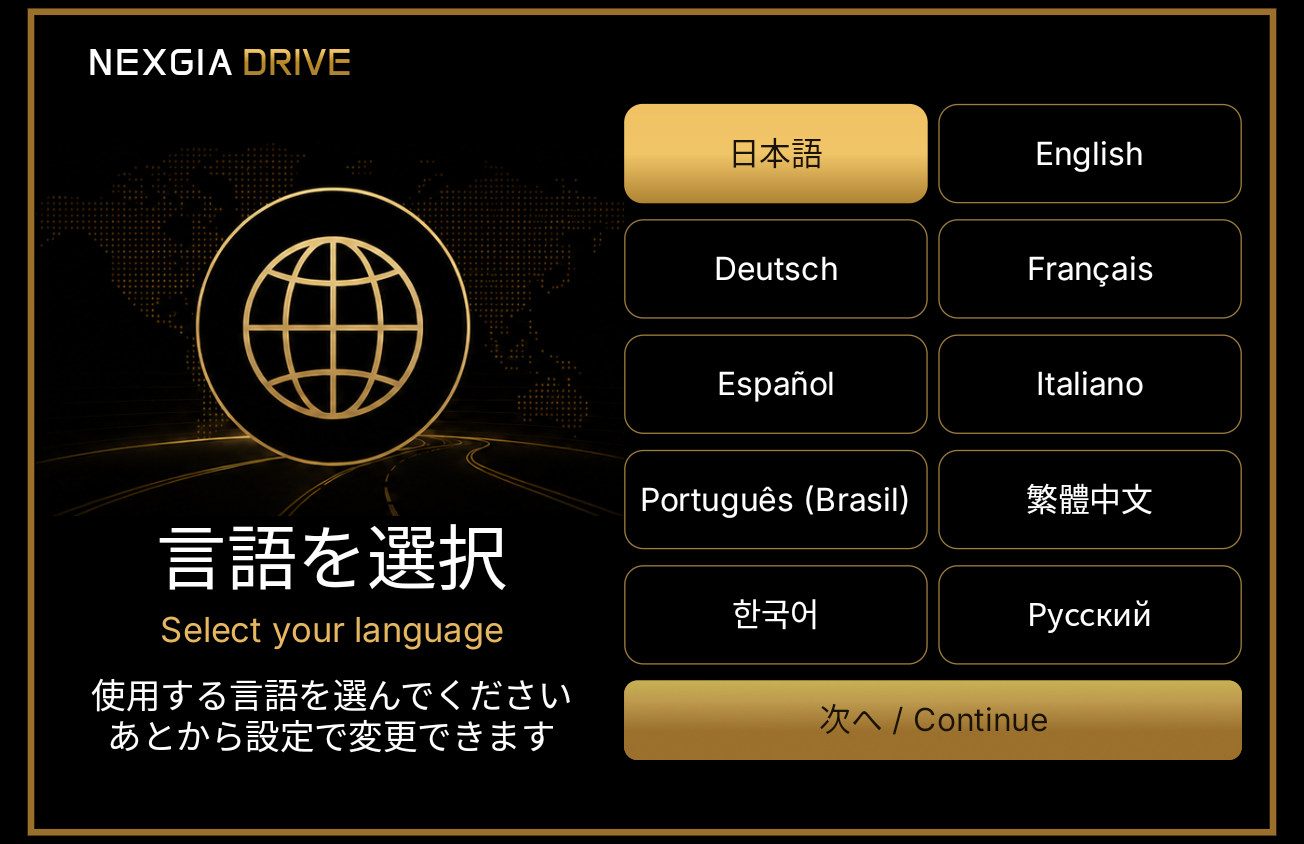
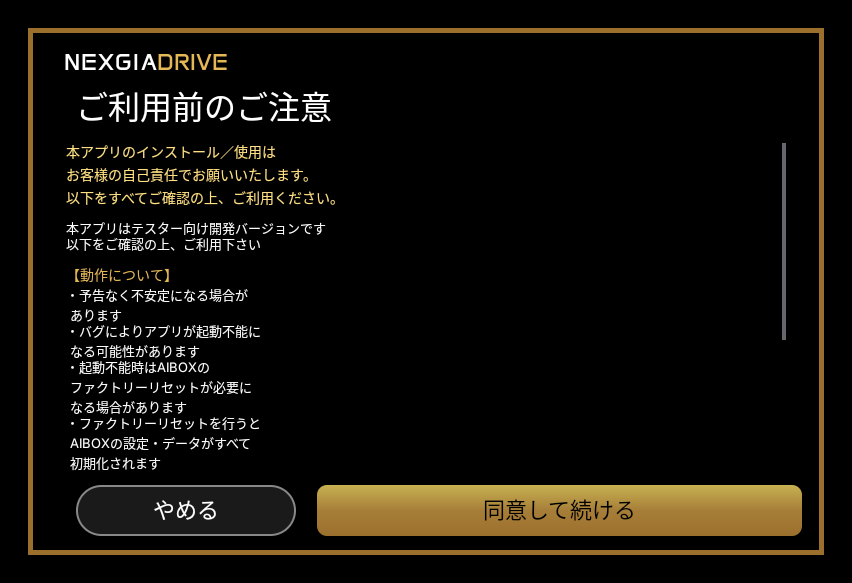
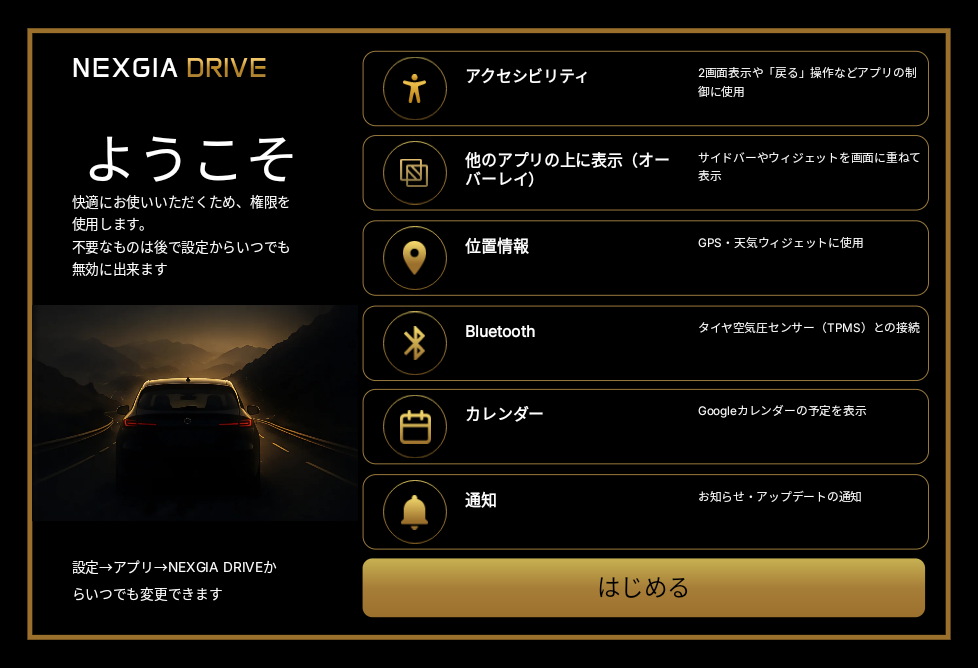
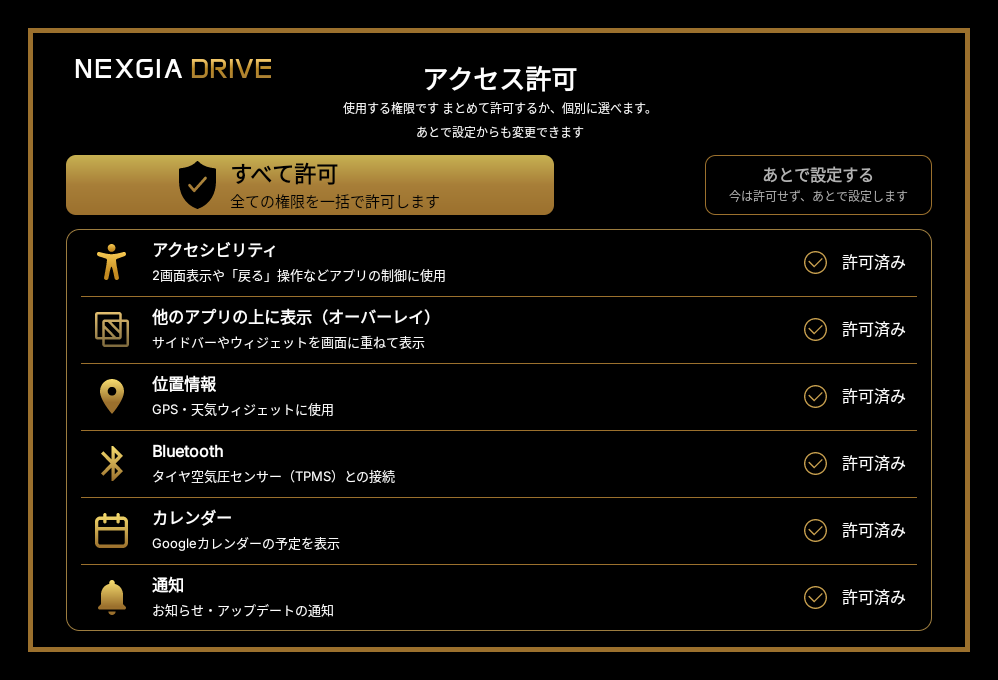
The first time you launch the app after installing it, the following screens appear in order.
- On the language selection screen, choose the language you want to use and tap "Next / Continue" (you can change this later in Settings).
- Review "Before You Use This App" and tap "Agree and Continue."
- On the "Welcome" screen, review the list of permissions the app uses, then tap "Get Started."
- On the "Access Permissions" screen, tap "Allow All" (you can also grant permissions individually, or postpone them with "Set up later"). On devices where permissions are auto-granted via system privileges, every item on this screen already shows as "Granted" from the start.
Once "Access Permissions" is finished, the home screen appears and you can start using the app right away.
Note: You can check and re-grant permission status at any time from Settings → Permissions (four items: Overlay / Accessibility / Notifications / Other Permissions).
1.4 Setting the Default Launcher
If you want NEXGIA DRIVE to launch automatically every time, set it as the "default home app (launcher)" using Android's standard OS feature.
Go to Settings → Display → Layout → Home App, then open the OS's standard home app selection dialog and choose it there.
Note: There have been rare reports of devices restarting repeatedly when NEXGIA DRIVE is set as the "default app at startup" and used together with certain hardware, such as multi-touch-capable levers. After changing the default launcher, we recommend waiting a while before enabling other settings (such as multi-touch). If anything goes wrong, revert the default launcher setting.
2. Basic Operations
This chapter covers the operations you'll use every day on the NEXGIA DRIVE home screen (the sidebar, display modes, widgets, DRIVE LOG, the music widget, and checking for updates).
2.1 Using the Sidebar
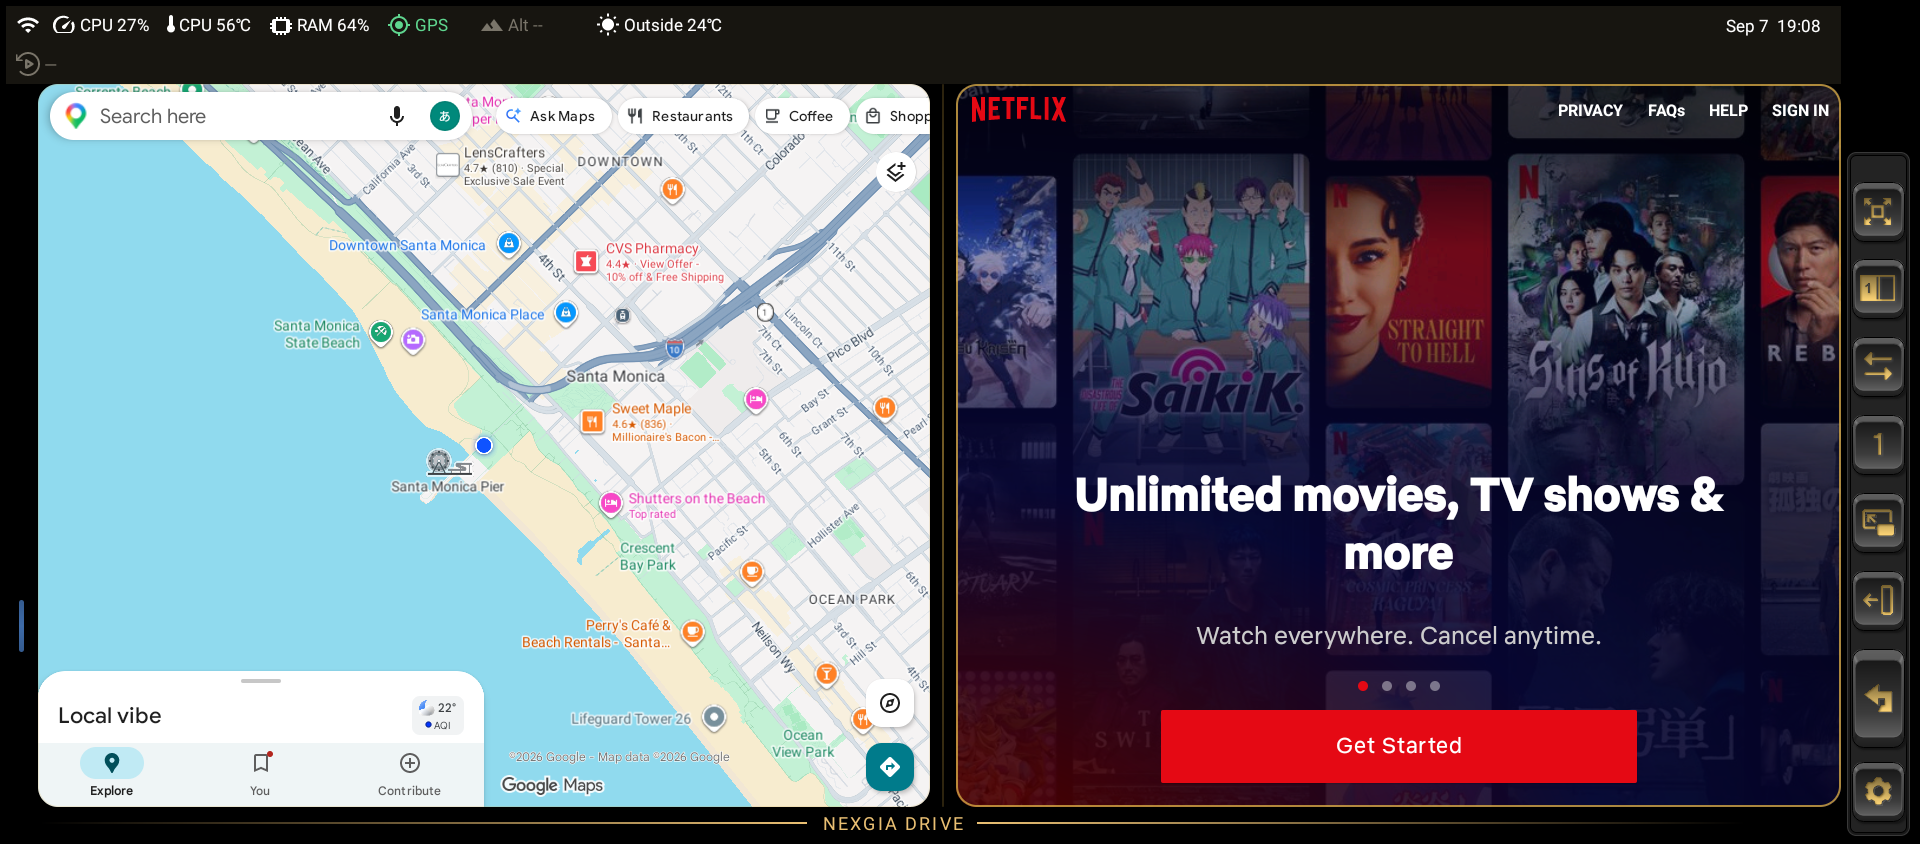
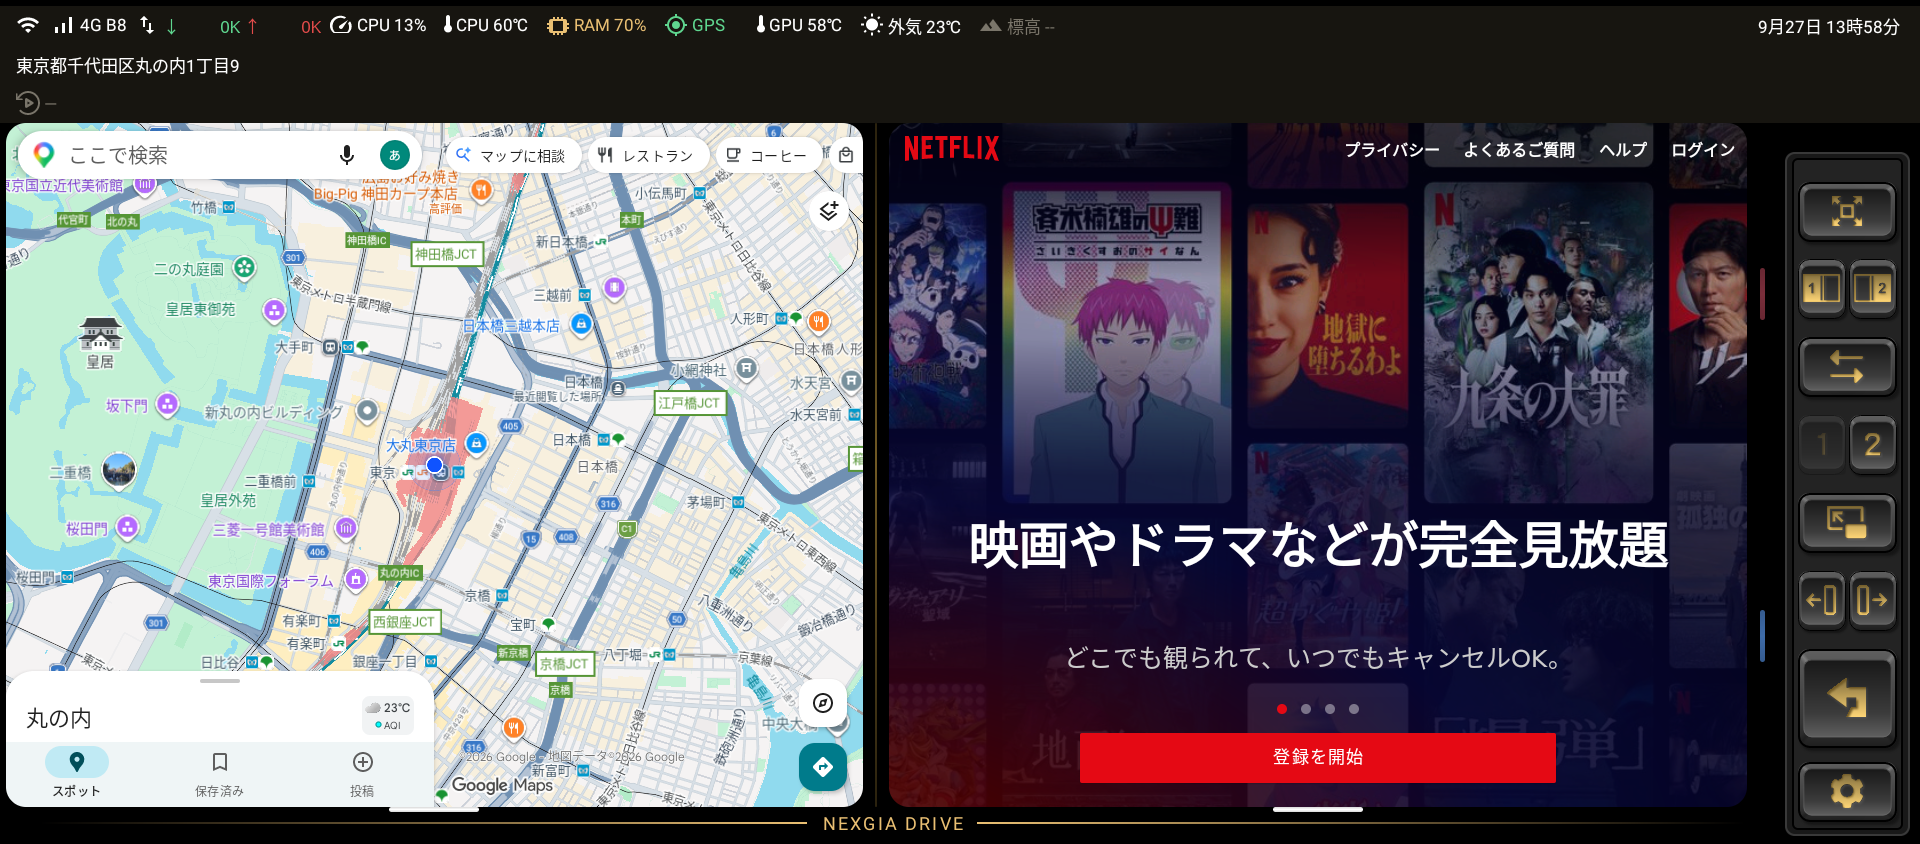
A persistent vertical bar (the sidebar) is shown at the edge of the home screen. The role of each sidebar button is as follows.
| Icon | Button | Action |
|---|---|---|
 |
Switch to Full Screen mode | Re-select the app to display |
  |
Change App (Left/Right) | Re-select the app to display on each screen |
 |
Swap Left/Right | Swaps the left and right apps while in Dual mode |
  |
Page 1 / Page 2 | Switches between two independent screen layouts (app placement and widget placement) |
 |
Screen Settings | Opens/closes the panel for switching display mode and adding widgets |
  |
Ratio Adjustment (arrows) | Changes the split ratio for Dual/Half display |
 |
Back | Returns to the previous screen |
 |
Settings (gear) | Opens the settings screen |
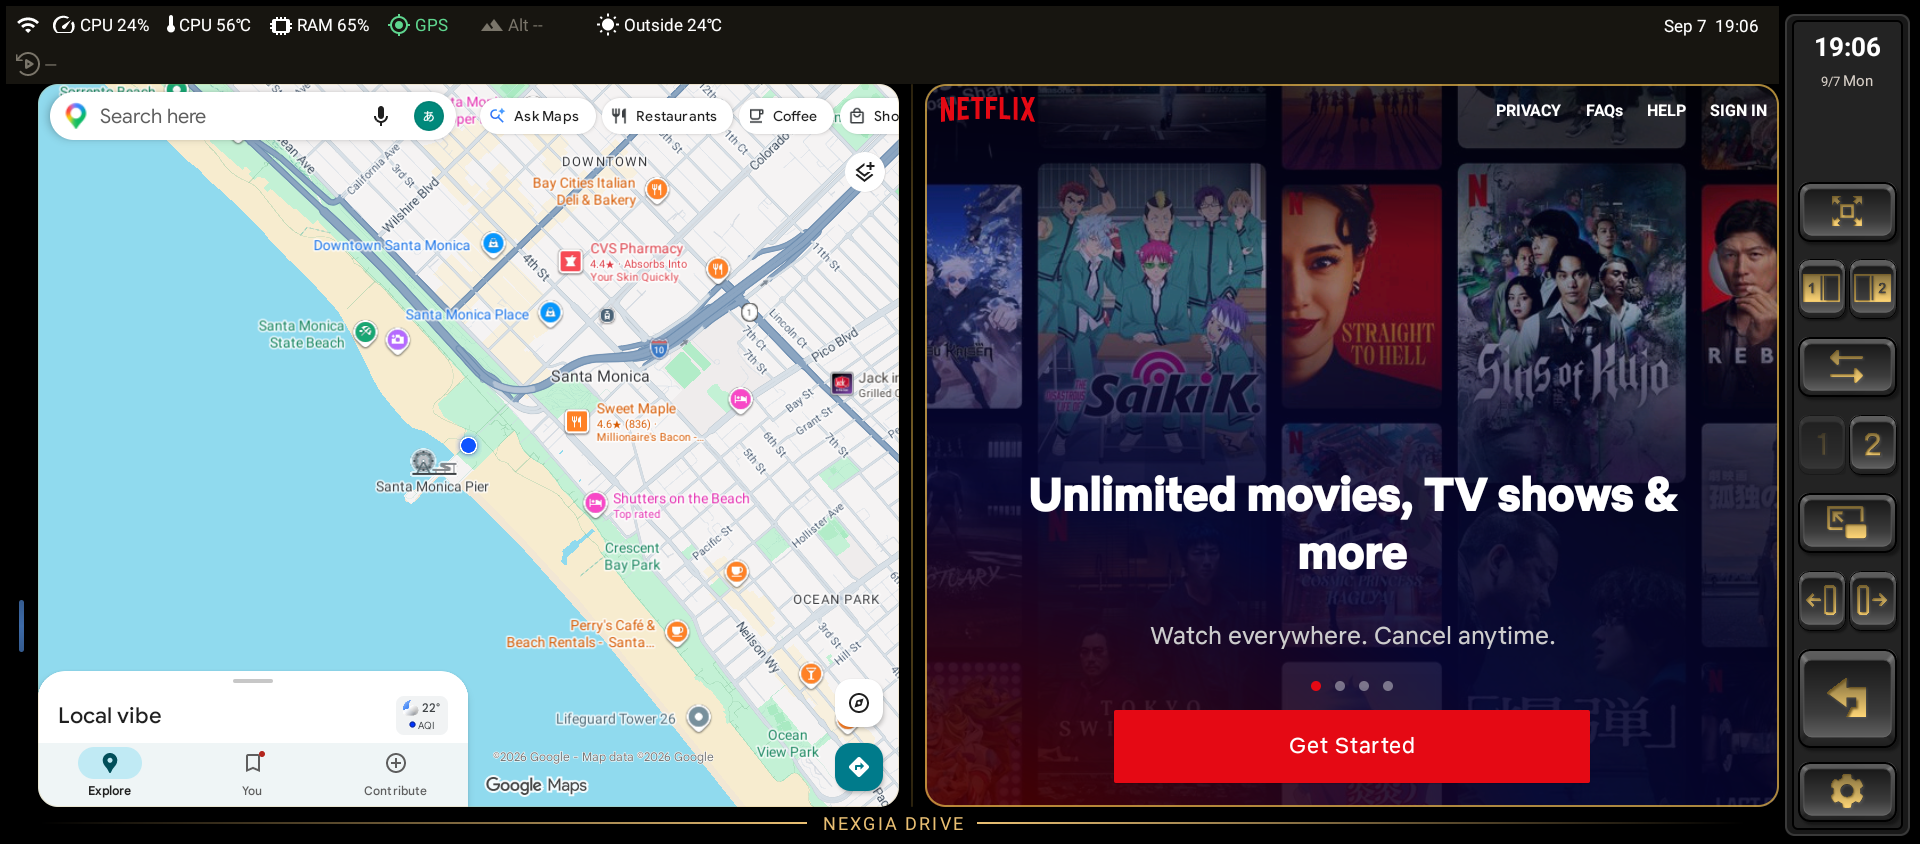
Note: If the sidebar width is set to "Small," the three buttons "Change App," "Ratio Adjustment," and "Page" are combined into one; tapping it shows a selection menu (it closes automatically after 5 seconds of inactivity, or once you make a choice).
Operating the Sidebar with a Controller or Steering Wheel
If you assign "Sidebar Next," "Sidebar Previous," and "Sidebar Select" at Settings → Controller → Short Press, you can select and press sidebar buttons using a steering wheel or controller. "Next"/"Previous" moves a thin gold focus frame between buttons, and "Select" presses the focused button. The focus frame disappears after a period of inactivity. If the sidebar is hidden, the first press only reveals it and doesn't move the focus yet. See 3.4.1 Short Press for details.
Mini Sidebar (When the Sidebar Isn't Always Shown)
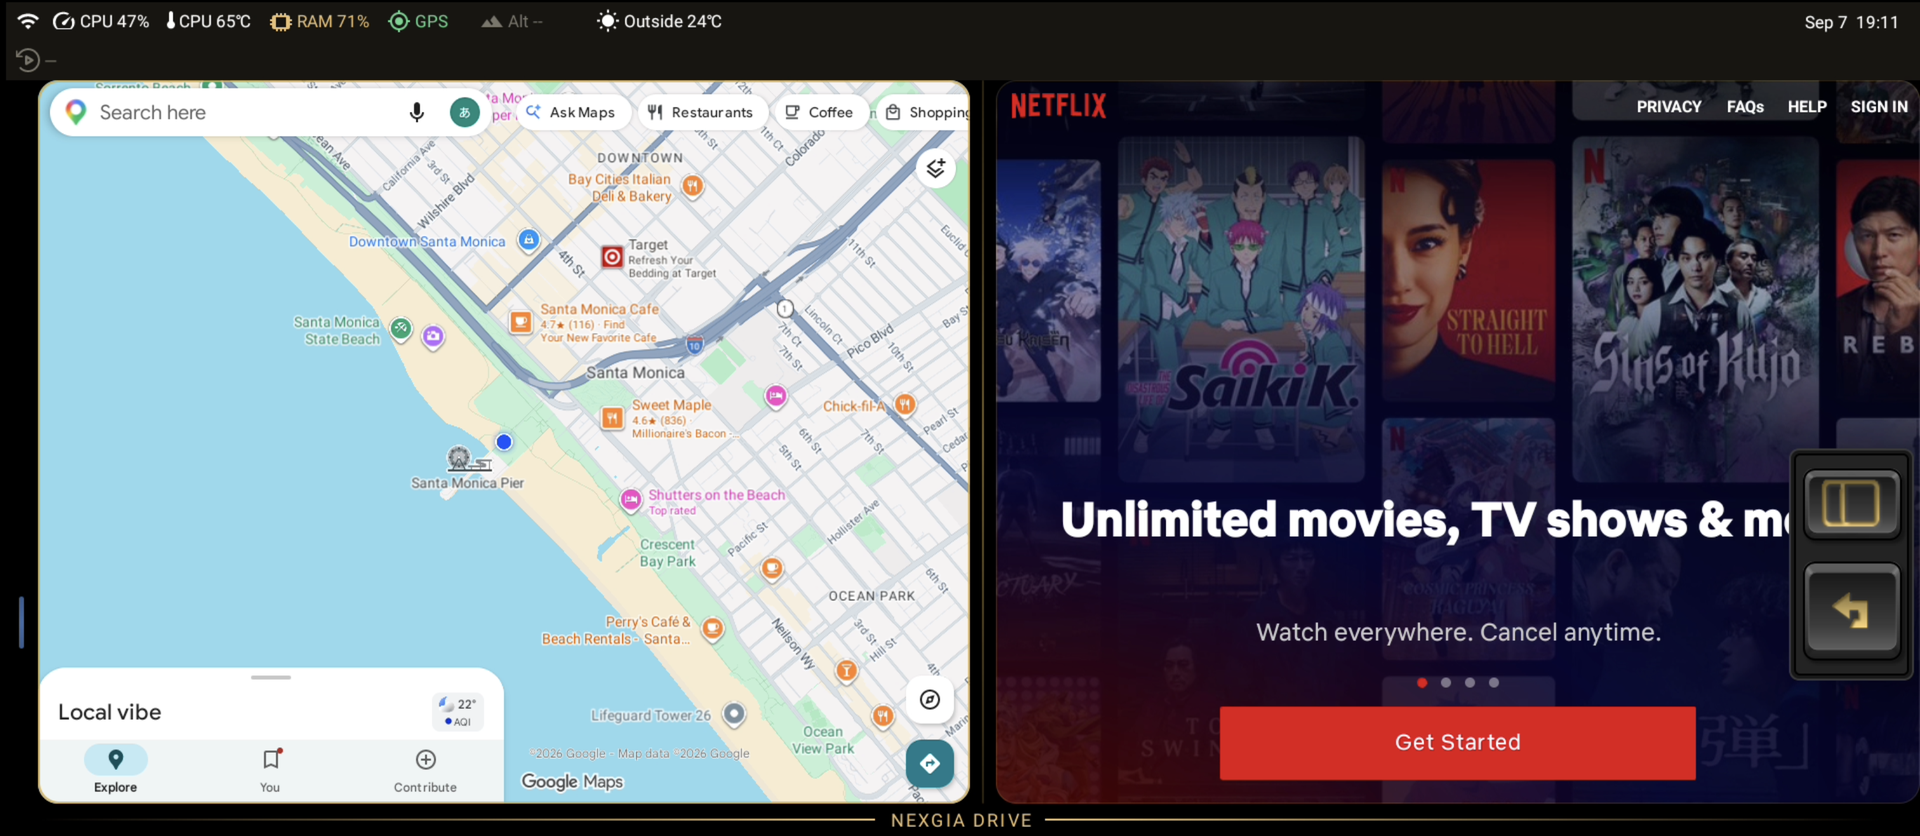
Turning off Settings → Display → Sidebar → Sidebar Always Visible hides the persistent sidebar. In this case, tapping the screen brings up a temporary panel equivalent to the sidebar (the mini sidebar), which disappears automatically after the time you set (Mini Sidebar Auto-Hide: 5 / 7 / 10 seconds).
The Sidebar on the Settings Screen
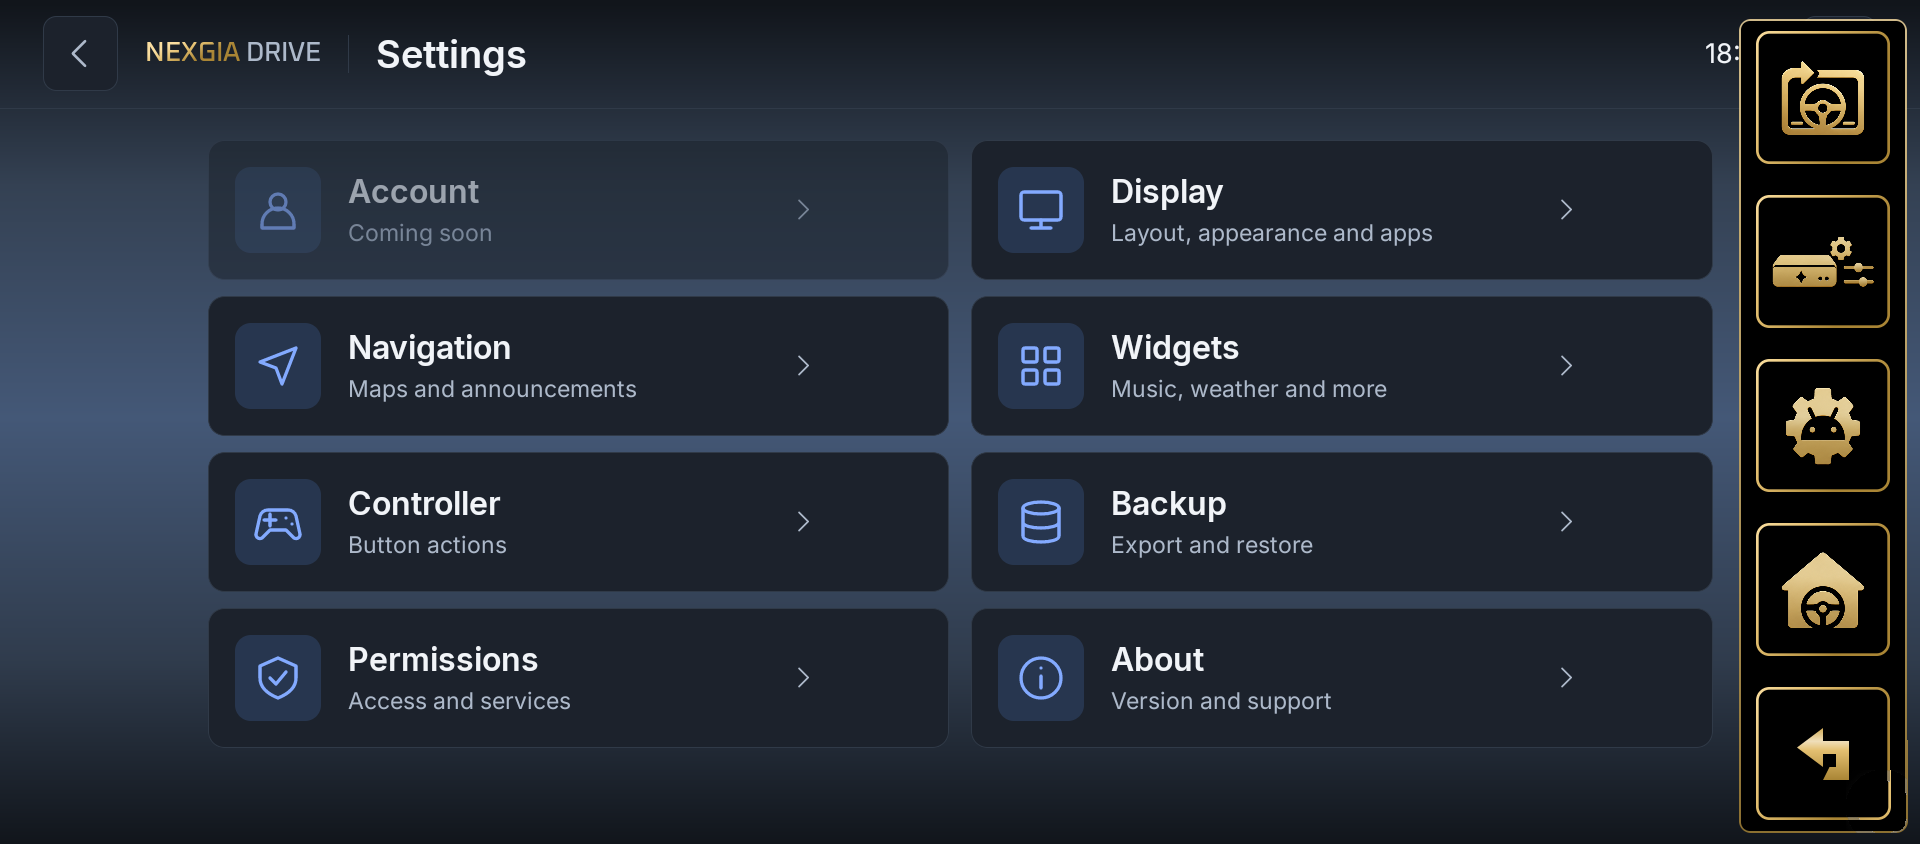
On the settings screen, the persistent sidebar shows only a "Back" button (the gear button just shows your current location and doesn't respond to taps). In portrait orientation, on smaller screen sizes, and in the simplified settings (non-Japanese UI), you can open an overlay menu with the following four actions from the menu button in the top right.
| Action | Behavior |
|---|---|
| Return to Car | Attempts to switch to the car manufacturer's native screen |
| AIBOX Settings | Opens the AIBOX unit's own settings app |
| Android Settings | Opens the standard Android settings app |
| Home | Returns to the NEXGIA DRIVE home screen |
2.2 Switching Display Mode and Pages
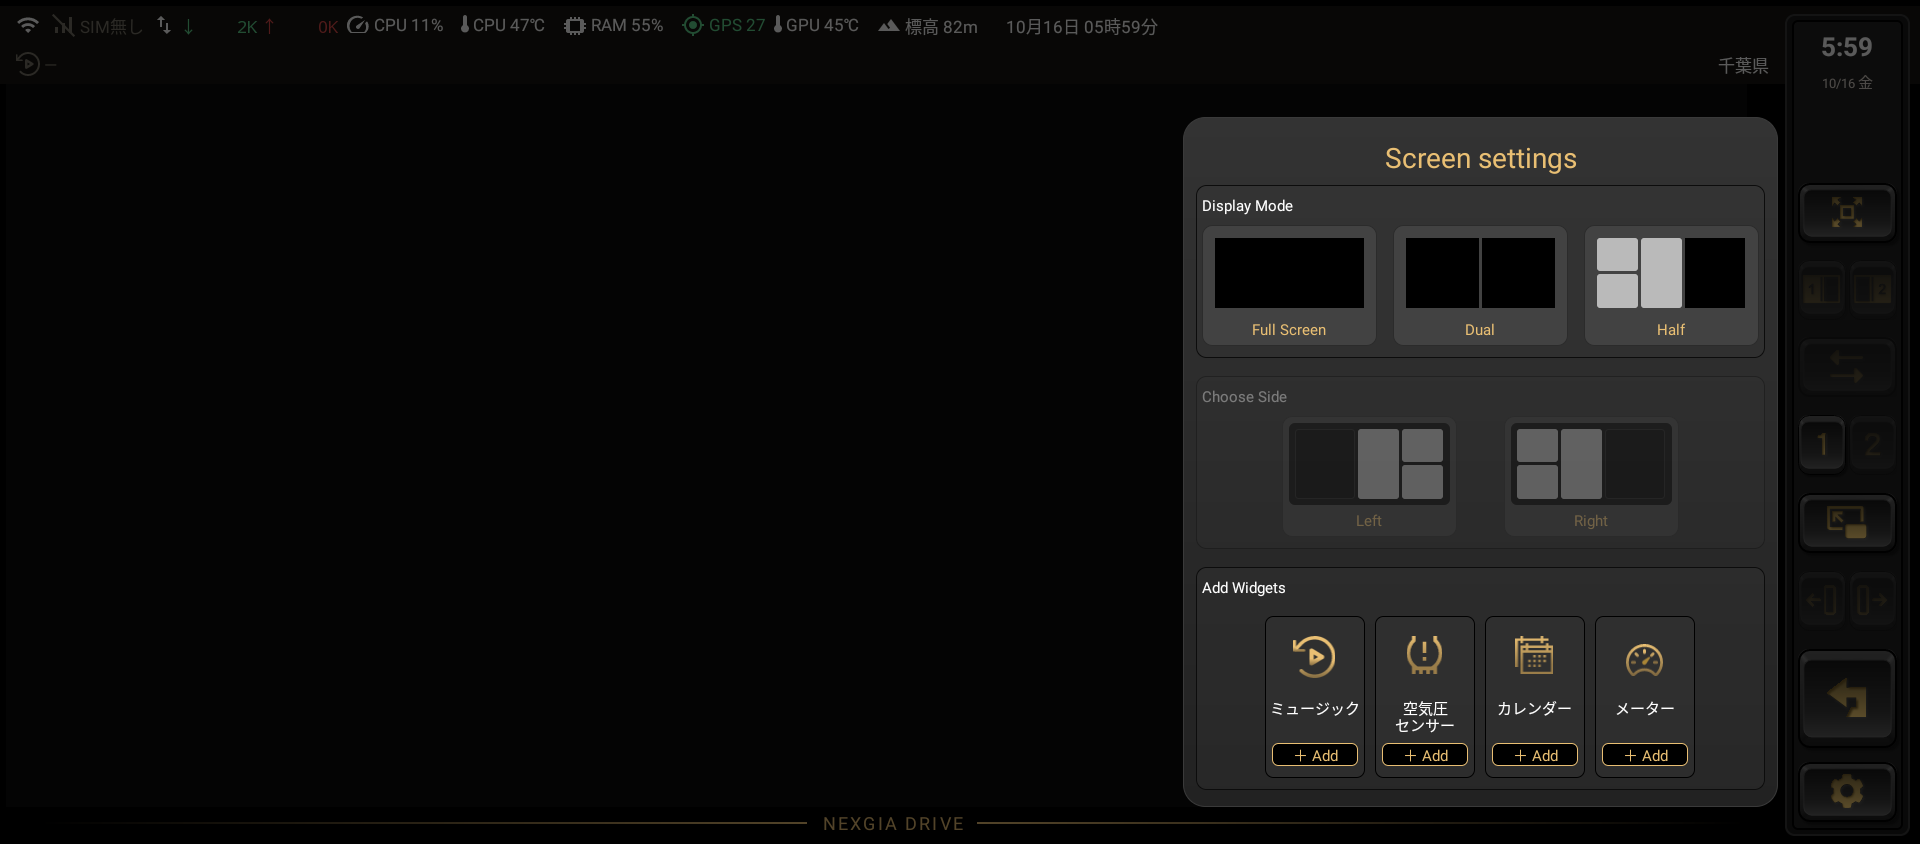
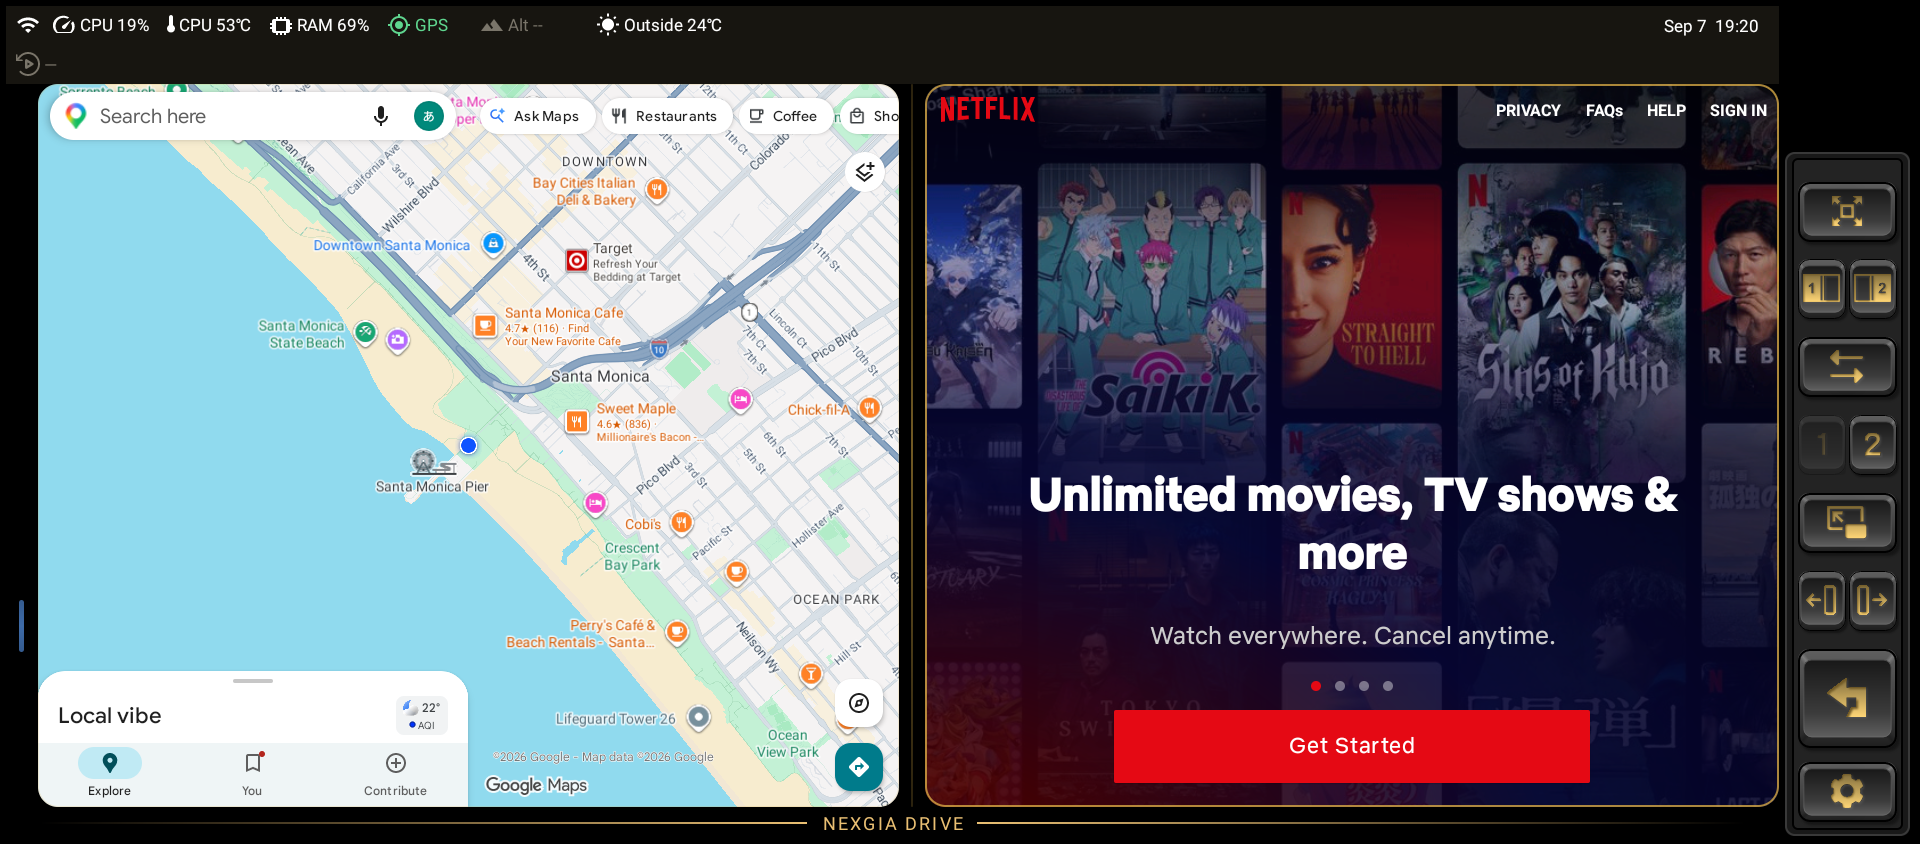
In NEXGIA DRIVE, you can choose how apps are arranged on screen as a "display mode."
- Full Screen: Displays one app in full screen.
- Dual: Displays two apps side by side (left/right, or top/bottom).
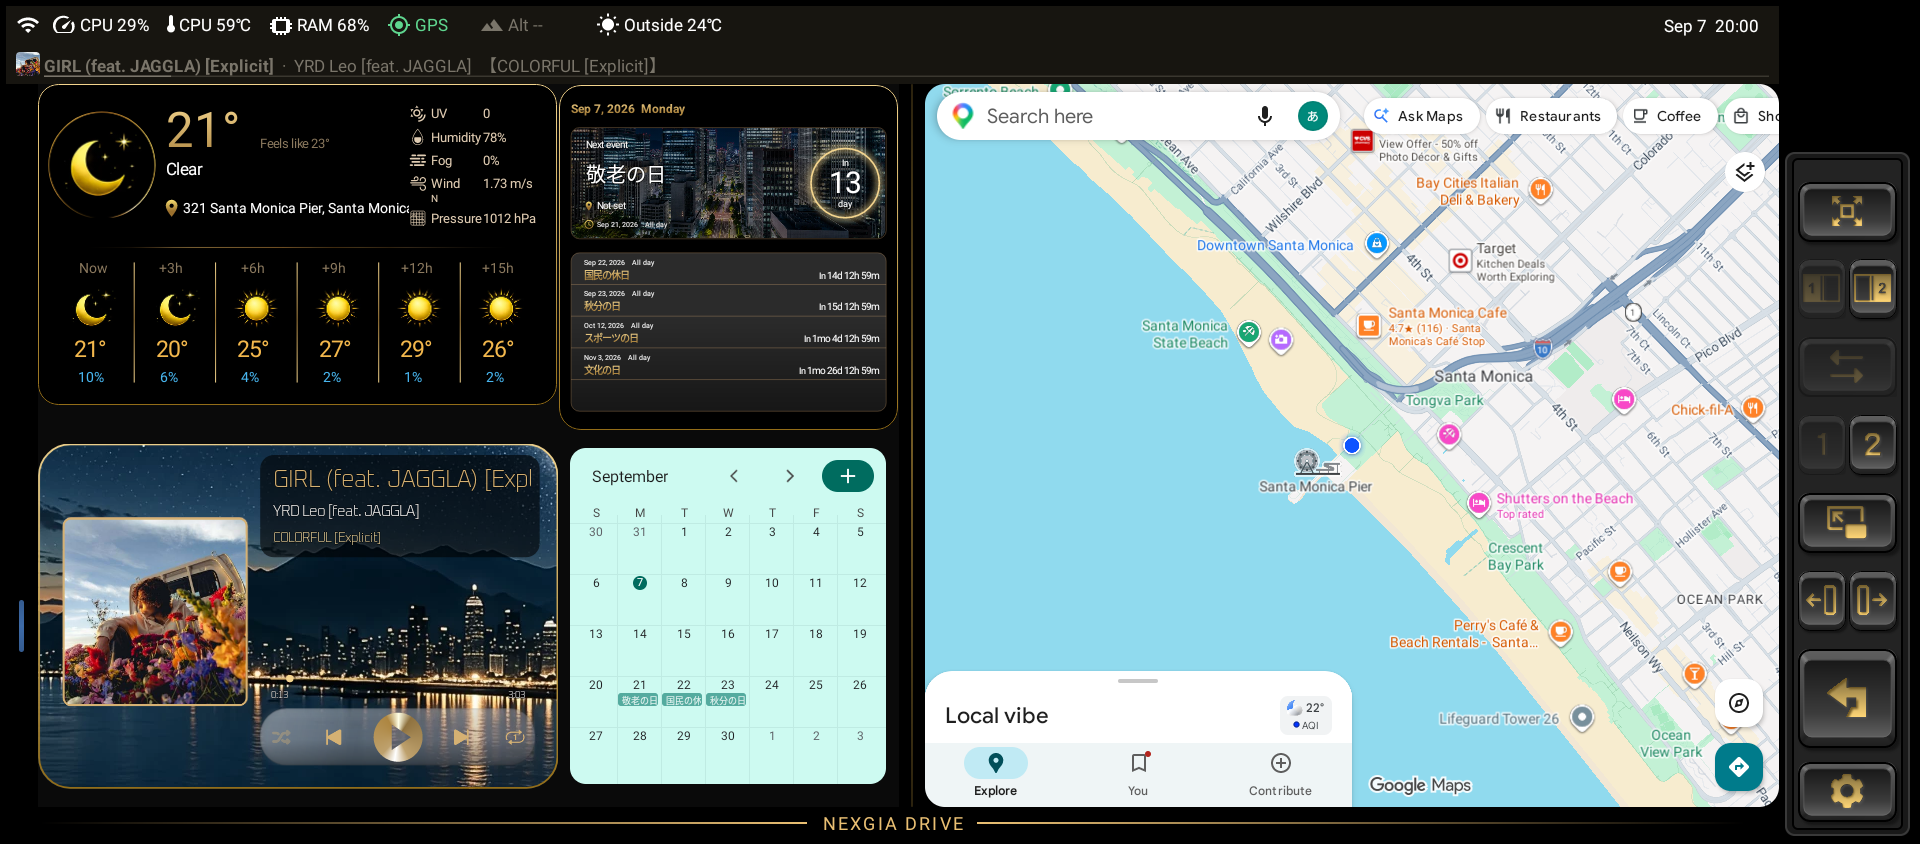
- Half: Splits the screen so that one side shows an app and the other side holds widgets (music, map, and so on).
You switch the display mode from the panel opened by the sidebar's "Screen Settings" button. Whether Dual/Half splits the screen left-right or top-bottom is chosen at Settings → Display → Layout → Split Orientation (default: side by side).


Triple Screen Mode
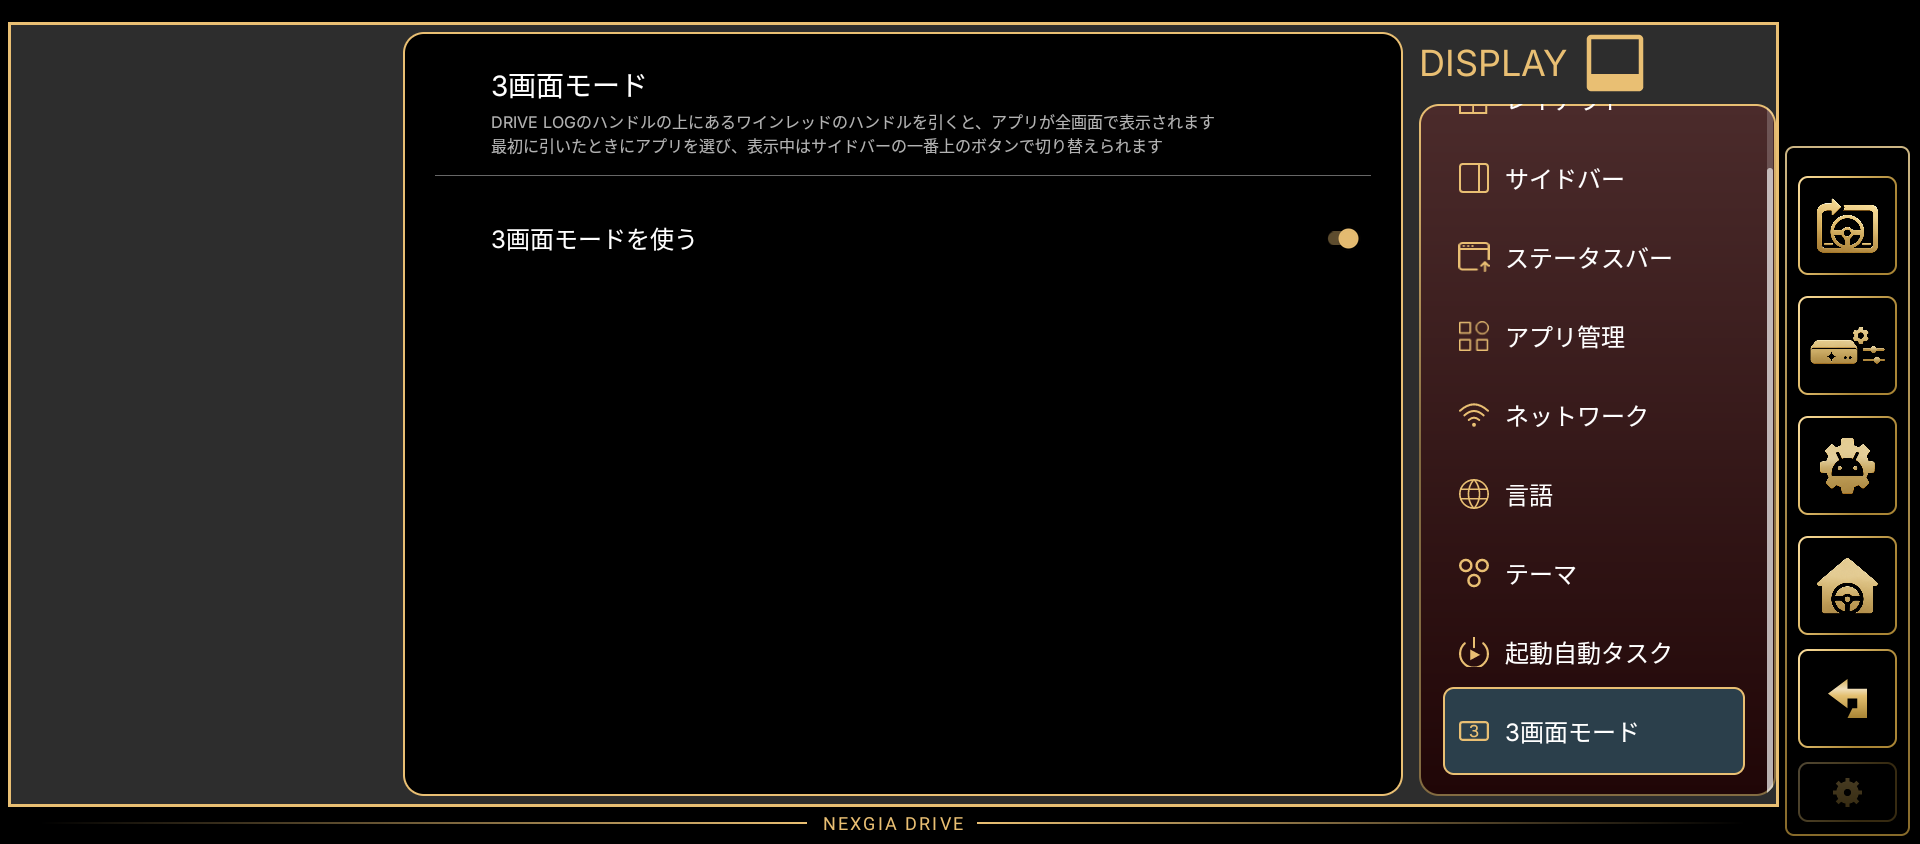
Turning on Use triple screen mode at Settings → Display → Triple Screen Mode shows a wine-red handle in the same row as the DRIVE LOG handle. Pulling this handle out shows one app in full screen (usable as a third screen).
- The first time you pull it out, you choose which app to show.
- While it is shown, the button at the top of the sidebar switches between apps, with a close button below it.
- Closing it does not quit the app.
- It can't be closed with the Back key — pull the handle to the opposite side, or use the close button.
- If you have assigned "Next Page" to a key, the third screen opens after Page ②. Pressing the key again while the third screen is shown closes it and returns to Page ①. See 3.4.1 Short Press for details.
- See 3.1.1 Layout and 3.1.7 Theme for the handle's position and color.


Switching Between Page ① and ②
The sidebar's "Page 1" and "Page 2" buttons let you switch between two independent screen layouts. Each page remembers its own combination of displayed apps and widget placement separately.
Adjusting the Split Ratio
Pressing the sidebar's ratio adjustment buttons (arrows) changes the left/right (or top/bottom) split ratio for Dual/Half display. The amount changed per tap can be adjusted at Settings → Display → Layout → Split Ratio Step (3% / 5% / 10%, default 5%).
2.3 Adding, Moving, and Removing Widgets
From the "+ Add" button in the sidebar's "Screen Settings" panel, you can add widgets (Music / Tire Pressure / Calendar / Meter) to the screen. Widgets that have already been added show "✓ Added."
The widget picker has an "Apps" tab and a "NEXGIA" tab (the NEXGIA tab currently shows "Coming soon," and there are still hardly any widgets to choose from there).

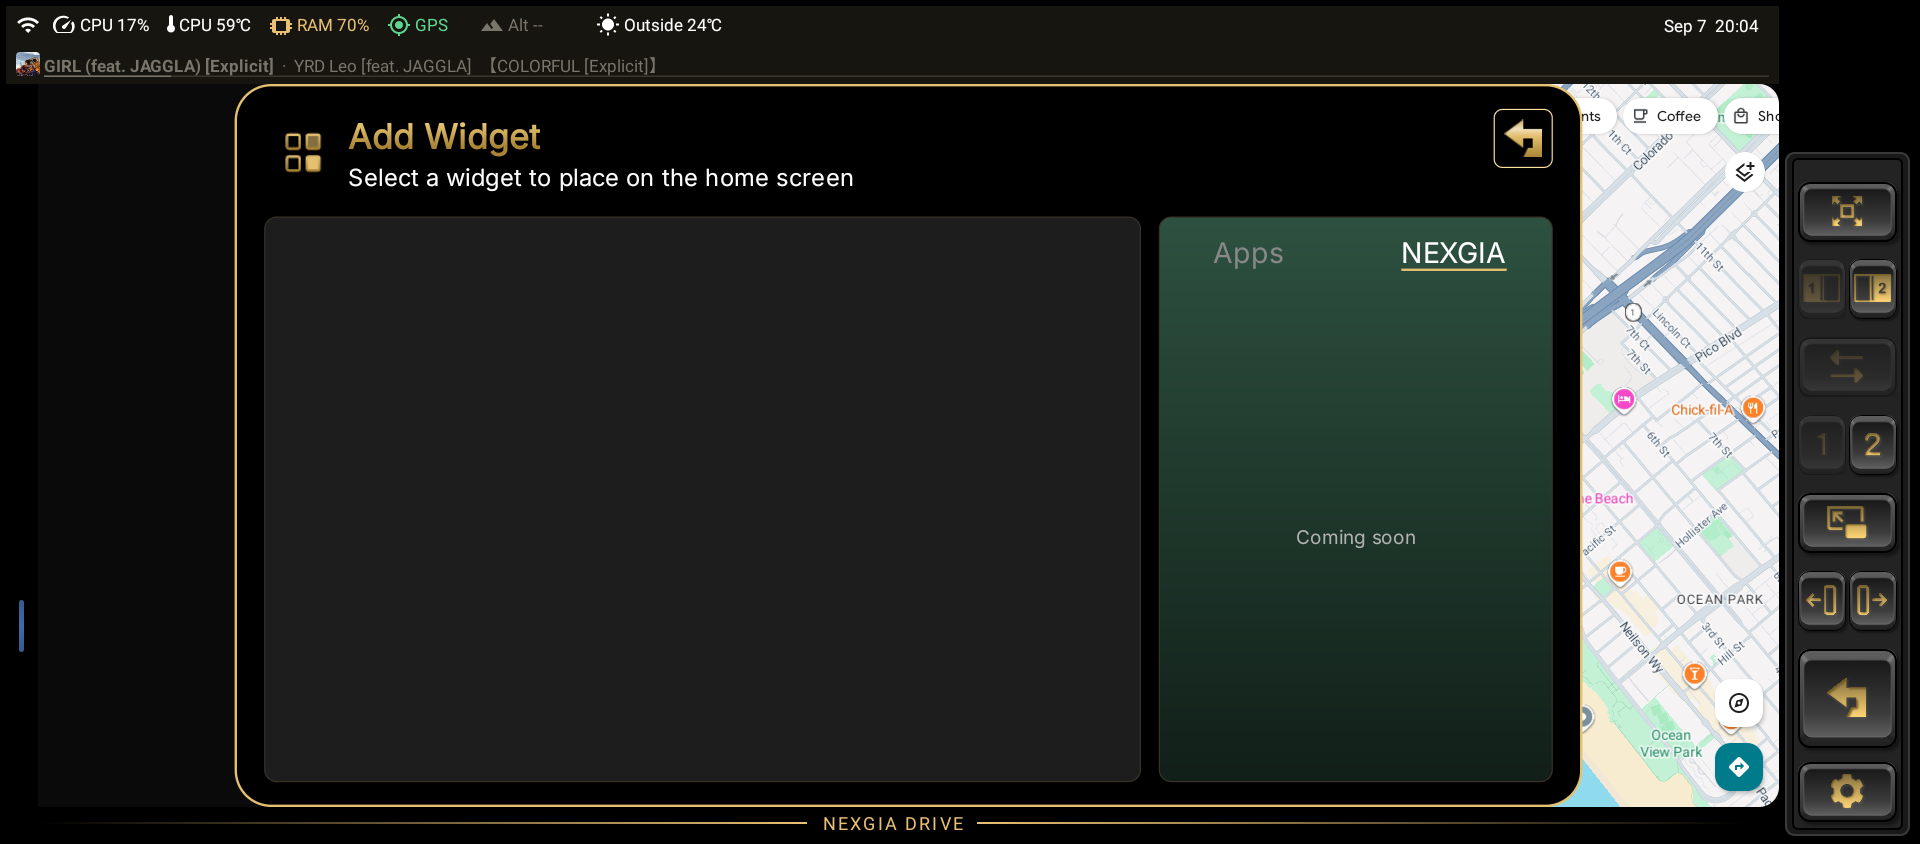
Once placed, a widget on screen supports the following actions.
- Drag it to move it
- Pinch its frame to resize it
- Delete it
Widgets can be placed independently on "Page 1" and "Page 2."
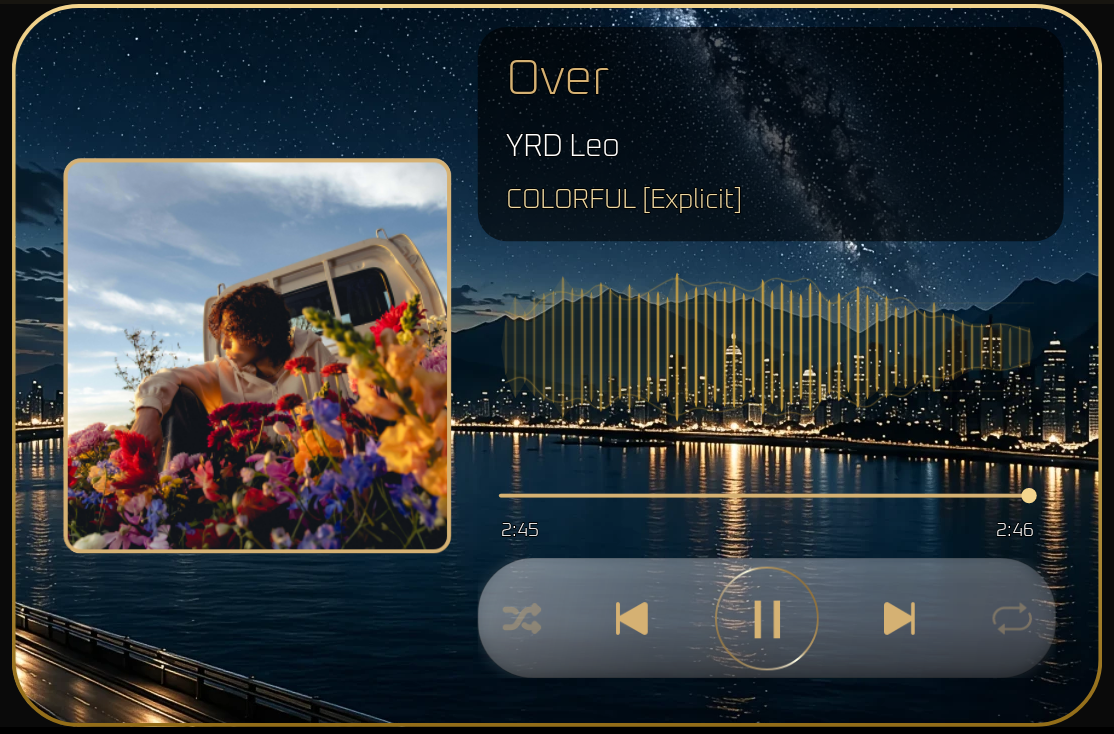
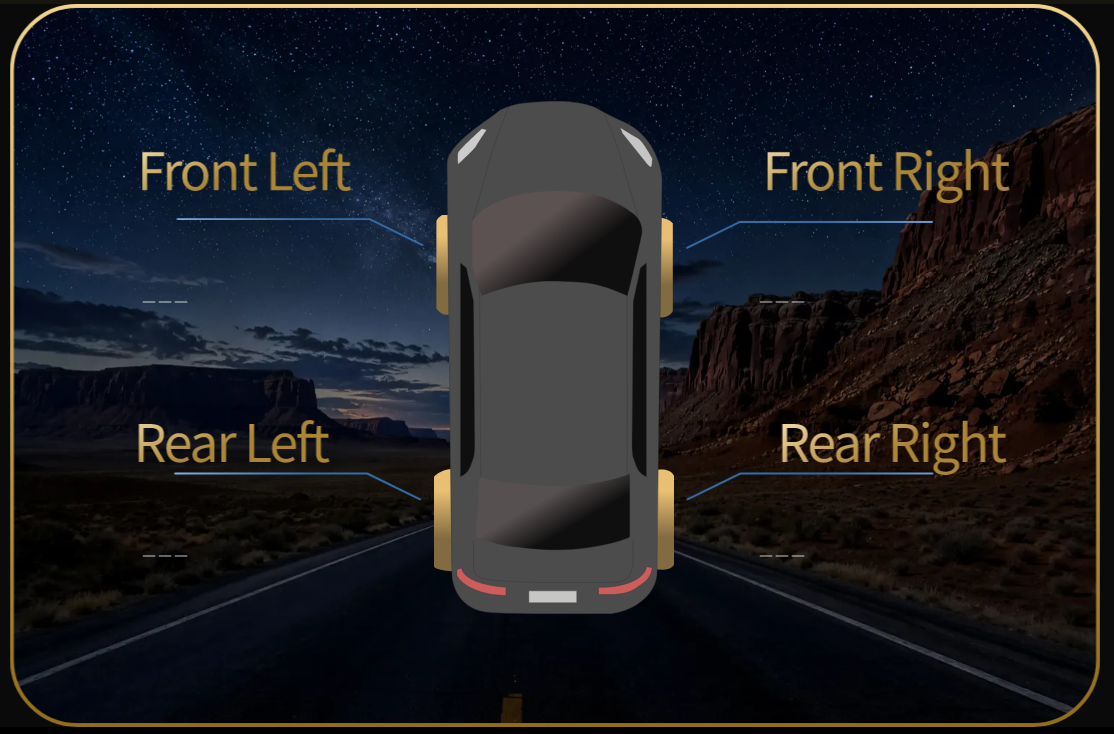
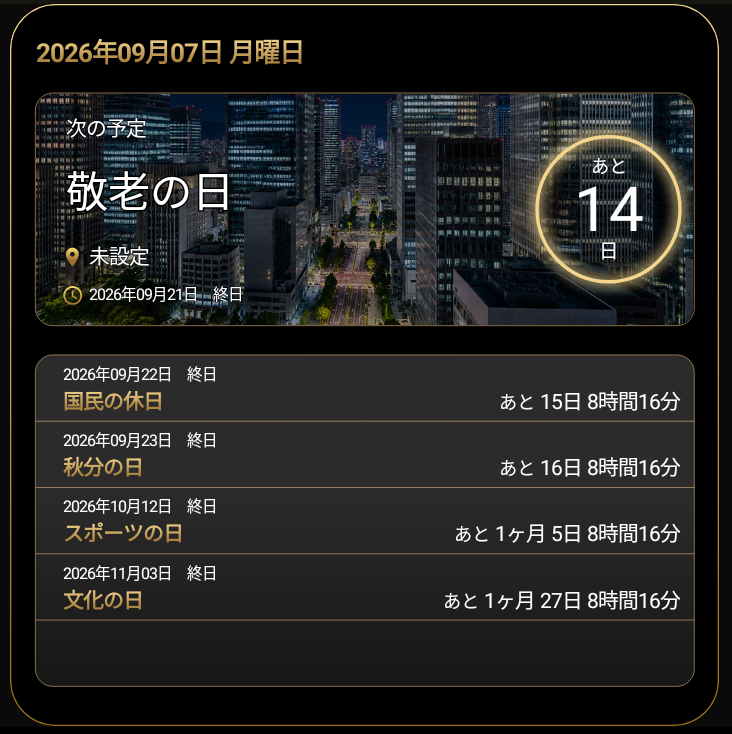
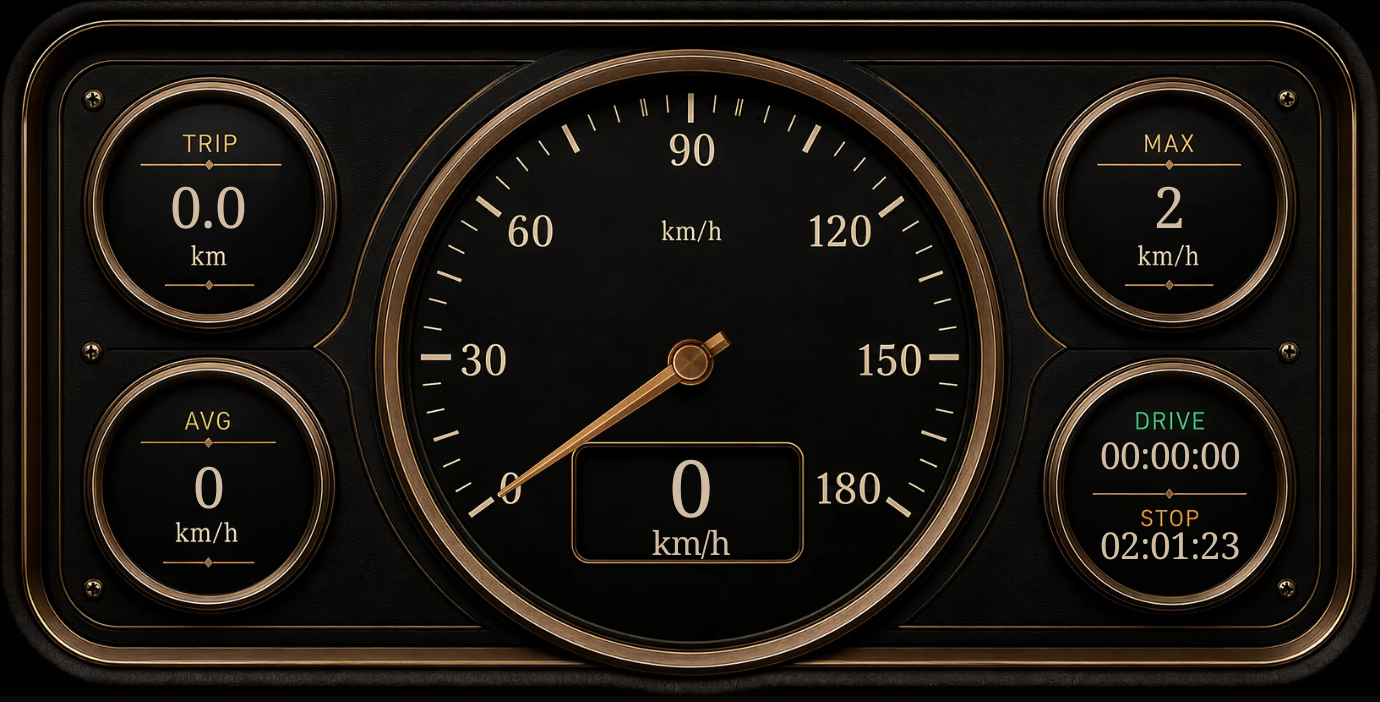
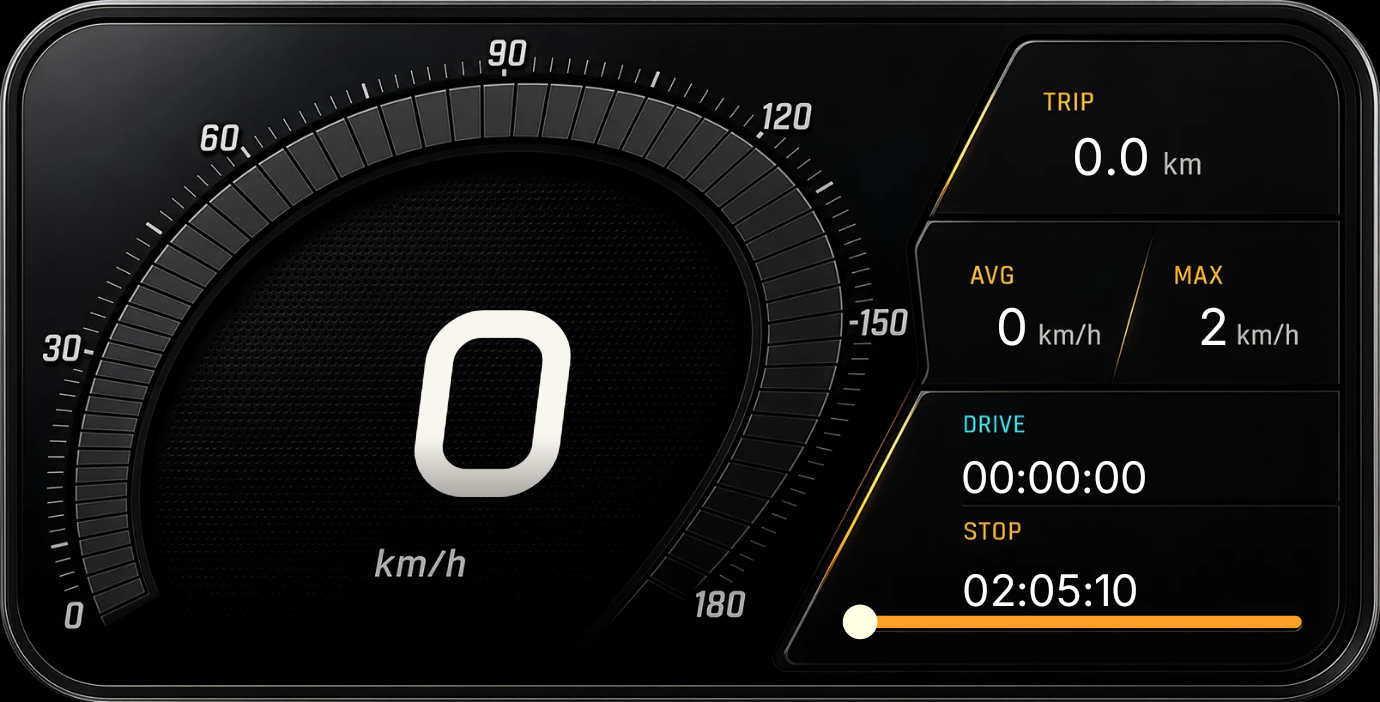
NEXGIA DRIVE's Widgets
These are the standard NEXGIA DRIVE widgets you can add from "+ Add."
2.4 Shortcut Bar
Turning on Settings → Display → Layout → App Shortcut Bar (off by default) shows a white handle at the bottom of the app screen. Tapping this handle, or swiping up on it, opens a shortcut bar of your frequently used apps.
The number of slots you can register can be changed at Settings → Display → Layout → Shortcut Bar Slot Count (1–15, default 5). Reducing the number of slots does not remove apps you've already registered.
The white handle that opens the shortcut bar can be placed at the bottom edge or the top edge of the app screen at Settings → Display → Layout → Shortcut Handle Position (Bottom / Top, default: Bottom). With "Top," the white handle appears at the top edge of each app screen, and the shortcut bar also opens at the top. The top handle opens the bar when you tap it (swiping does not open it). The app screen becomes slightly smaller by the margin used for the handle. Use this if the lower edge of your car's screen juts out toward you and the bottom edge is hard to press.
Besides regular apps, the shortcut bar also supports two special entries:
- App Pair: Choose one app for the left screen and one for the right when you register it, then launch both at once in Dual mode with a single tap.
- Talk to ChatGPT: Opens ChatGPT's voice conversation mode right away as an overlay (requires the ChatGPT app). Closing it ends the conversation.

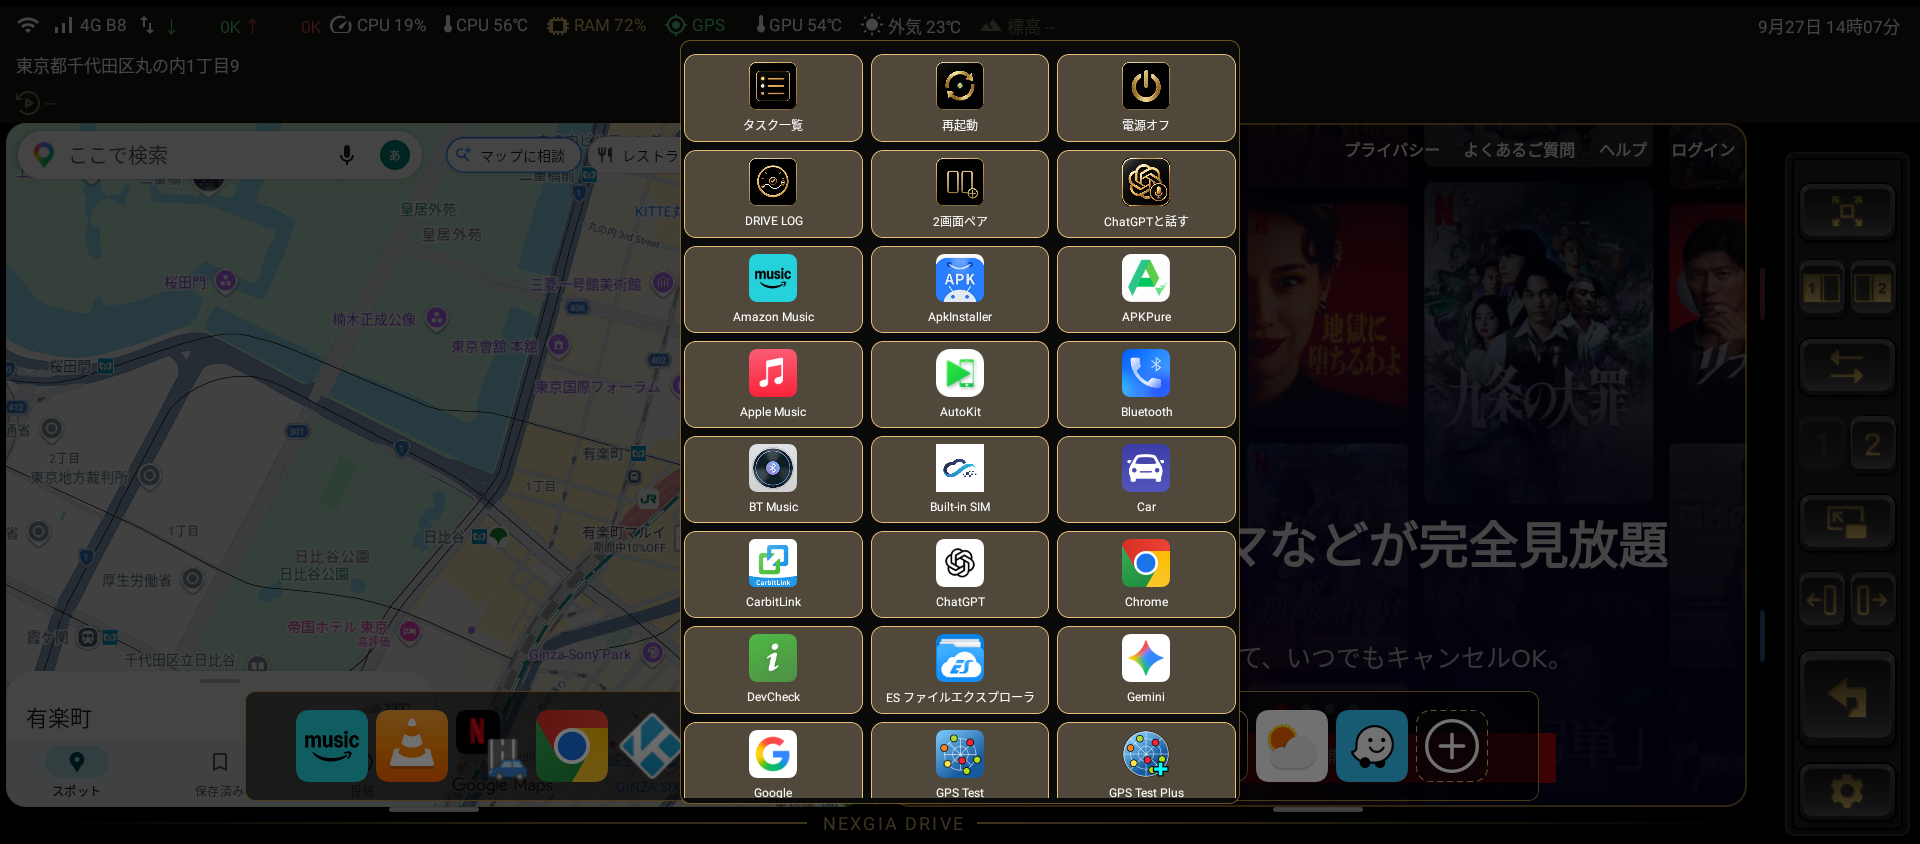
- Press and hold an icon, then drag it left or right to change the order.
- If you press and hold an icon and release it without moving it, an × appears at its top right, and tapping the × clears that slot.
- A cleared slot goes back to being a "+" slot, and tapping the "+" lets you register a different app.
2.5 Using DRIVE LOG (Drive Recording)
DRIVE LOG is a feature that automatically records your driving from the moment you turn the engine on until you turn it off. It is off by default (opt-in); to use it, turn on Settings → Display → Layout → Drive Log.
- The handle for opening your records appears as a gold sliding handle at the screen edge opposite the sidebar (the Drive Log Handle setting is on by default; even with it off, you can still open DRIVE LOG from the app list or the shortcut bar).
- Pulling out the handle shows the list of drive records.

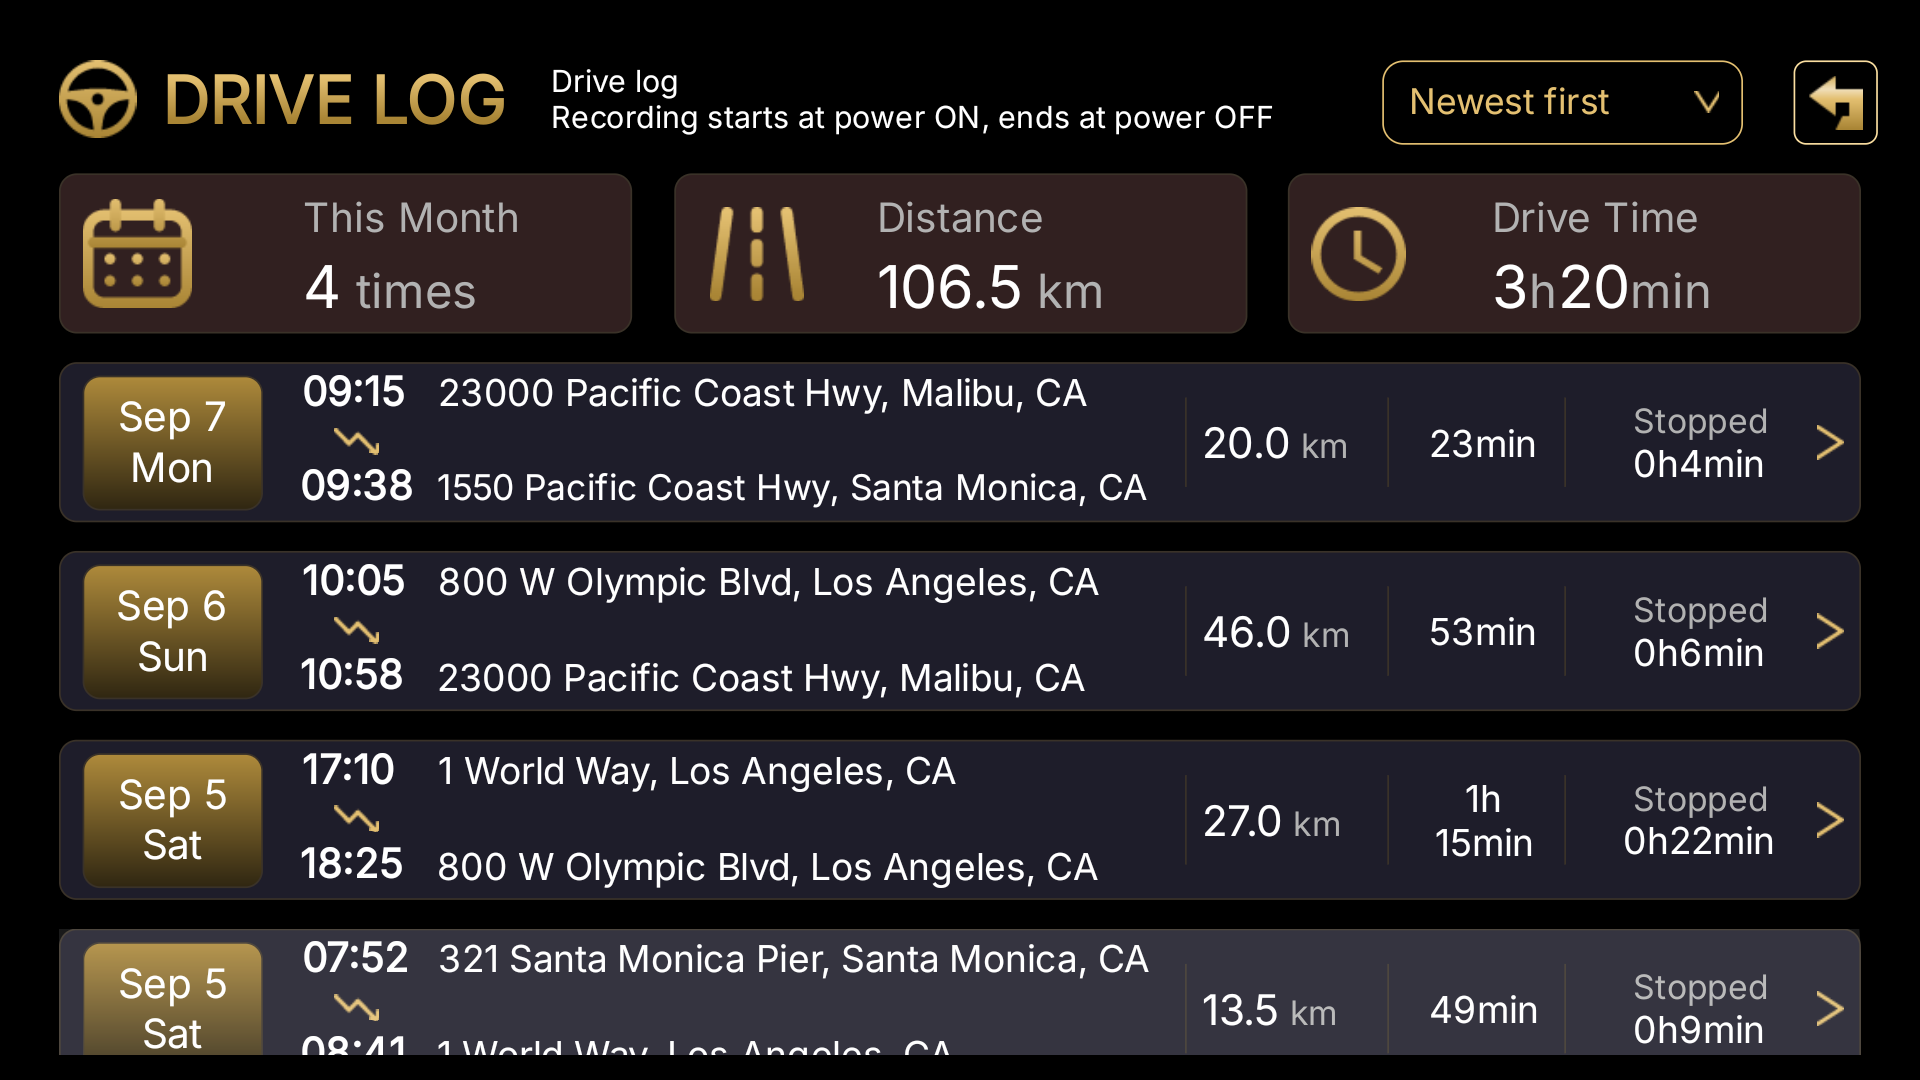
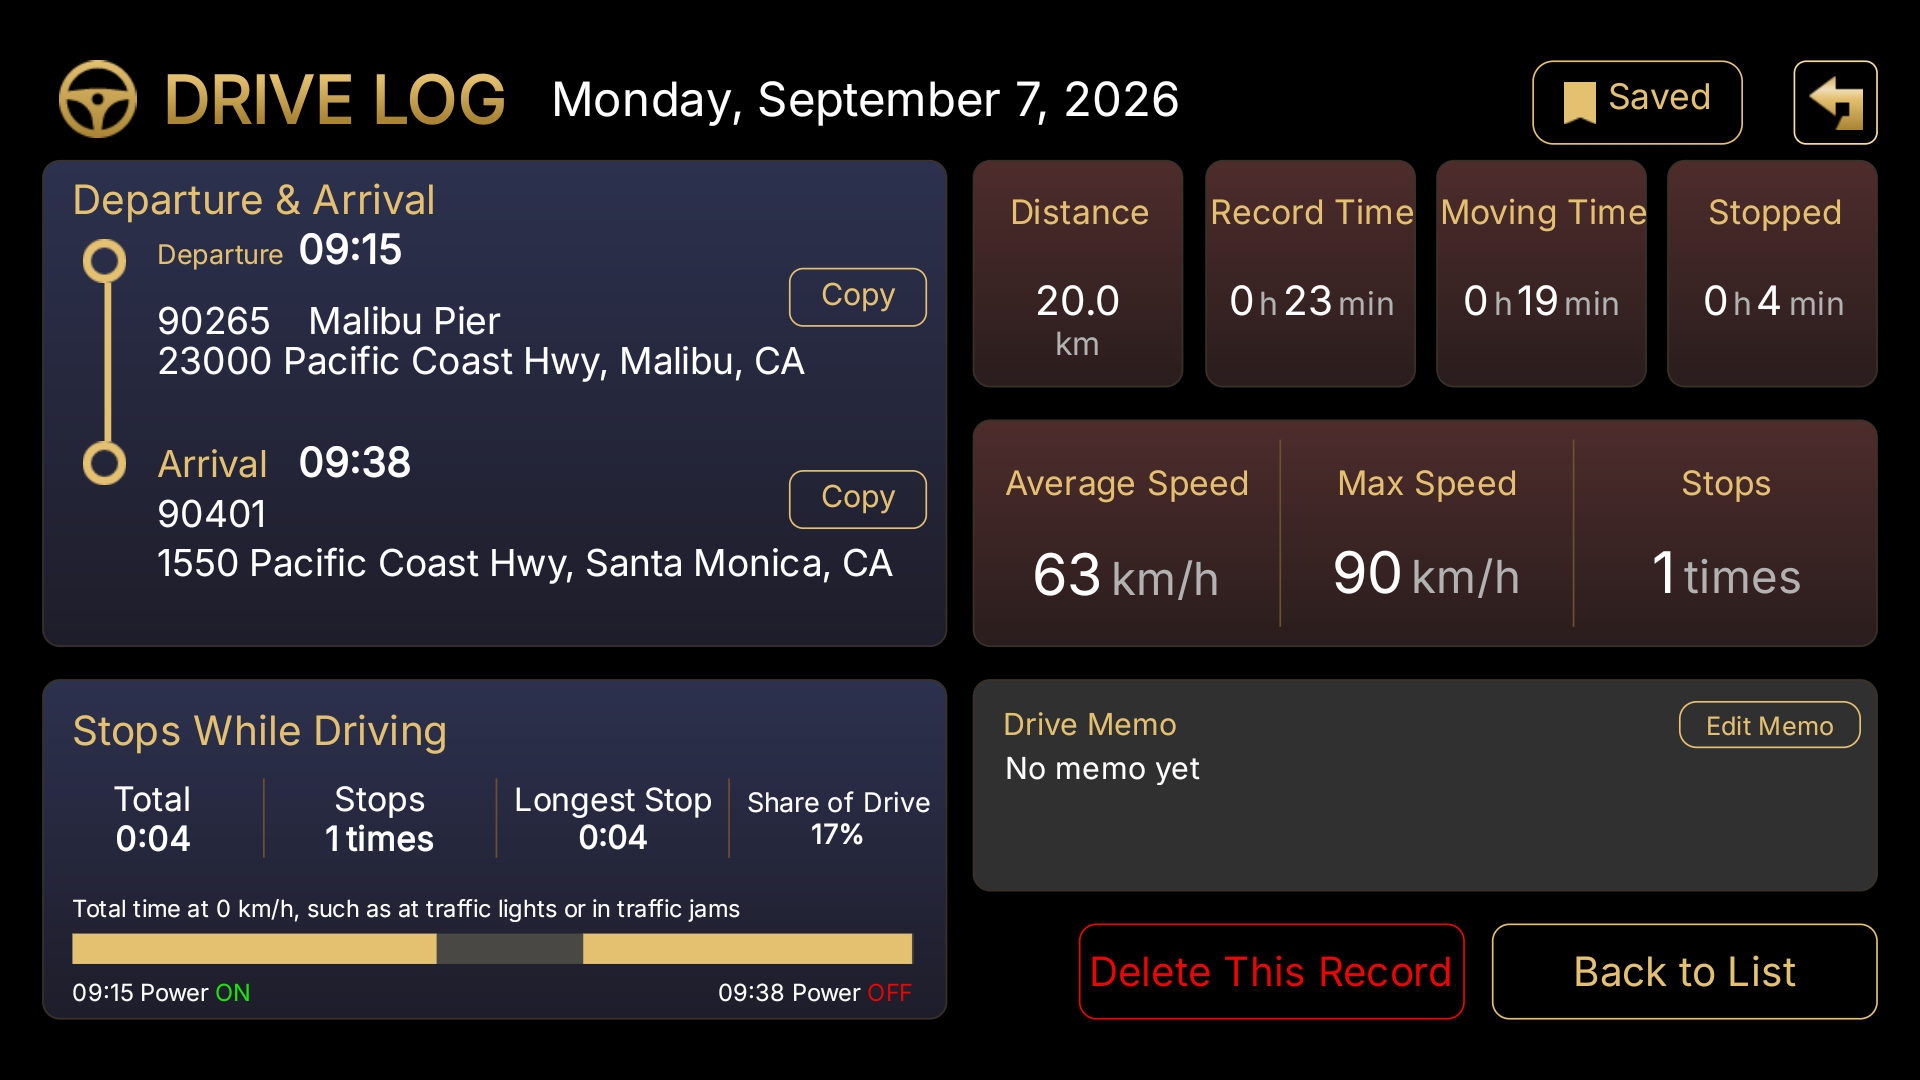
Tapping a record opens its detail screen, where you can edit its memo, mark it as saved (excluding it from automatic deletion), delete it, or copy it.
Note: Records older than 3 months are automatically deleted (records marked as saved are not deleted). Note: Setting Minimum Trip Distance and Minimum Trip Duration (both off by default) lets you avoid recording trips that are too short.
Driving Route Map
- Scrolling down on the DRIVE LOG detail screen shows the route you drove on a map under "Driving Route".
- Tapping the map or pressing the "Enlarge" button shows it in full screen; press "Close" to go back.
- An internet connection is required the first time a map is displayed. A map that has been displayed once is shown without a connection from then on.
- A record with few recorded positions shows "No route recorded" instead.

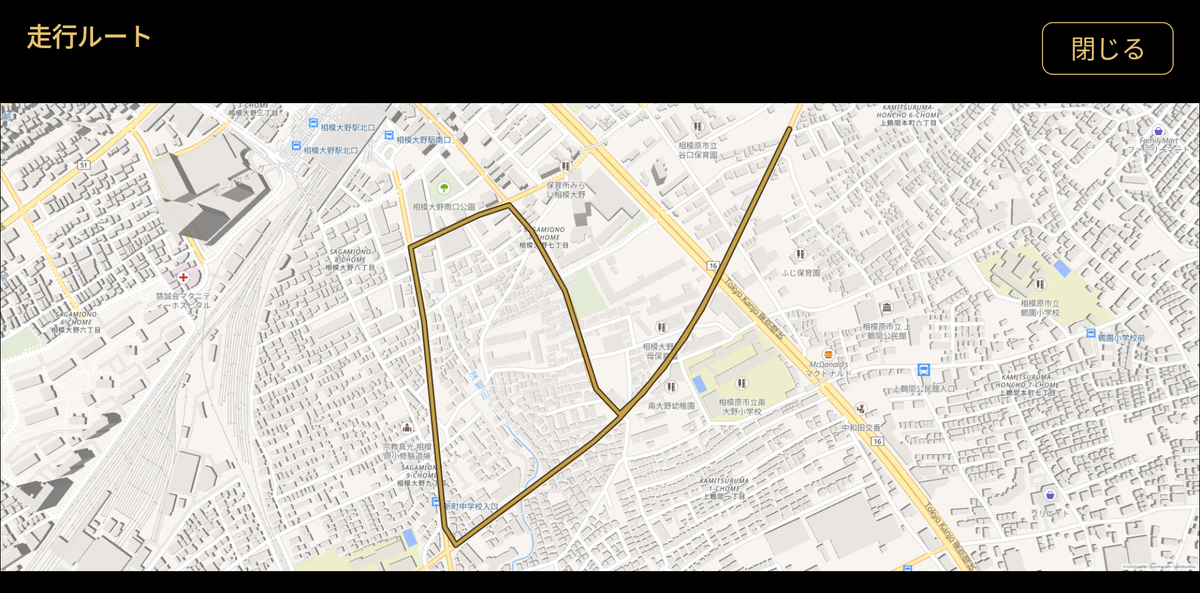
Note: The map uses data from OpenFreeMap / OpenMapTiles / OpenStreetMap.
2.6 The Music Widget and Overlay
Tapping the album art on the music widget shows the music app's screen as an overlay. You can choose which side it appears on (left/right) at Settings → Widgets → Music → Music Widget Side (default: right).
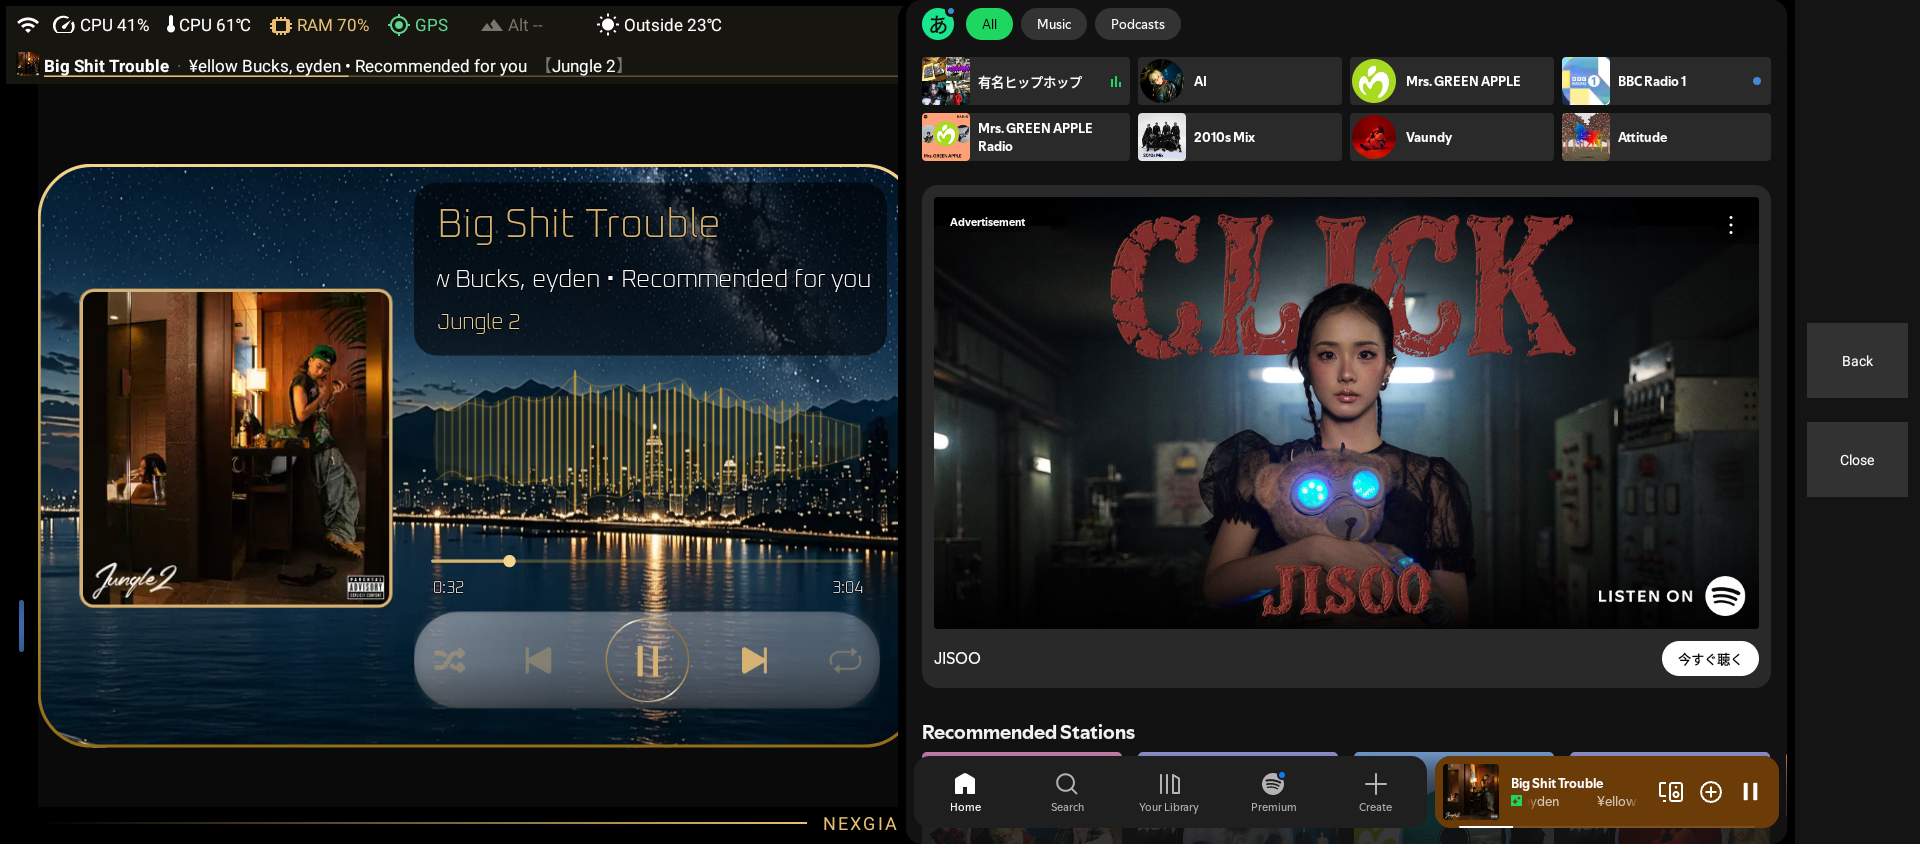
Auto-Resume Settings
- At Settings → Widgets → Music → Preferred Music App, choose the main music app the widget controls (you can't set the next item until this one is set).
- Turn on Auto-Resume Music (off by default).
- Auto-Resume Time Limit (1 / 6 / 12 / 24 / 48 hours, default 24 hours) determines the window within which restarting the engine will trigger auto-resume.
With Auto-Resume Music turned on, restarting the engine automatically resumes music if it's within the time limit you set since playback last stopped. However, if you manually stop the music and then turn off the engine, the music will not resume automatically the next time you start the engine (it stays stopped).
※ Amazon Music cannot auto-resume if the app itself is not holding the previous playback information (song and position). Since an Amazon Music update in early September 2026, some environments have seen the previous song fail to be restored after launch. In this case, please select and play the song from the Amazon Music screen. Spotify / YouTube Music are not affected.
2.7 Checking for Updates
NEXGIA DRIVE normally updates itself automatically whenever a new version is released. If you want to check manually, go to Settings → About → Version and tap the Check for Updates button. If a new version is available, a dialog appears, letting you proceed to confirm the download and installation.
You can check the currently installed version number on the same Version screen.
3. Settings Reference
This chapter explains every item on the settings screens, screen by screen. Display names and descriptions are shown exactly as they appear in the app.
Note: The settings screen in languages other than Japanese is a simplified, list-based layout — different from the Japanese settings screen. Some items available in Japanese are not yet available here; this chapter documents only what is actually on the non-Japanese screen.
3.1 Display
Settings → Display
Use the submenu on the right to select the "Layout," "Sidebar," "Status Bar," "Network," "Language," "App Management," "Theme," "Triple Screen Mode," or "Auto-start at Boot" panel.
3.1.1 Layout
Settings → Display → Layout


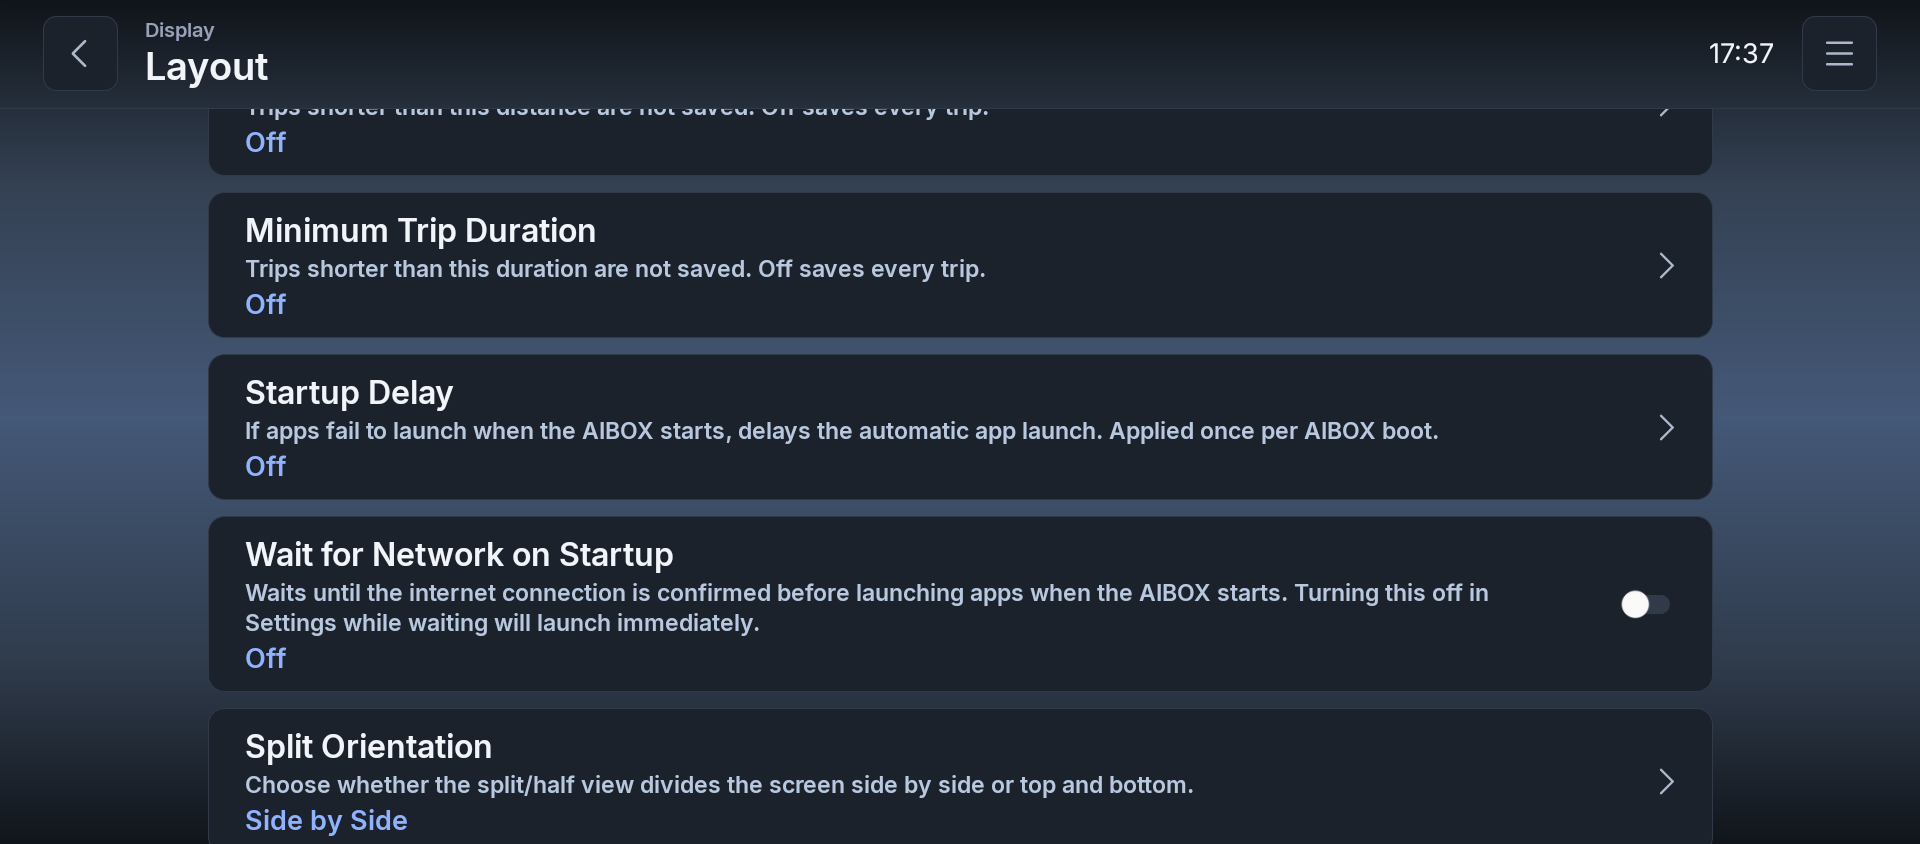
| Item | Description | Options/Default |
|---|---|---|
| Home App | Choose which app opens when the Home button is pressed. | Button → dialog listing installed launcher apps (default: OS default) |
| Theme | Choose the color theme for the settings screens. This is separate from the "Theme" panel below (Custom Theme) and does not change the home screen. | Dark / Light (default: Dark) |
| Startup Page | Page shown when the app starts. | Last Used / Page 1 / Page 2 (default: Last Used) |
| Split Ratio Step | Width change per tap of the split ratio button. | 3% per Tap / 5% per Tap / 10% per Tap (default: 5% per Tap) |
| Memory Optimization | Number of apps kept running in the background when switching pages. Lower is lighter. | Keep 0 / 1 / 2 / 3 Apps (default: Keep 3 Apps) |
| App UI Size | Makes the entire app UI one step larger or smaller. | Larger / Standard / Smaller (default: Standard) |
| App Display Scale | Adjusts the size of app text and buttons shown in split/single view. | Much Smaller / Smaller / Standard / Larger / Much Larger (default: Standard) |
| Multi-Touch (Steering Wheel) | Enables two-finger touch (e.g. map pinch-zoom). Only works while connected via Android Auto. The screen may go black for a few seconds when switching. | On / Off (default: Off) |
| Tap to Focus (Split Mode) | In split mode, the first tap on an unselected screen only selects that panel (the tap is not sent to the app). | On / Off (default: Off) |
| Selected Panel Frame | The gold frame shows which panel receives back and key inputs in split mode. | Normal / Thin / Off (default: Normal) |
| App Shortcut Bar | Tap the white handle below the app screen, or swipe up on it, to open an app launch bar for quick one-tap access. | On / Off (default: Off) |
| Shortcut Bar Slot Count | Number of slots in the shortcut bar. Reducing slots does not remove already-registered apps. | 1–15 (default: 5) |
| Shortcut Handle Position | Place the white handle that opens the shortcut bar at the bottom or the top of each panel. At the top, tap the handle to open the bar, which also appears at the top. | Bottom / Top (default: Bottom) |
| Split Divider Guide Line | Always shows a short gold handle at the split/half-view boundary. | On / Off (default: Off) |
| Drive Log | Records your driving trips. Entries older than 3 months are deleted automatically (saved entries are kept). | On / Off (default: On) |
| Drive Log Handle | Shows a handle at the screen edge for opening Drive Log. Turning this off frees up screen space — Drive Log can still be opened from the app list, the single-app picker, or the shortcut bar. | On / Off (default: On) |
| Handle Side | When split left/right, choose which side the DRIVE LOG and 3-screen mode handle sits on. | Auto / Left / Right (default: Auto) |
| Handle Vertical Position | When split top/bottom, choose whether the DRIVE LOG and 3-screen mode handle band is fixed to the top or bottom of the screen. | Auto / Top / Bottom (default: Auto) |
| Minimum Trip Distance | Trips shorter than this distance are not saved. Off saves every trip. | Off / 100 m / 300 m / 500 m / 1 km (default: Off) |
| Minimum Trip Duration | Trips shorter than this duration are not saved. Off saves every trip. | Off / 1 minute / 3 minutes / 5 minutes / 10 minutes (default: Off) |
| Startup Delay | If apps fail to launch when the AIBOX starts, delays the automatic app launch. Applied once per AIBOX boot. | Off / 1–10 sec / 15 / 20 / 30 / 60 sec (default: Off) |
| Wait for Network on Startup | Waits until the internet connection is confirmed before launching apps when the AIBOX starts. Turning this off in Settings while waiting will launch immediately. | On / Off (default: Off) |
| Split Orientation | Choose whether the split/half view divides the screen side by side or top and bottom. | Side by Side / Top and Bottom (default: Side by Side) |
Note: "App UI Size" requires the app to restart after being changed (a confirmation dialog appears first). "Theme" (in this Layout panel) applies immediately with no restart. Note: Turning on "Multi-Touch (Steering Wheel)" shows a confirmation dialog, and the setting takes effect the next time the app starts.
3.1.2 Sidebar
Settings → Display → Sidebar

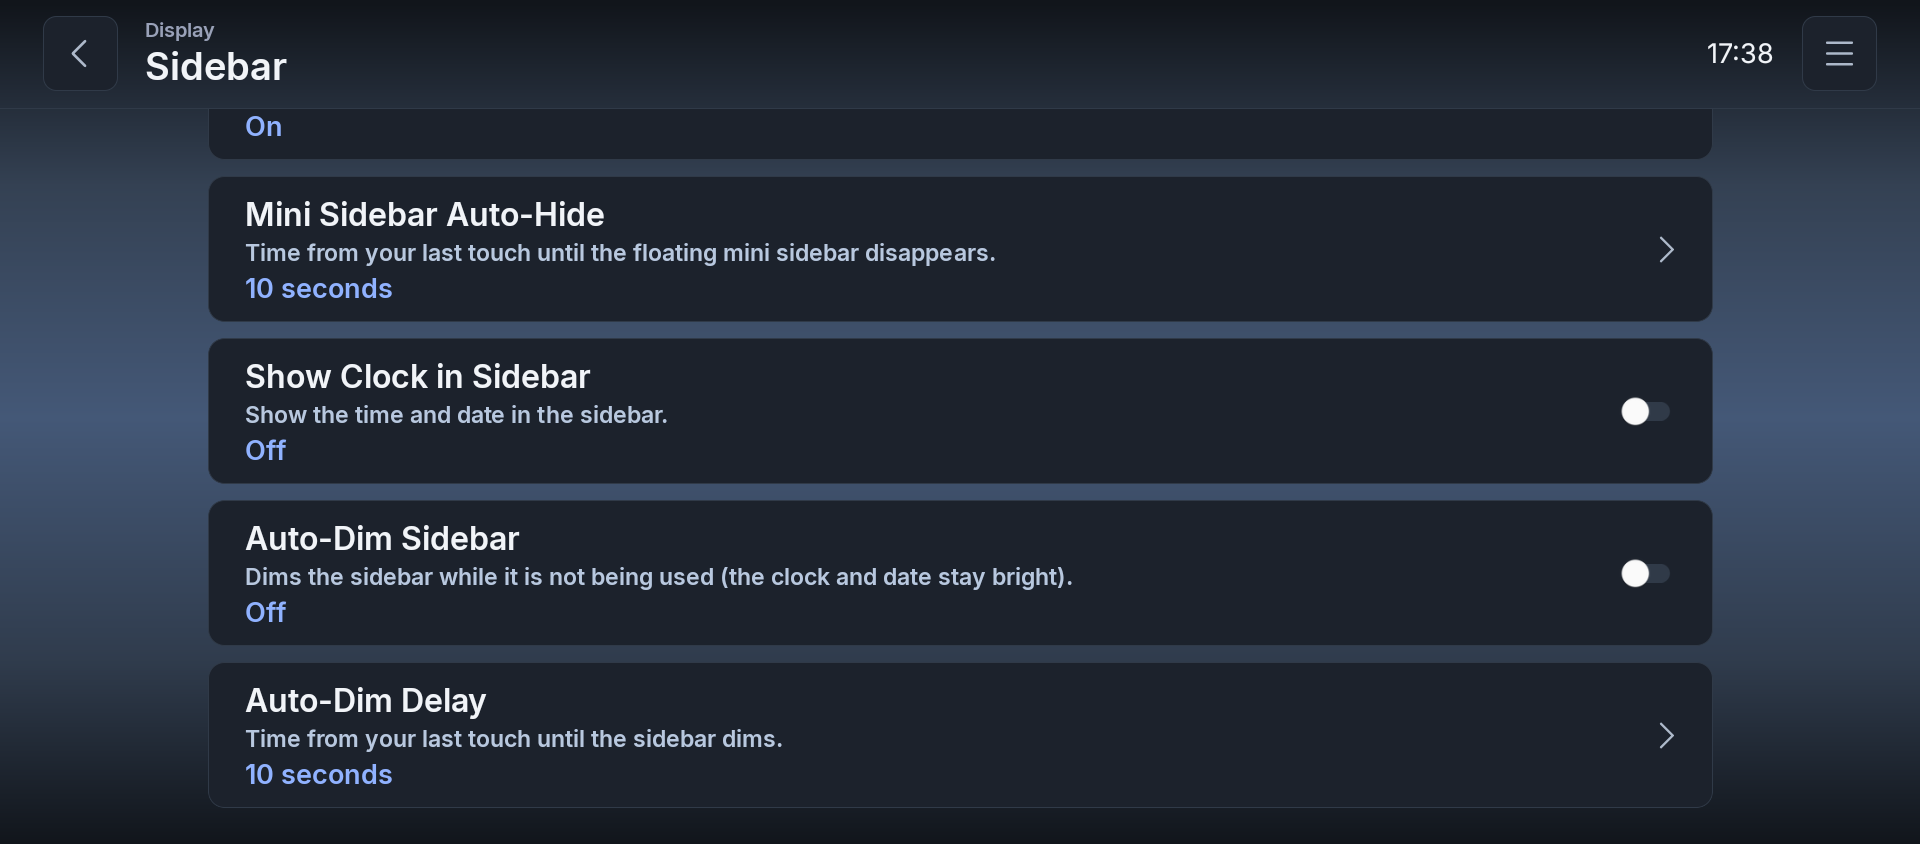
| Item | Description | Options/Default |
|---|---|---|
| Handle Position | Choose which side the back button sits on in the horizontal sidebar. | Right / Left (default: Right) |
| Sidebar Position | Choose which side of the screen the sidebar appears on. | Left / Right / Top / Bottom (default: Right) |
| Sidebar Size | Choose the width of the sidebar. | Small / Medium / Large (default: Medium) |
| Sidebar Always Visible | When off, touch anywhere to bring up a small floating panel that opens the sidebar. | On / Off (default: On) |
| Mini Sidebar Auto-Hide | Time from your last touch until the floating mini sidebar disappears. | 5 sec / 7 sec / 10 sec (default: 5 sec) |
| Show Clock in Sidebar | Show the time and date in the sidebar. | On / Off (default: On) |
| Auto-Dim Sidebar | Dims the sidebar while it is not being used (the clock and date stay bright). | On / Off (default: Off) |
| Auto-Dim Delay | Time from your last touch until the sidebar dims. | 5 sec / 7 sec / 10 sec (default: 10 sec) |
3.1.3 Status Bar
Settings → Display → Status Bar
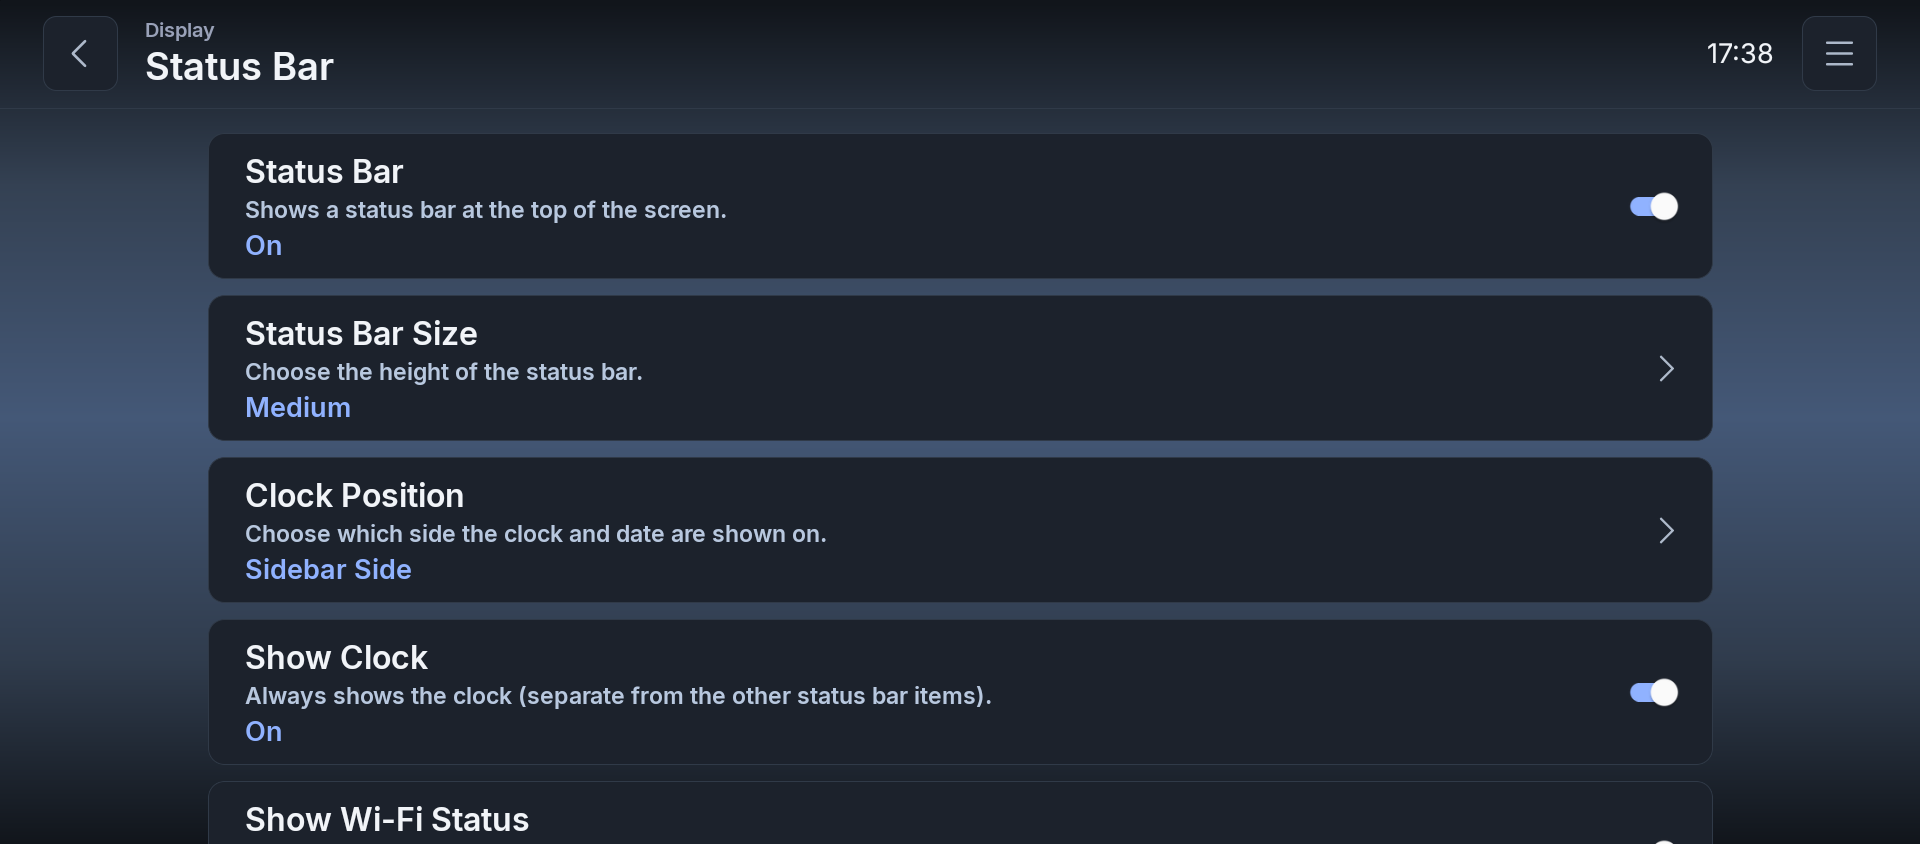
| Item | Description | Options/Default |
|---|---|---|
| Status Bar | Shows a status bar at the top of the screen. | On / Off (default: Off) |
| Status Bar Size | Choose the height of the status bar. | Small / Medium / Large (default: Medium) |
| Clock Position | Choose which side the clock and date are shown on. | Sidebar Side / Opposite Side (default: Sidebar Side) |
| Now Playing Row Position | Choose whether the now-playing row appears at the top or bottom of the status bar. | Top / Bottom (default: Bottom) |
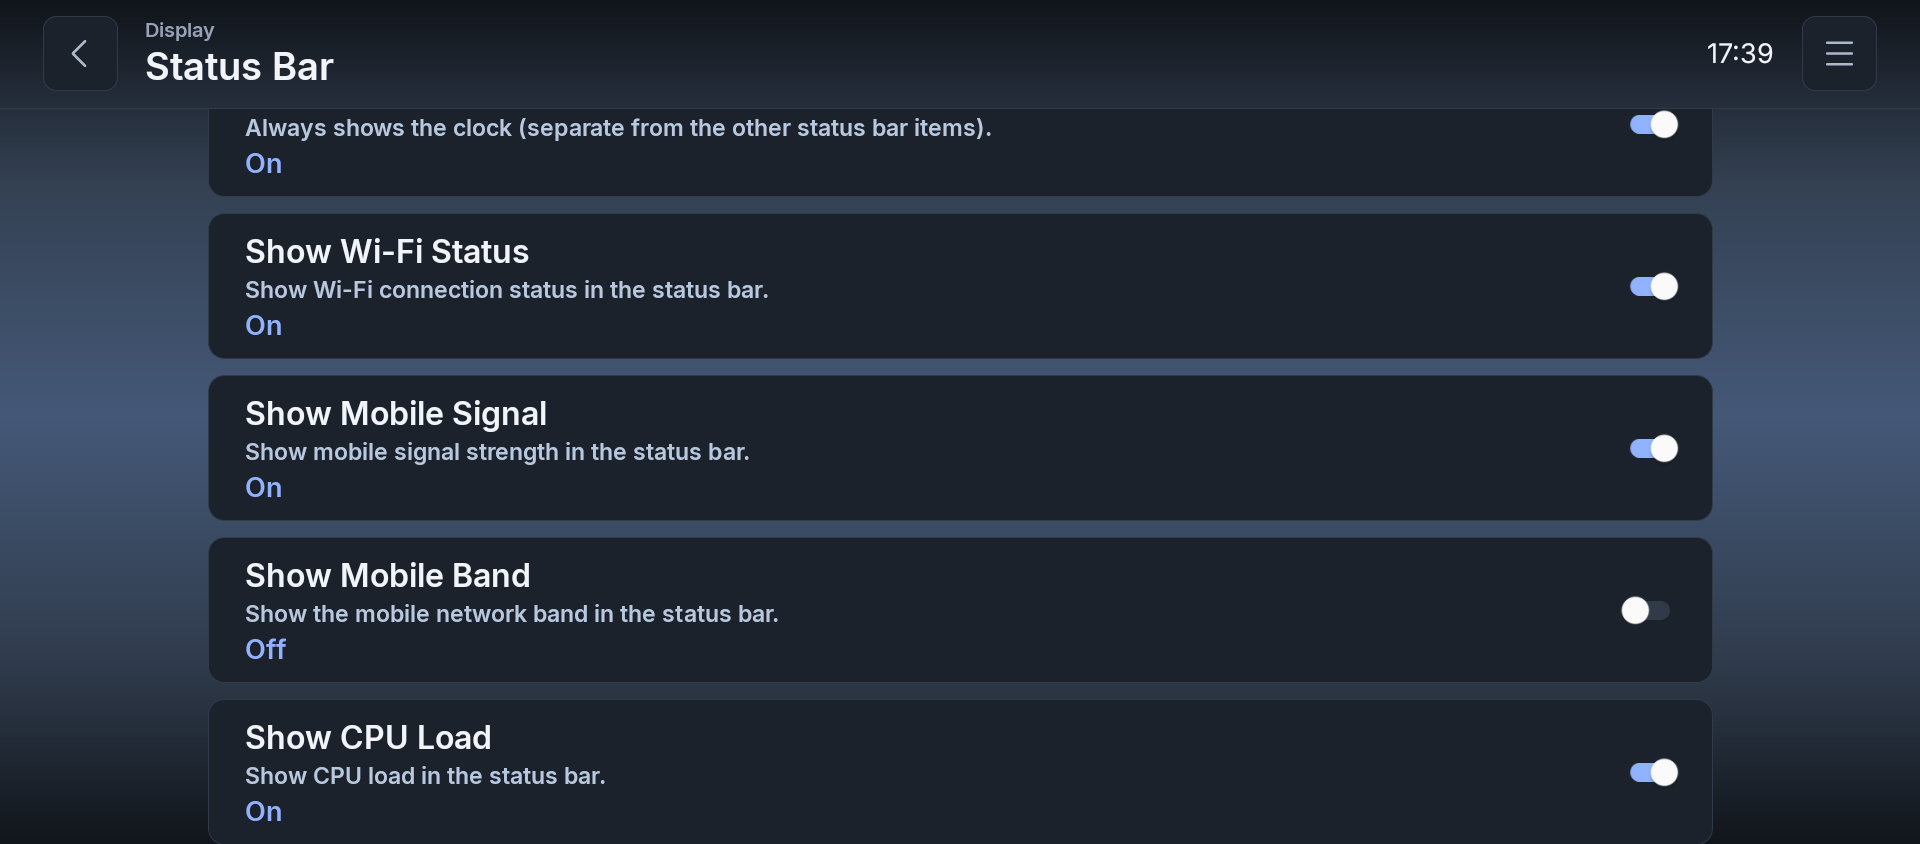
Individual status bar items (each is its own On/Off toggle, in on-screen order):
| Item | Description | Default |
|---|---|---|
| Show Clock | Always shows the clock (separate from the other status bar items). | On |
| Show Wi-Fi Status | Show Wi-Fi connection status in the status bar. | On |
| Show Mobile Signal | Show mobile signal strength in the status bar, as an icon with 0 to 3 bars. | Off |
| Show Mobile Band | Show the mobile network band in the status bar. Grayed out while "Show Mobile Signal" is off. | Off |
| Show CPU Load | Show CPU load in the status bar. | Off |
| Show Memory Usage | Show memory usage in the status bar. | Off |
| Show CPU Temperature | Show CPU temperature in the status bar. | Off |
| Show GPU Temperature | Show GPU temperature in the status bar. | Off |
| Show GPS Status | Show GPS fix status in the status bar. | Off |
| Show Altitude | Show altitude (from GPS) in the status bar. | Off |
| Show PA Temperature | Show amplifier (PA) temperature in the status bar. | Off |
| Show Tethering Status | Show tethering status in the status bar. | Off |
| Show Now Playing Row | Show a dedicated row for the currently playing song in the status bar. | Off |
| Current Address | Shows your current street address on its own line in the status bar. Text shrinks to fit. Requires location permission. | Off |
| Show Network Speed | Show real-time network speed (down/up) in the status bar. | Off |
3.1.4 Network
Settings → Display → Network
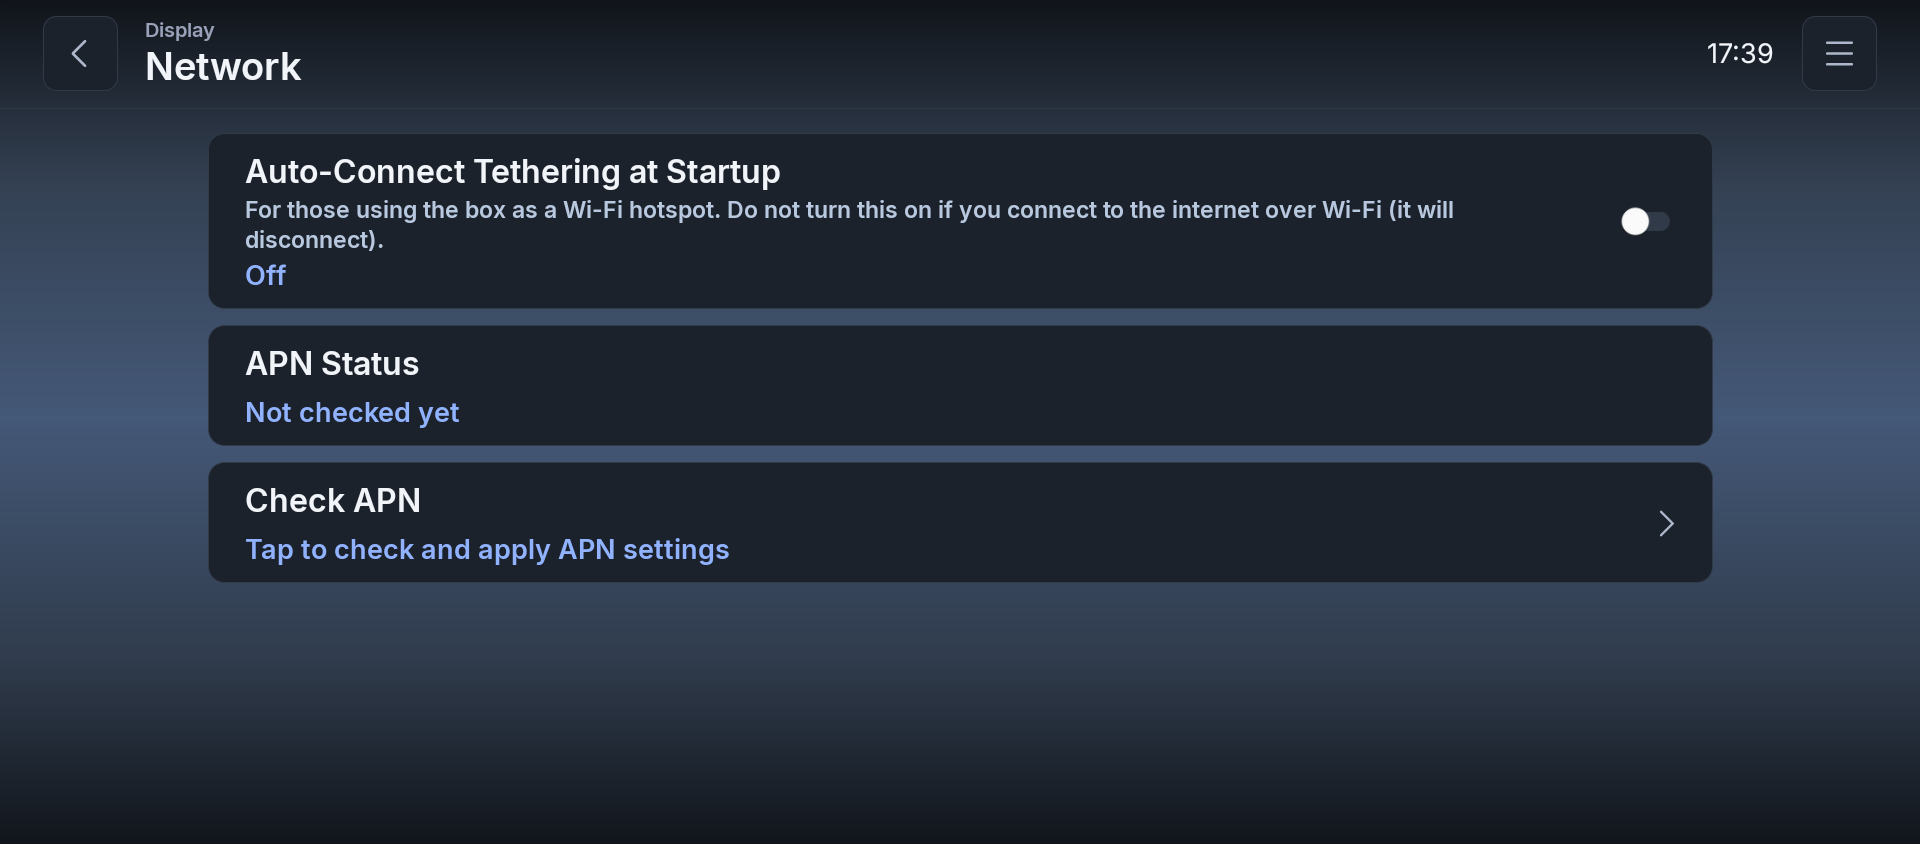
| Item | Description | Options/Default |
|---|---|---|
| Auto-Connect Tethering at Startup | For those using the AIBOX as a Wi-Fi hotspot. Do not turn this on if you connect to the internet over Wi-Fi (it will disconnect). | On / Off (default: Off) |
| APN Status | Shows the result of the last APN check. | Display (default: "Not checked yet") |
| Check APN | Tap to check and apply APN settings. | Button |
3.1.5 Language
Settings → Display → Language
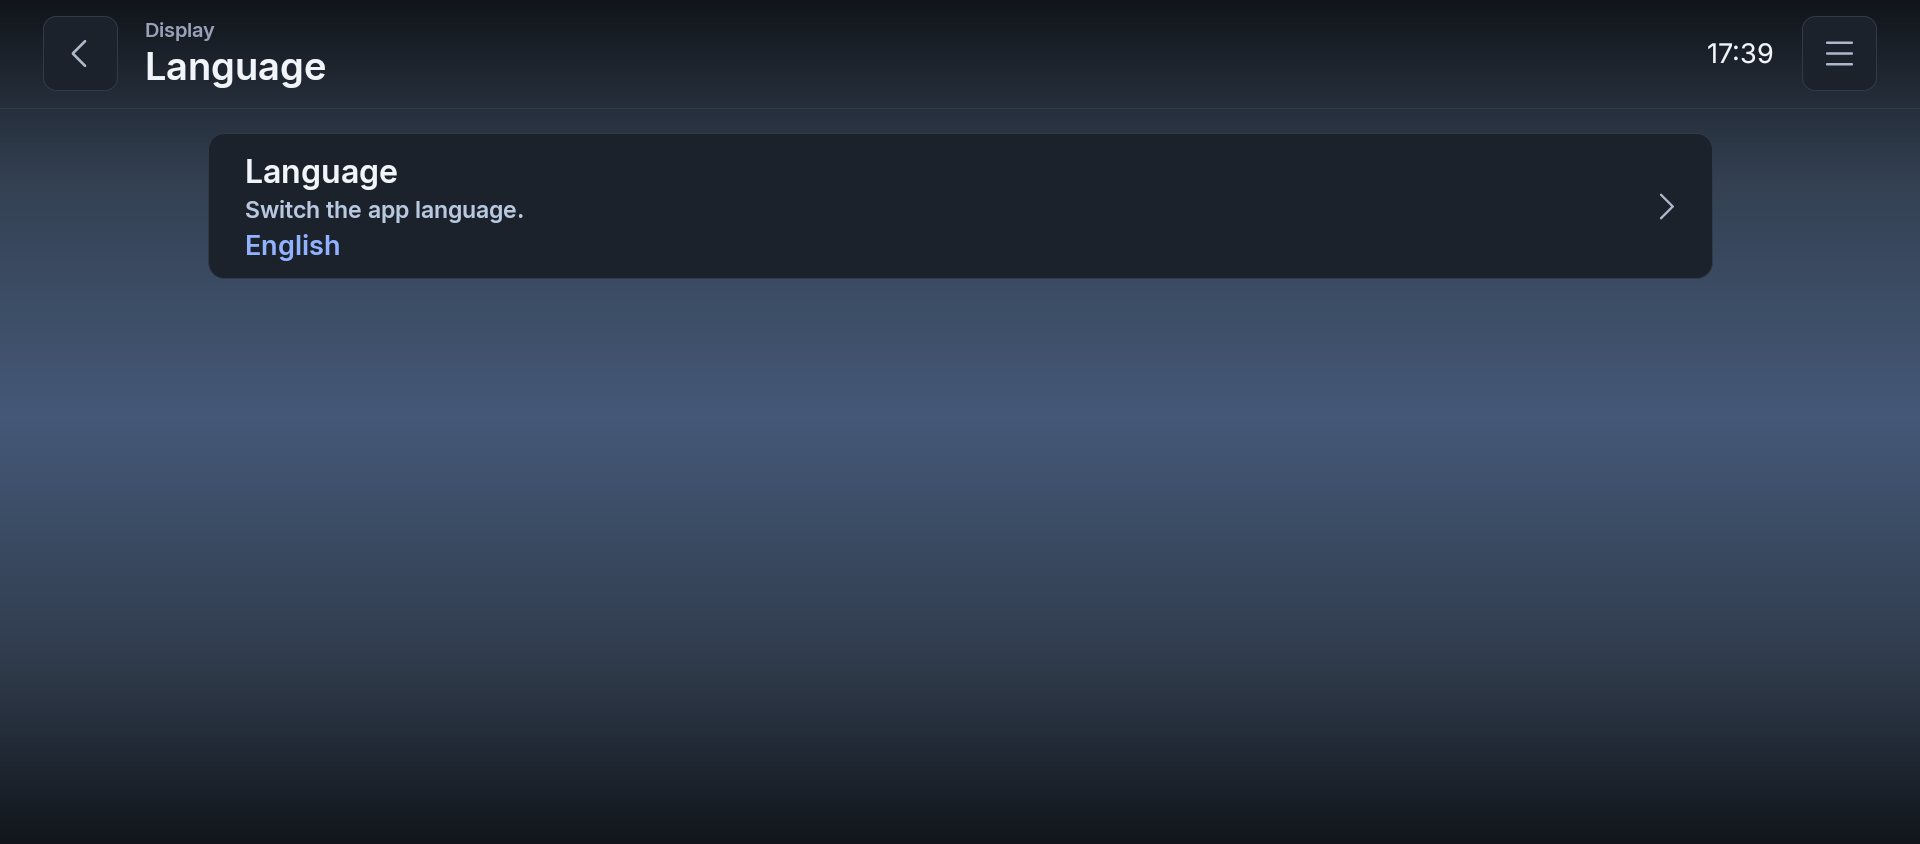
| Item | Description | Options/Default |
|---|---|---|
| Language | Switch the app language. | Japanese / English / Deutsch / Français / Español / Italiano / Português (Brasil) / 繁體中文 / 한국어 / Русский (default: matches first-time setup selection) |
Note: Choosing anything other than Japanese switches the settings screen to this simplified, list-based layout.
3.1.6 App Management
Settings → Display → App Management
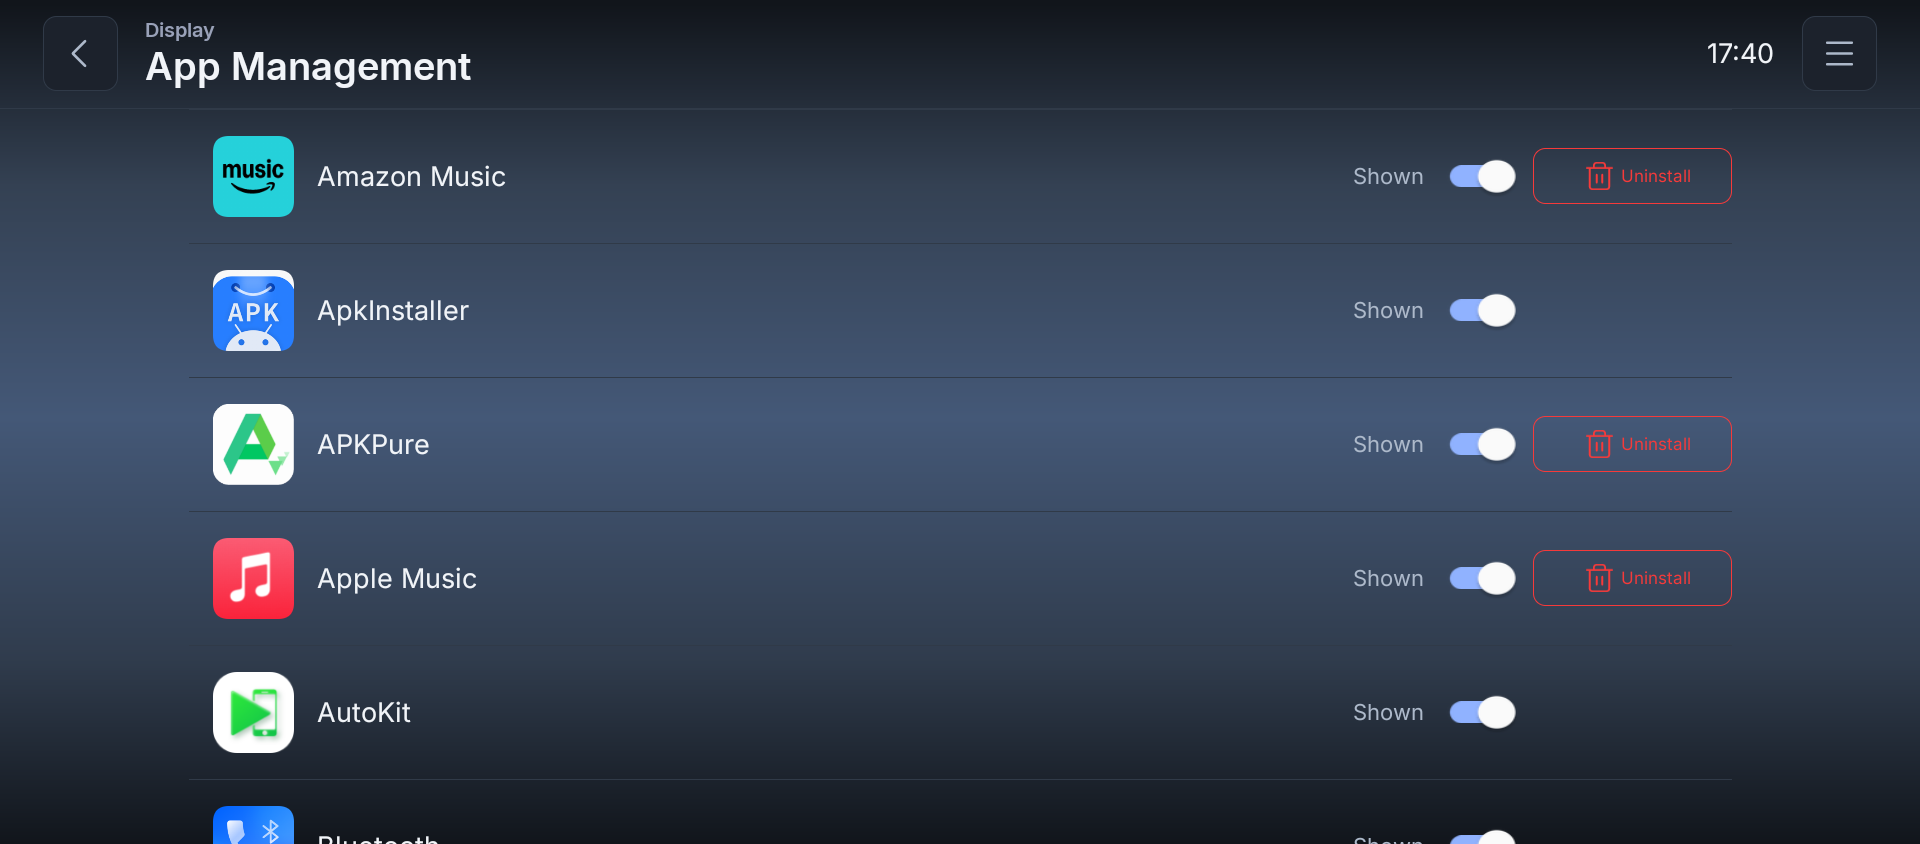
Shows every installed app as a row with its icon and name.
| Item | Description | Type |
|---|---|---|
| Shown | Whether the app appears in the app pickers used throughout NEXGIA DRIVE. | Toggle (default: On) |
| Uninstall | Uninstalls the app. Only shown for apps that can be uninstalled (not shown for pre-installed system apps such as ApkInstaller). | Button |
3.1.7 Theme
Settings → Display → Theme
Customize the home screen's colors to your own preference. Choose the sidebar icon color from presets, and freely set colors for the background, frame, text, and more.
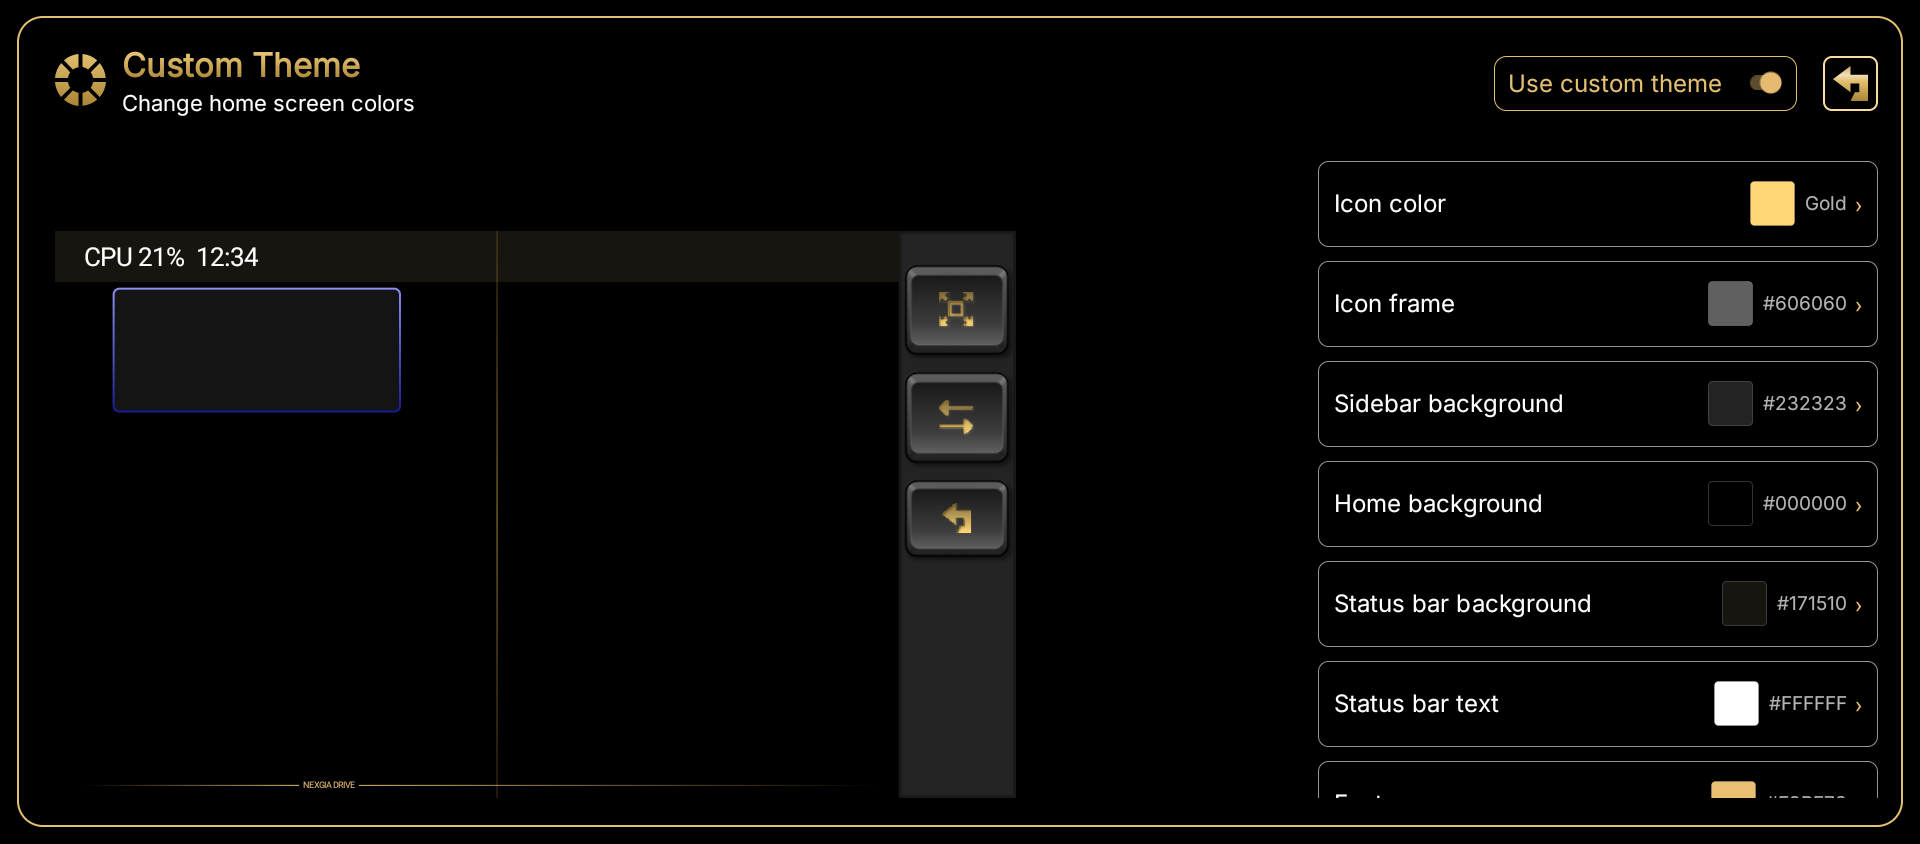
| Item | Description | Options/Default |
|---|---|---|
| Use custom theme | When on, the colors set on this screen are applied to the home screen. When off, the app returns to the standard colors (black + gold). | On / Off (default: Off) |
| Icon color | Choose the sidebar icon color from presets. | Gold / White / Silver (Light) / Silver (Dark) + 24 hues × Light/Medium/Dark (76 colors total) (default: Gold) |
| Icon frame | Color of the sidebar icon's outline. | Custom color (default: #606060) |
| Sidebar background | Sidebar background color. | Custom color (default: #232323) |
| Home background | Home screen background color. | Custom color (default: #000000) |
| Status bar background | Status bar background color. | Custom color (default: #171510) |
| Status bar text | Status bar text color. | Custom color (default: #FFFFFF) |
| Footer | Color of the footer bar (the NEXGIA DRIVE strip) at the bottom of the screen. | Custom color (default: #E9BF73) |
| Widget frame | Color of the gold widget frame. | Custom color (default: #F4D58E) |
| Divider | Color of the line between the two split screens and the split handle. | Custom color (default: #D4A843) |
| Shortcut handle | Color of the shortcut handle (the white pill) at the bottom of each pane. | Custom color (default: #FFFFFF) |
| Selected panel frame | Color of the frame around the panel that currently receives back and key inputs in split mode (see "Selected Panel Frame" in 3.1.1 Layout). | Custom color (default: #D4A843) |
| DRIVE LOG handle | Color of the handle that opens Drive Log. | Custom color (default: #3E6BA8) |
| 3-screen mode handle | Color of the handle that opens Triple Screen Mode. | Custom color (default: #7A2E3B) |
| Reset to default | Resets every item to the default colors. | Button |
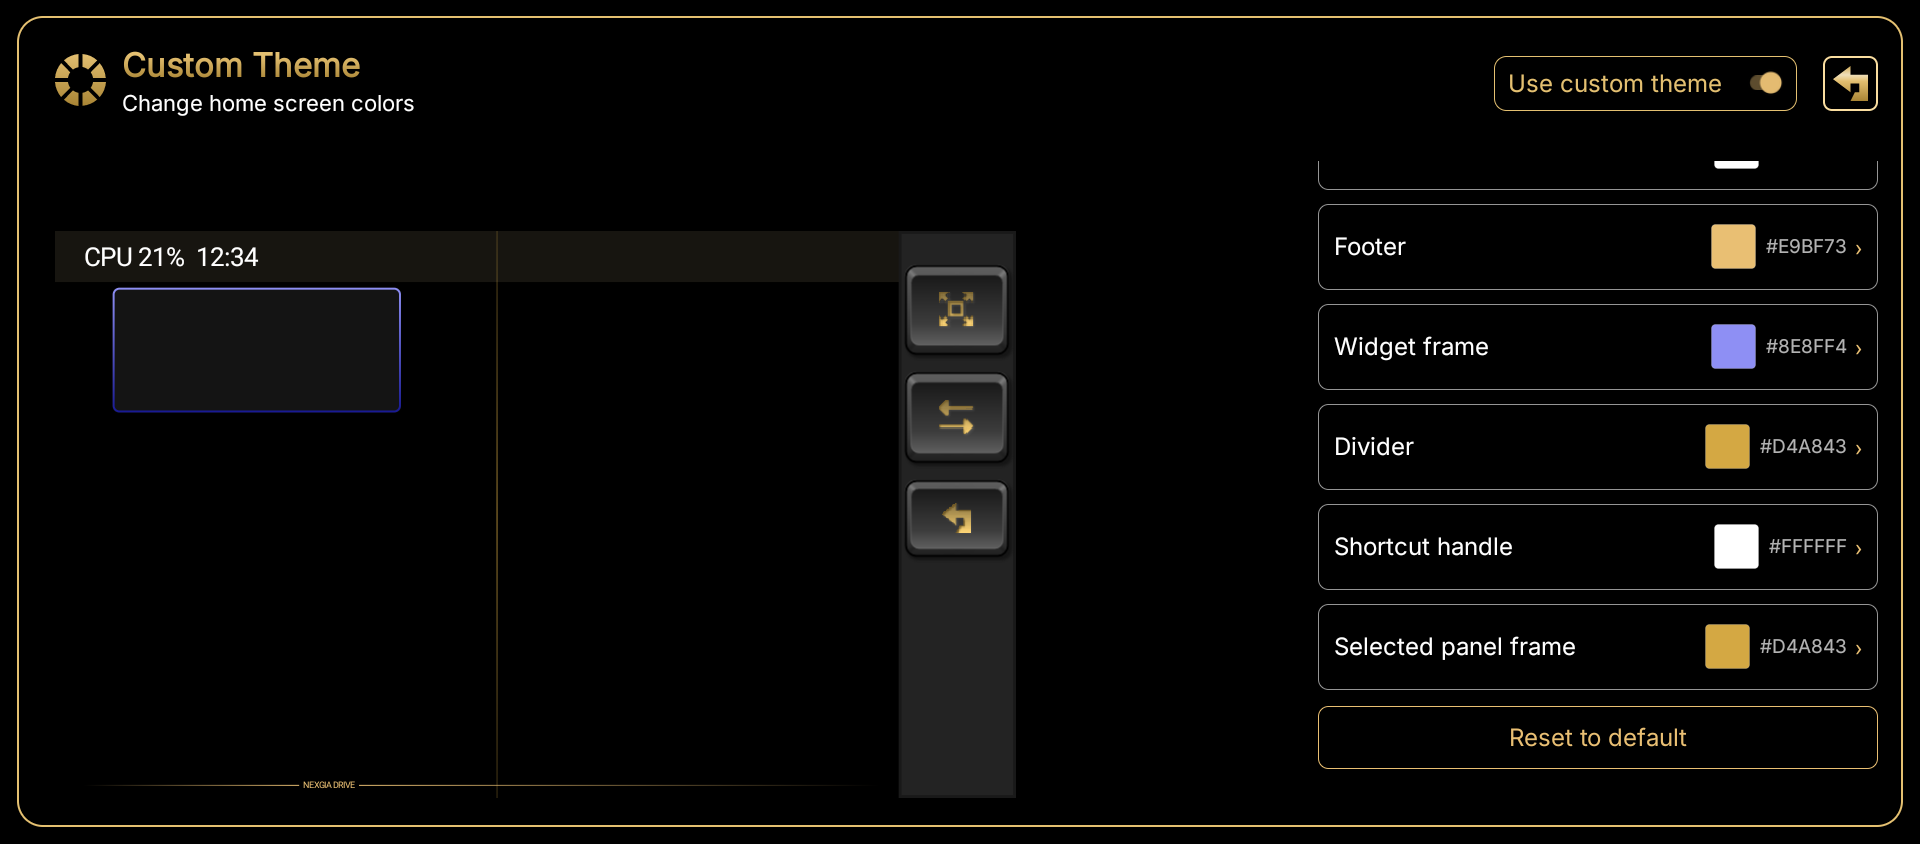
How to change a color
- Tap "Icon color" to open the preset grid. Tapping a color applies it immediately. Tap "Back" to return to the list.
- Tap any other item to open the color editor. Compare "Current" and "New" while picking a color, or type a hex code (#RRGGBB) directly, then tap "Confirm."
- Check the preview on the left of the screen to see the color change.

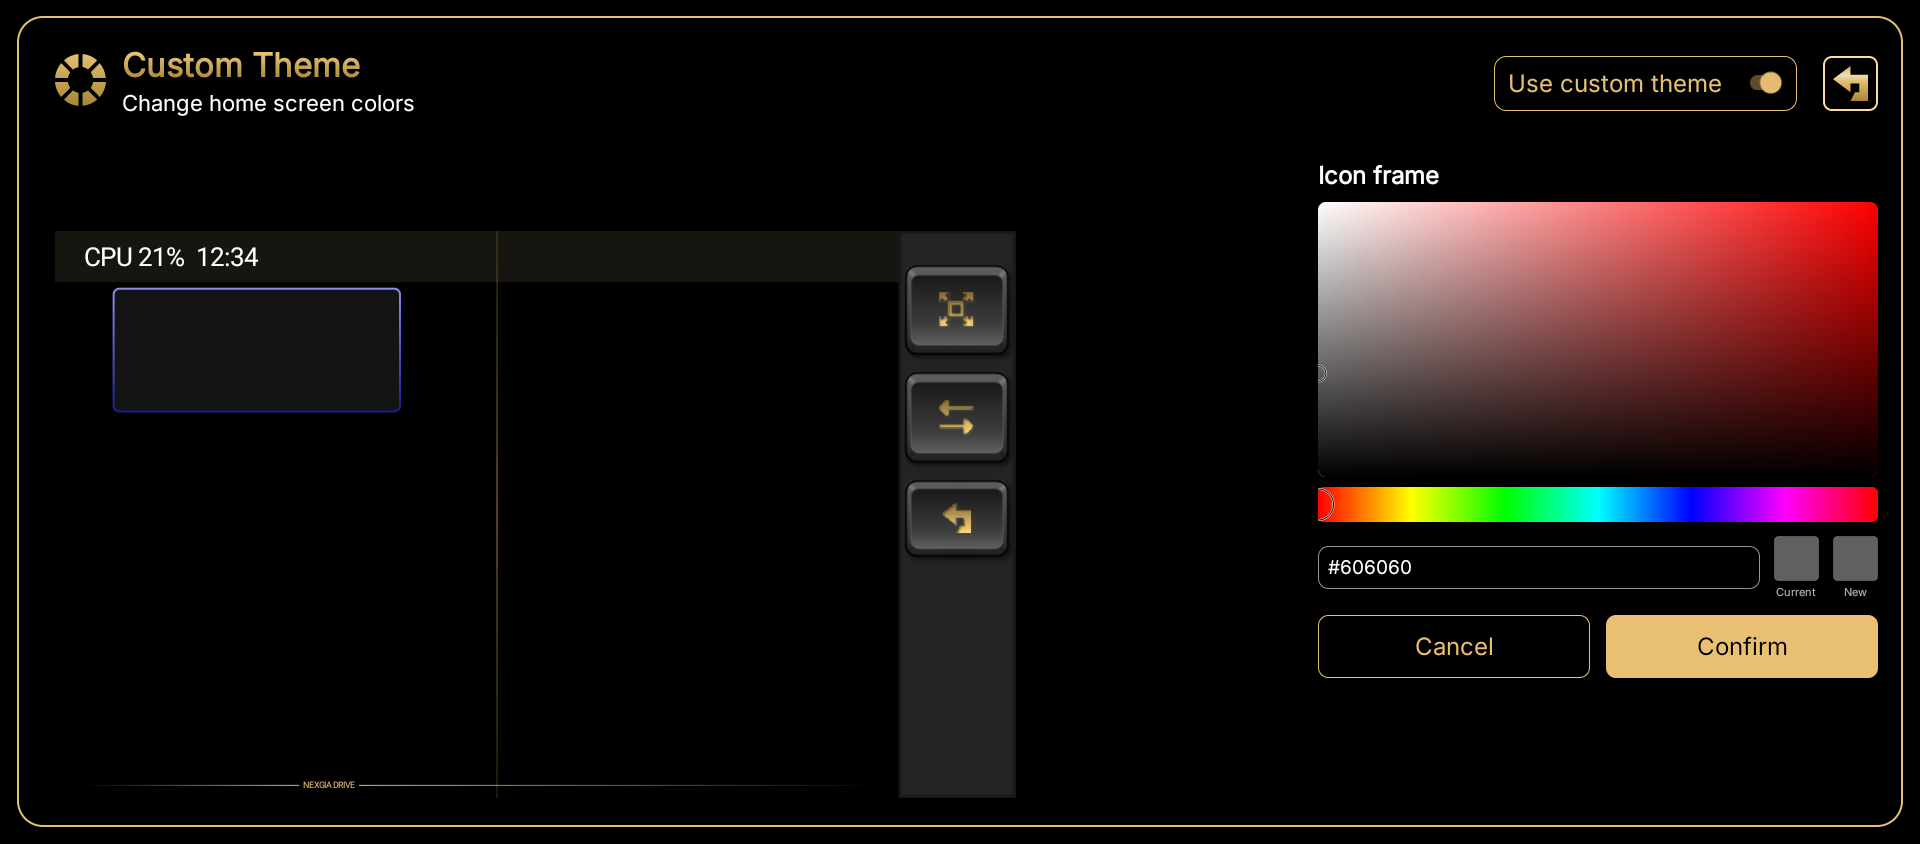
Note: Changes apply immediately. The app does not need to restart. Note: While "Use custom theme" is off, your saved colors are kept and are applied again once you turn it back on.
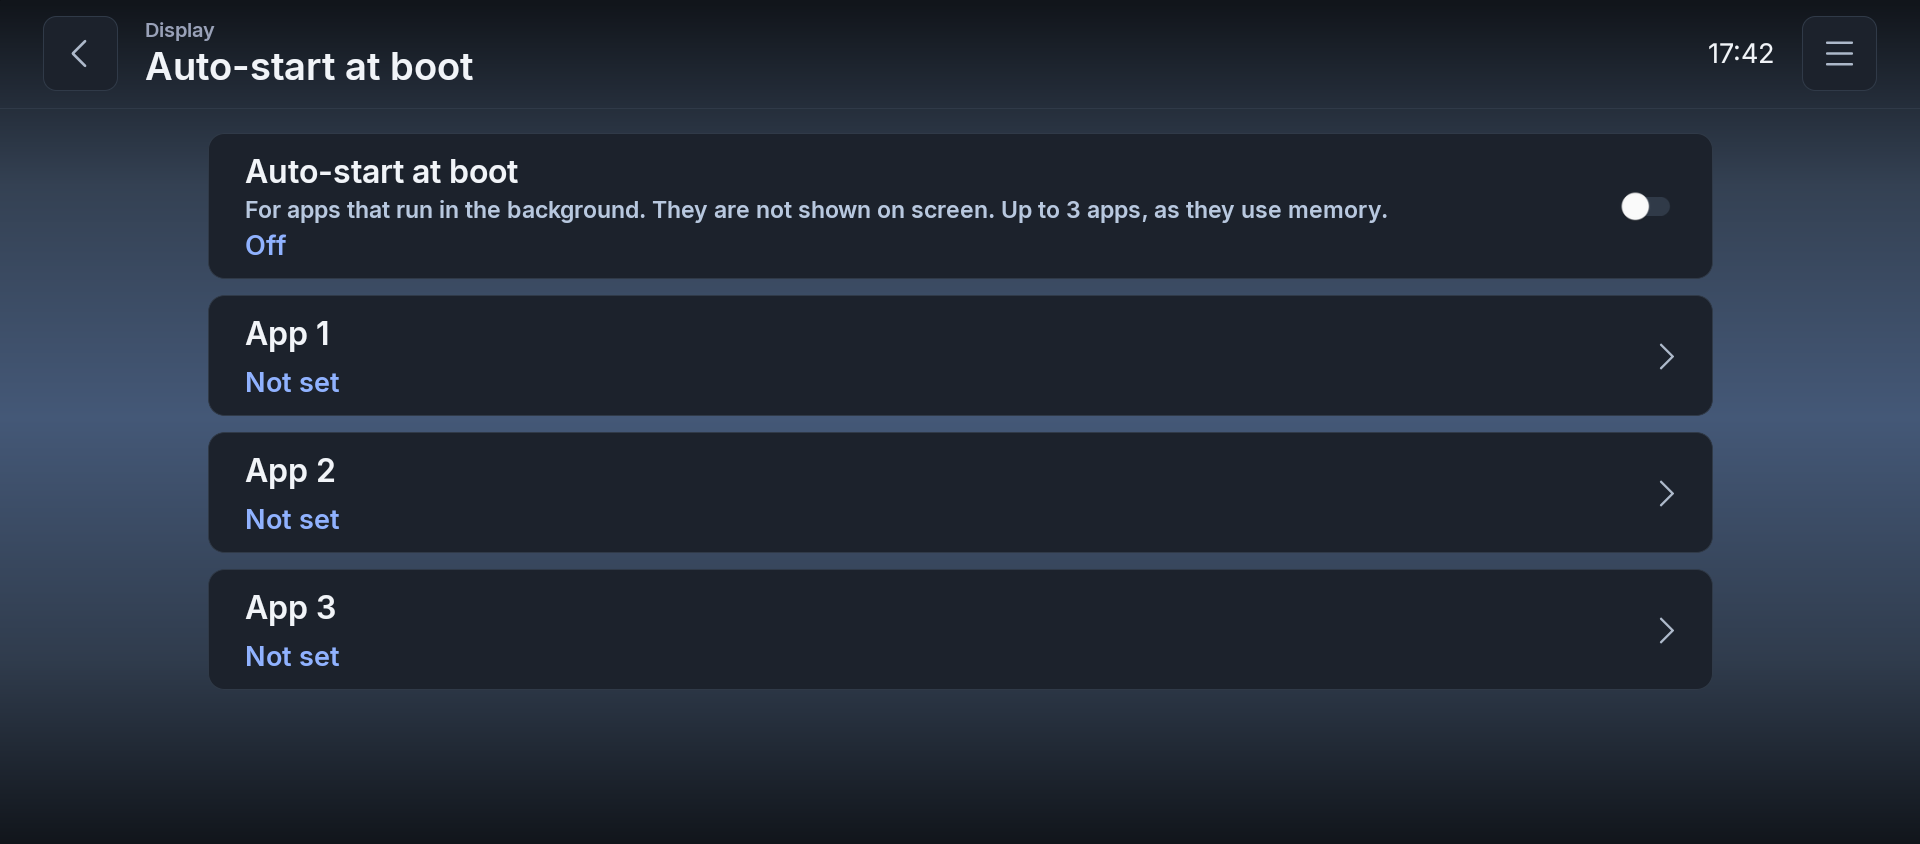
3.1.8 Auto-start at Boot
Settings → Display → Auto-start at Boot
Launch apps in the background at startup.
| Item | Description | Options/Default |
|---|---|---|
| Auto-start at boot | For apps that run in the background. They are not shown on screen. Up to 3 apps, as they use memory. | On / Off (default: Off) |
| App 1 / App 2 / App 3 | Tap to select an app to launch in the background at startup. | Button → app selection (default: not set) |
3.2 Navigation
Settings → Navigation
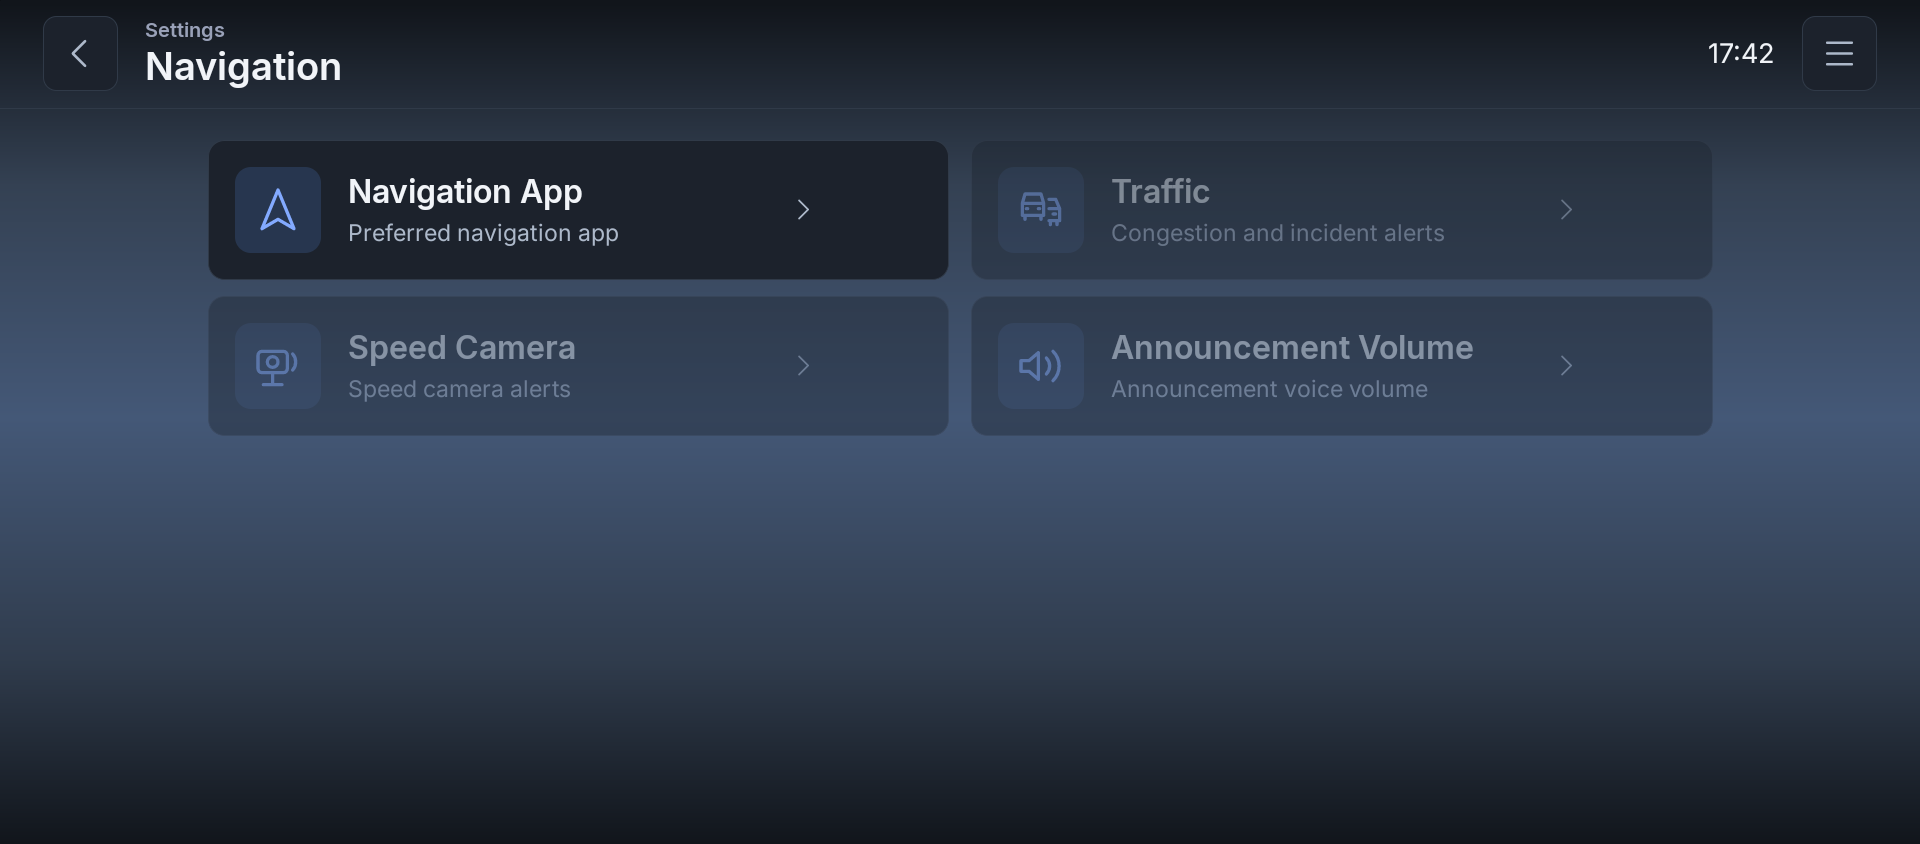
Use the submenu on the right to select the "Navigation App," "Traffic," "Speed Camera," or "Announcement Volume" panel.
3.2.1 Navigation App
Settings → Navigation → Navigation App
| Item | Description | Options/Default |
|---|---|---|
| Navigation App | App used when returning to a destination. | Button → app selection (default: not set) |
3.2.2 Traffic
Settings → Navigation → Traffic
Not currently available on the non-Japanese settings screen (shown grayed out).
3.2.3 Speed Camera
Settings → Navigation → Speed Camera
Not currently available on the non-Japanese settings screen (shown grayed out).
3.2.4 Announcement Volume
Settings → Navigation → Announcement Volume
Not currently available on the non-Japanese settings screen (shown grayed out).
3.3 Widgets
Settings → Widgets
Use the submenu on the right to select the "Music," "Tire Pressure," "Calendar," or "Speedometer" panel.
3.3.1 Music
Settings → Widgets → Music
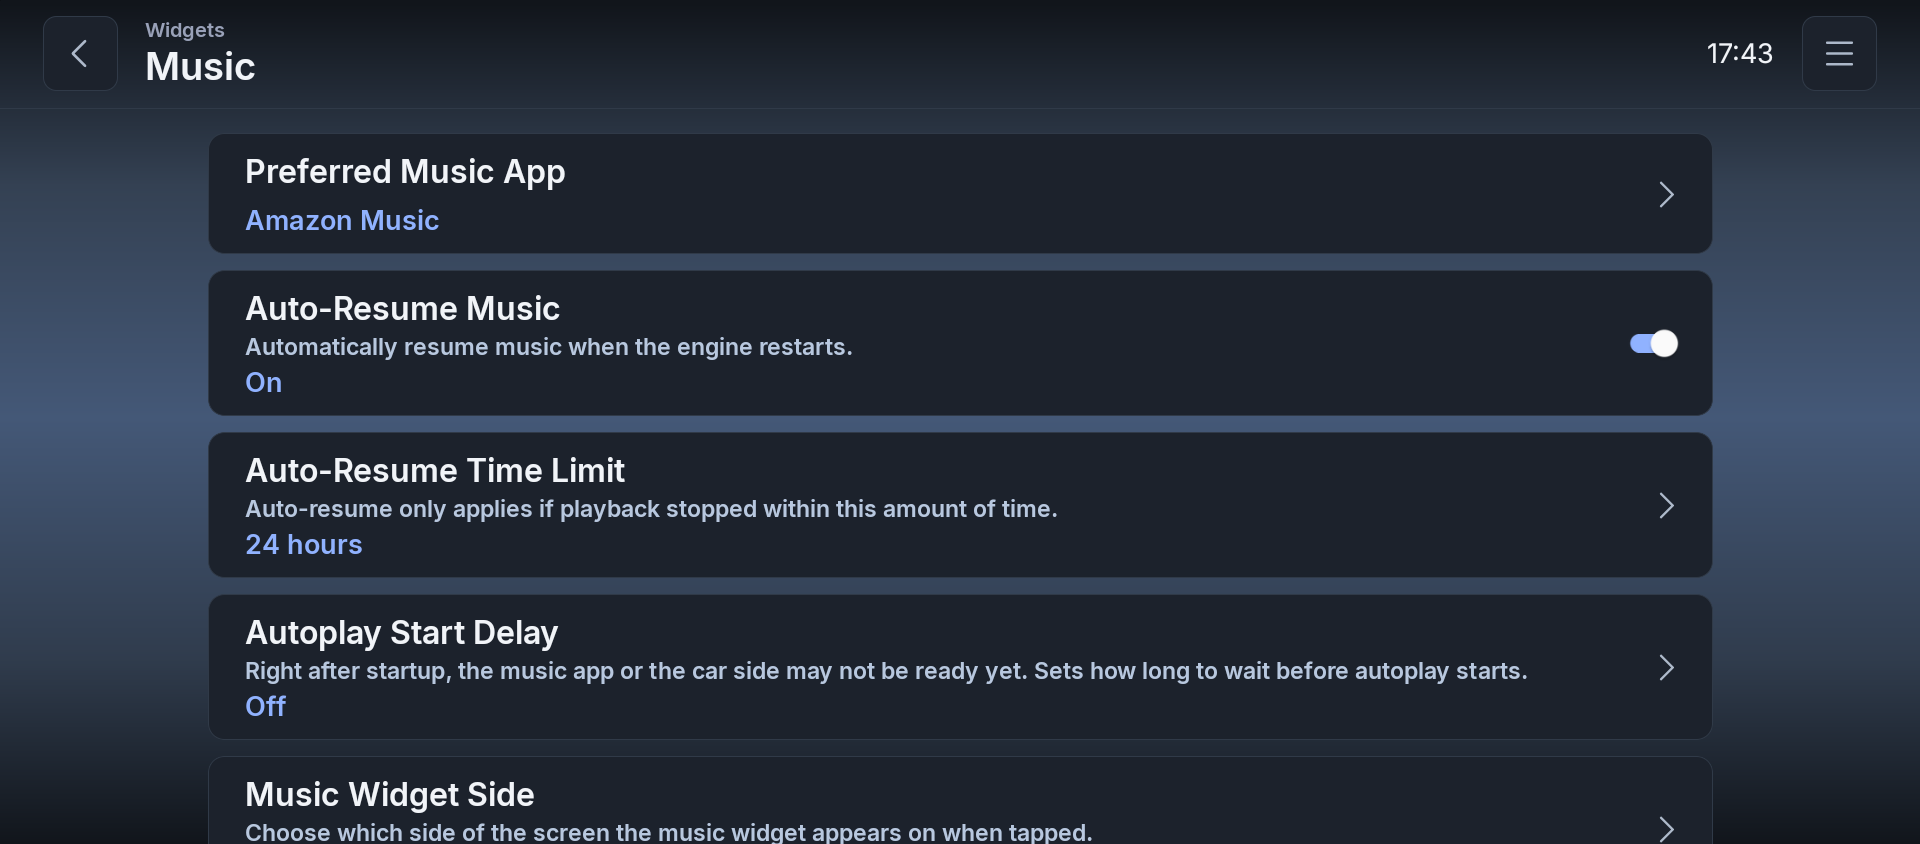
| Item | Description | Options/Default |
|---|---|---|
| Preferred Music App | App used for music auto-resume. | Button → app selection (default: not set) |
| Auto-Resume Music | Automatically resume music when the engine restarts. | On / Off (default: Off) |
| Auto-Resume Time Limit | Auto-resume only applies if playback stopped within this amount of time. | 1 / 6 / 12 / 24 / 48 hours (default: 24 hours) |
| Music Widget Side | Choose which side of the screen the music widget appears on when tapped. | Left / Right (default: Right) |
Note: "Auto-Resume Music" cannot be changed while no music app is selected. Note: "Auto-Resume Time Limit" cannot be changed while "Auto-Resume Music" is off.
3.3.2 Tire Pressure (TPMS)
Settings → Widgets → Tire Pressure
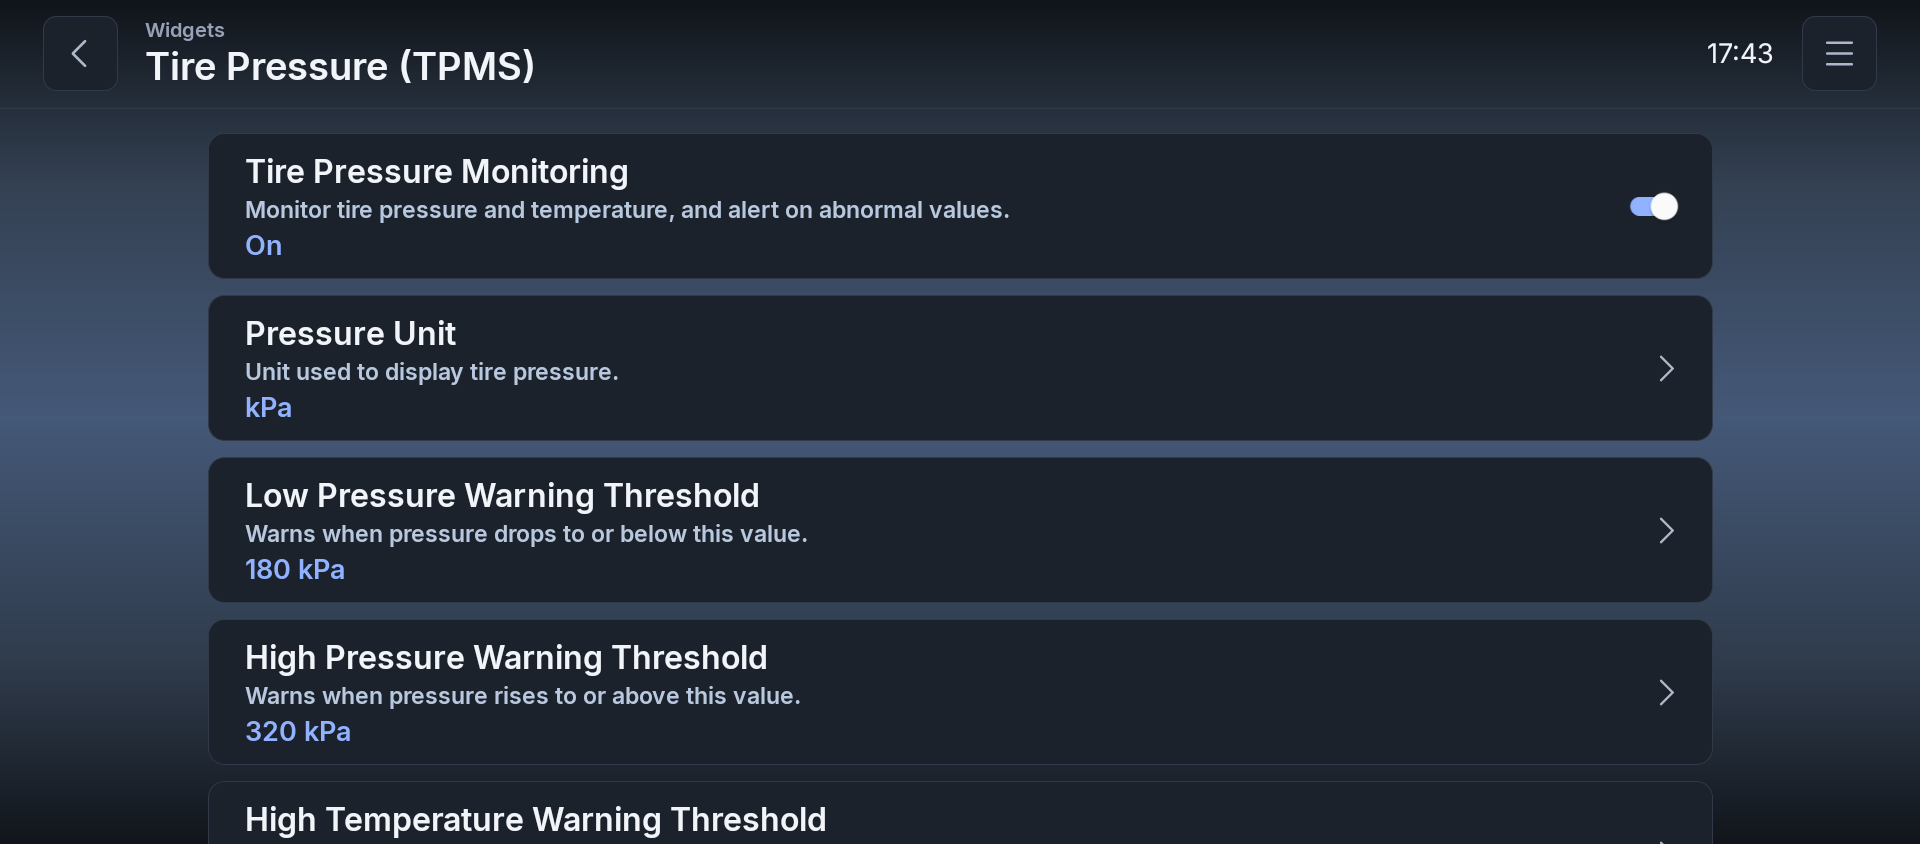
| Item | Description | Options/Default |
|---|---|---|
| Tire Pressure Monitoring | Monitor tire pressure and temperature, and alert on abnormal values. | On / Off (default: On) |
| Pressure Unit | Unit used to display tire pressure. | kPa / PSI / bar (default: kPa) |
| Low Pressure Warning Threshold | Warns when pressure drops to or below this value. | 50–300 kPa (default: 180 kPa) |
| High Pressure Warning Threshold | Warns when pressure rises to or above this value. | 200–600 kPa (default: 320 kPa) |
| High Temperature Warning Threshold | Warns when temperature rises to or above this value. | 30–120°C (default: 70°C) |
Note: While "Tire Pressure Monitoring" is off, the pressure unit and each warning threshold cannot be changed.
3.3.3 Calendar
Settings → Widgets → Calendar
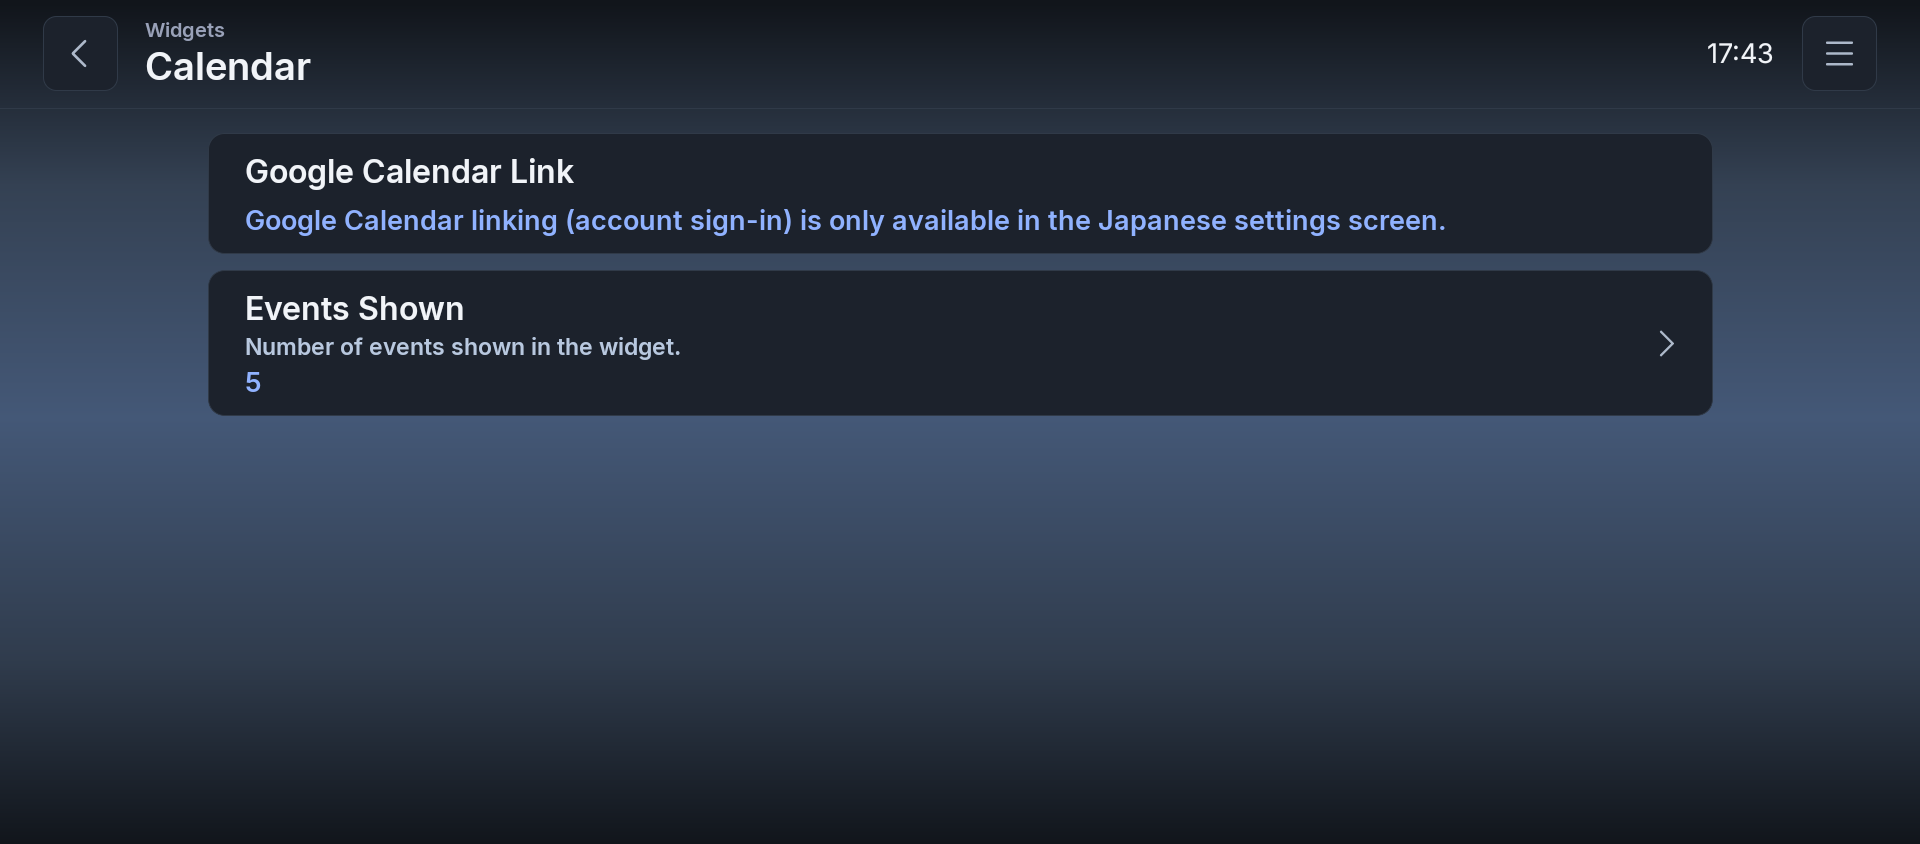
| Item | Description | Options/Default |
|---|---|---|
| Google Calendar Link | Static notice. | "Google Calendar linking (account sign-in) is only available in the Japanese settings screen." |
| Events Shown | Number of events shown in the widget. | Stepper (default: 5) |
Note: Linking a Google Calendar account is a Japanese-settings-only feature; the non-Japanese screen only shows the notice above.
3.3.4 Weather
The weather widget has been discontinued as of v814.
- "Weather" no longer appears on the screen for adding widgets.
- There is no "Weather" item in Settings either.
- Weather widgets you had already placed are no longer displayed either.
- The temperature display in the status bar has been discontinued in the same way.
3.3.5 Speedometer
Settings → Widgets → Speedometer
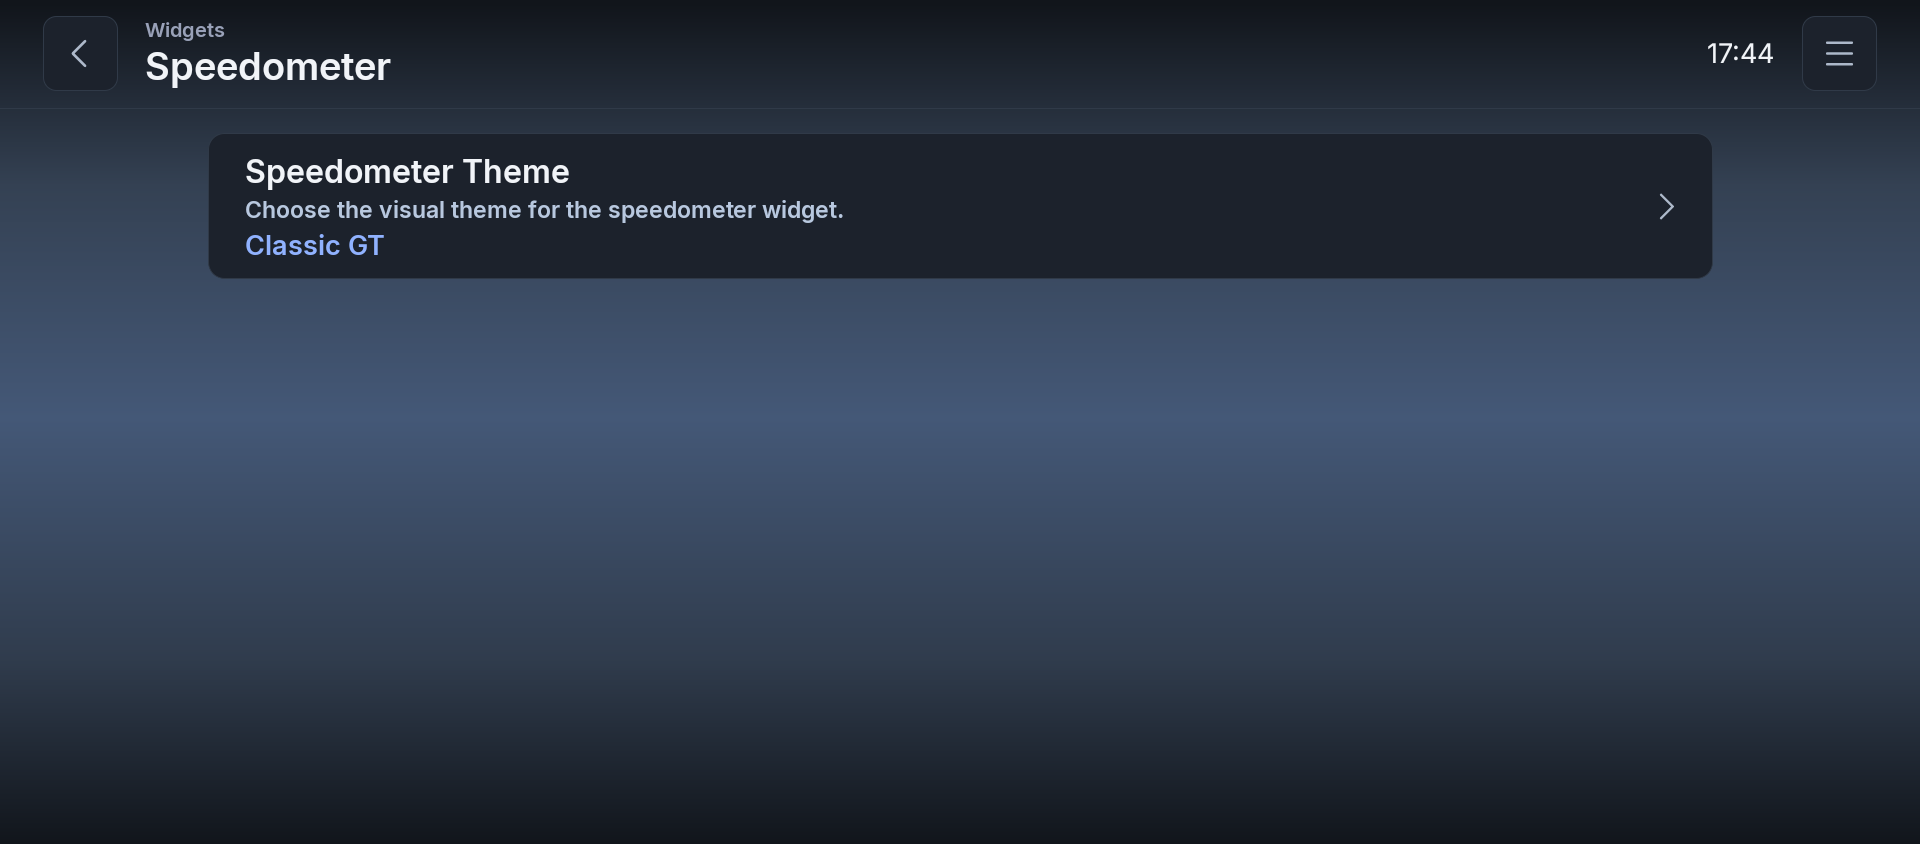
| Item | Description | Options/Default |
|---|---|---|
| Speedometer Theme | Choose the visual theme for the speedometer widget. | Modern Luxury / GPS Drive / Classic GT / Digital Horizon / Performance Pulse (default: Classic GT) |
3.4 Controller
Settings → Controller
In NEXGIA DRIVE, any device that sends button input to the AIBOX can have an action assigned to each of its buttons, regardless of the device type. This mainly includes devices such as:
- A Bluetooth-connected game controller
- A Bluetooth volume controller (a remote with media buttons)
- Switches on the car's steering wheel
Switches on the car's steering wheel can be assigned from exactly the same "Short Press" screen as a Bluetooth controller. By assigning NEXGIA DRIVE actions (back, volume, track skip, split ratio adjustment, and more) to the steering wheel's forward/back/play-pause buttons and so on, you can consolidate driving-time operations onto the steering wheel even in vehicles without a dedicated remote. This is one of NEXGIA DRIVE's signature features.
Use the submenu on the right to select the "Short Press" or "Long Press" panel.
3.4.1 Short Press
Settings → Controller → Short Press
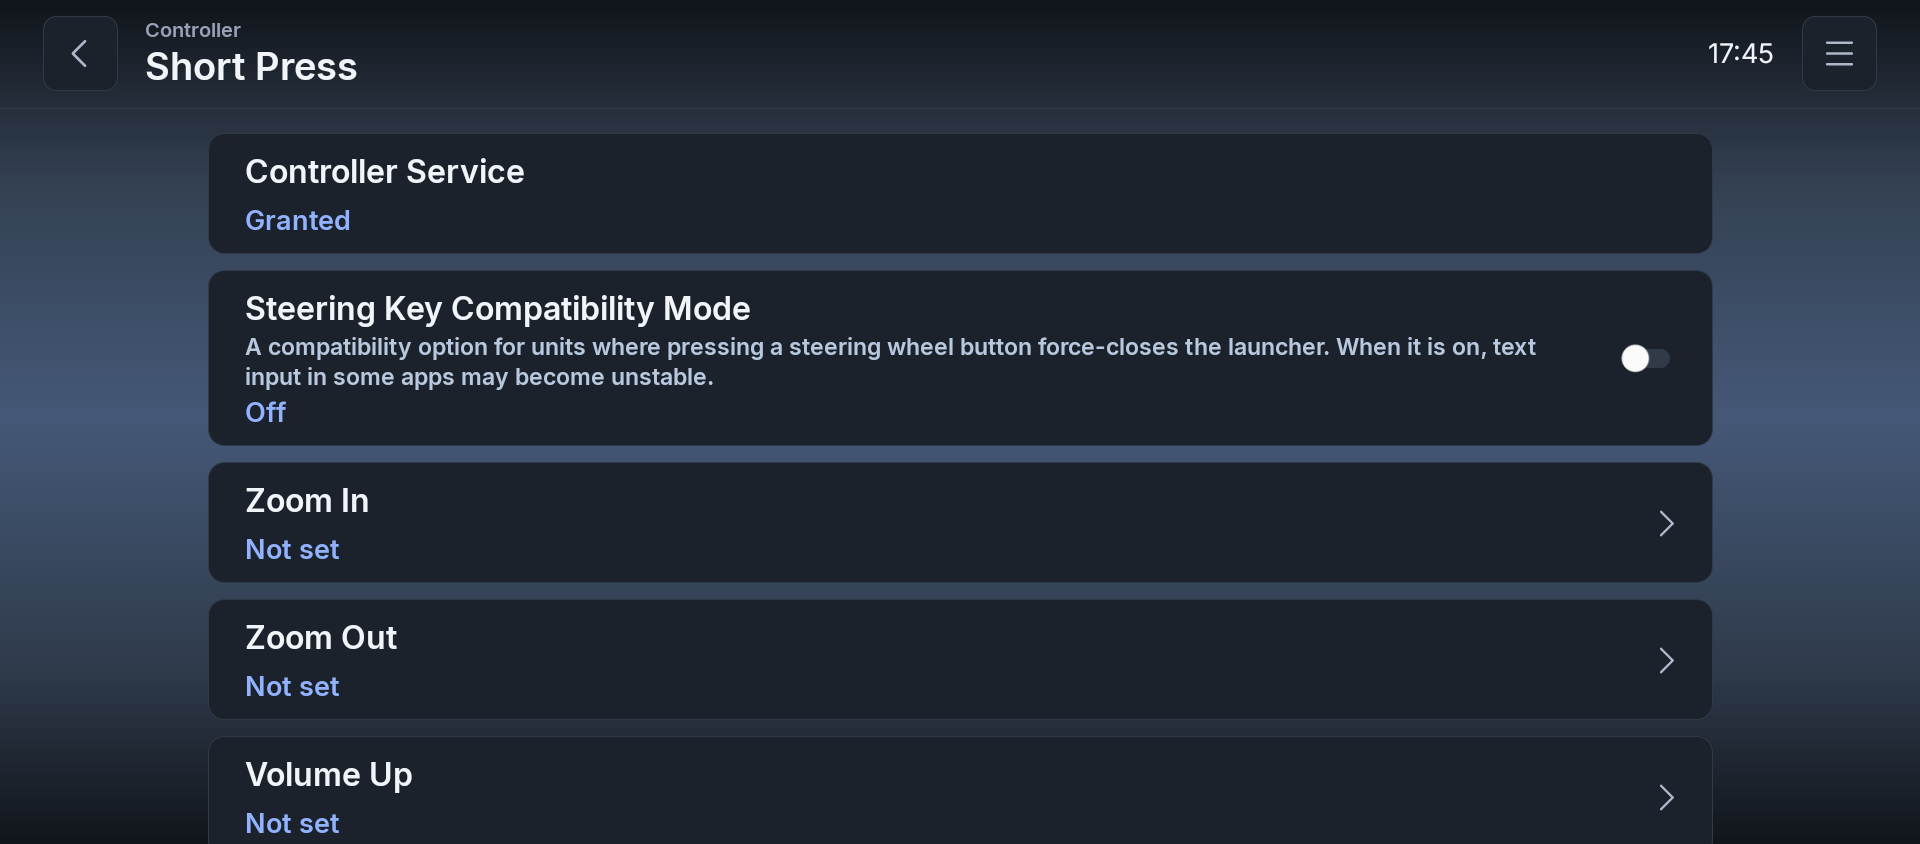
| Item | Description | Type |
|---|---|---|
| Controller Service | Status of the Accessibility service this feature depends on. | Display (Granted / Denied) |
| Steering Key Compatibility Mode | A compatibility option for units where pressing a steering wheel button force-closes the launcher. When it is on, text input in some apps may become unstable. | Toggle (default: Off) |
| Zoom In | "Detect Key" / "Clear" button | Key bind |
| Zoom Out | Same as above | Key bind |
| Volume Up | Same as above | Key bind |
| Volume Down | Same as above | Key bind |
| Back | Same as above | Key bind |
| Home | Same as above | Key bind |
| Play / Pause | Same as above | Key bind |
| Next Track | Same as above | Key bind |
| Previous Track | Same as above | Key bind |
| Enter | Same as above | Key bind |
| Scroll Up | Same as above | Key bind |
| Scroll Down | Same as above | Key bind |
| Split Ratio Left | Same as above | Key bind |
| Split Ratio Right | Same as above | Key bind |
| Sidebar Next | Same as above | Key bind |
| Sidebar Previous | Same as above | Key bind |
| Sidebar Select | Same as above | Key bind |
| Next Page | Same as above | Key bind |
| Open Accessibility Settings | Tap to open system settings. | Button |
Note: After pressing "Detect Key," pressing a physical button assigns that action to the button. An already-assigned row can be unassigned with the "Clear" button. Reassigning a different action to the same button automatically removes the previous assignment. Note: There are 19 assignable actions: Not Assigned / Volume Up / Volume Down / Next Track / Previous Track / Back / Home / Scroll Up / Scroll Down / Enter / Play/Pause / Zoom In / Zoom Out / Split Ratio Left / Split Ratio Right / Sidebar Next / Sidebar Previous / Sidebar Select / Next Page. Note: "Sidebar Next," "Sidebar Previous," and "Sidebar Select" let you select and press sidebar buttons using this key assignment (Next/Previous moves a thin gold focus frame between buttons, and Select presses the focused button). See 2.1 Using the Sidebar for details. Note: "Next Page" switches pages in the order Page ① → Page ② → Page ① each time it is pressed (this is the same whether it is assigned to the Home key or to another button). If you are using triple screen mode, the third screen opens after Page ②, and pressing the key again closes the third screen and returns to Page ① (Page ① → Page ② → third screen → Page ①). "Using triple screen mode" means that Use triple screen mode is on at Settings → Display → Triple Screen Mode and an app has been chosen for the third screen. Note: If pressing a steering wheel button is fully handled by the vehicle itself (the head unit) and never reaches the AIBOX as button input (as with some vehicles' voice-assistant-only buttons), "Detect Key" won't detect it and it can't be assigned. Note: "Steering Key Compatibility Mode" is a compatibility setting for certain models where NEXGIA DRIVE force-closes when a steering wheel button is pressed. Normally you can leave it off.
Home Key
- In the key assignment list, "Home Key" lets you choose the action that runs when you press the vehicle's Home key (for example, with "Next Page," each press switches the pages in turn).
- If another app or a voice assistant is covering the screen, pressing the Home key first brings NEXGIA DRIVE back to the front, and the action takes effect from the next press.
- The Home key action also works after you have operated an app in Dual mode.
3.4.2 Long Press
Settings → Controller → Long Press
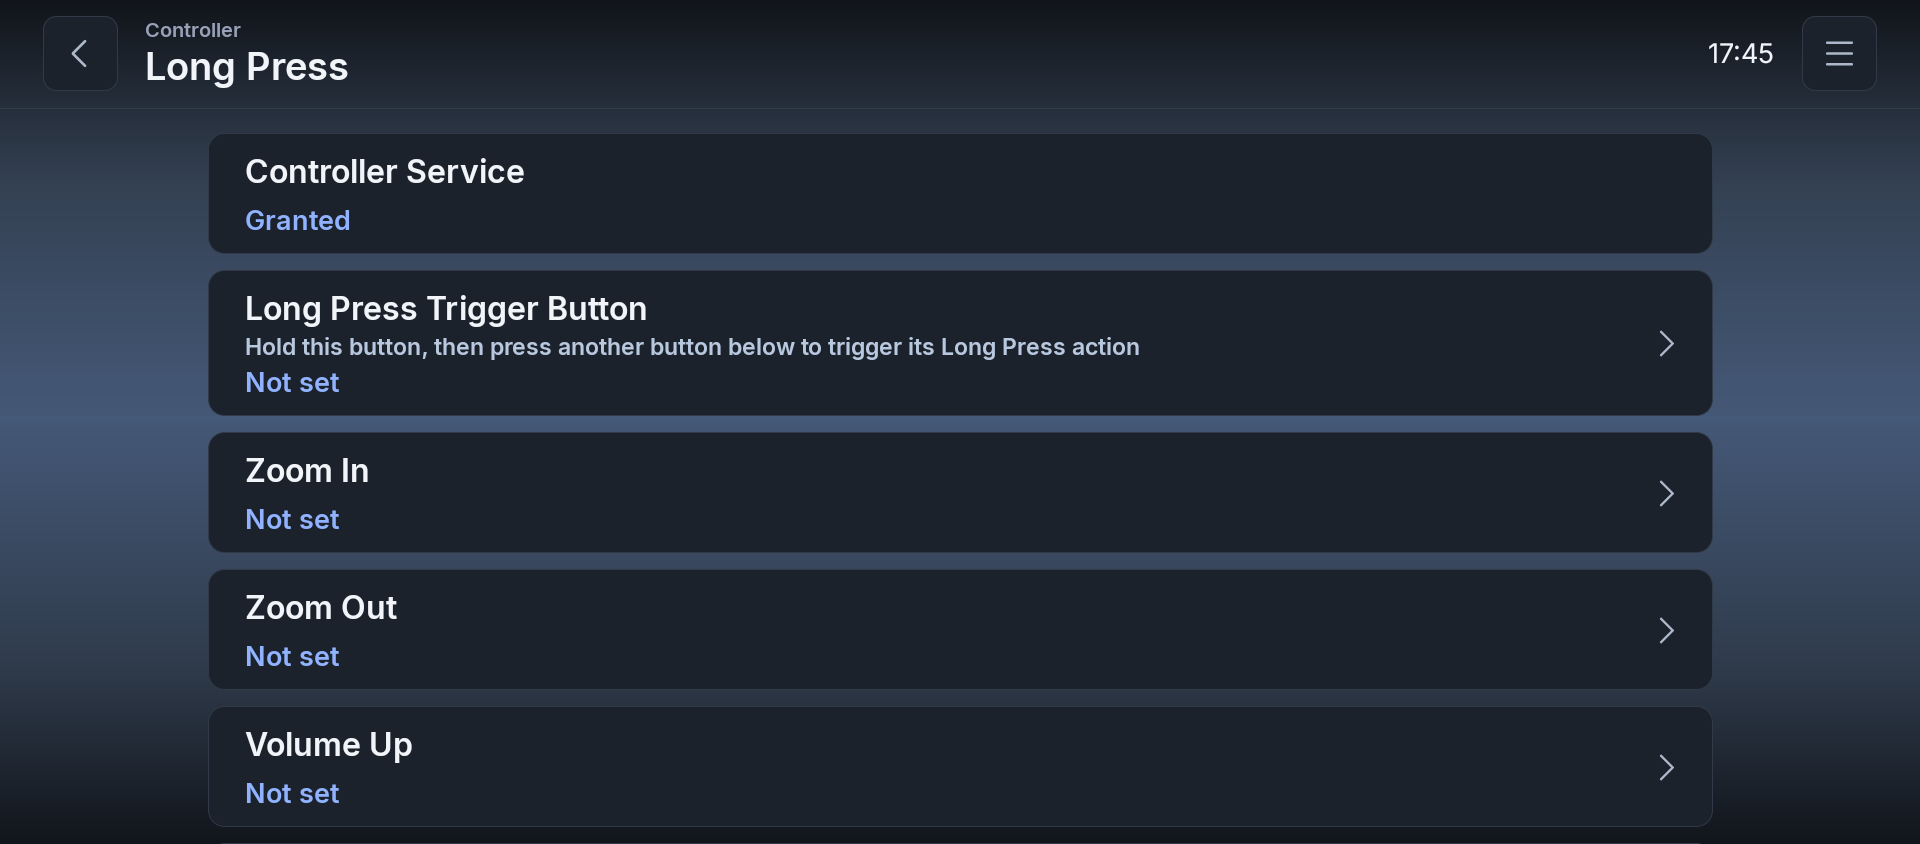
Once you set any one button as the "Long Press Trigger Button," you can create a second set of mappings that only activate while that button is held down together with another button. Because the same physical button can be assigned different actions for "pressed alone" (the mapping in 3.4.1) and "pressed while holding the long-press trigger button" (the mapping on this page), even a controller or steering wheel switch with few buttons can be assigned a large number of operations.
| Item | Description | Type |
|---|---|---|
| Controller Service | Status of the Accessibility service this feature depends on. | Display (Granted / Denied) |
| Long Press Trigger Button | Hold this button, then press another button below to trigger its Long Press action. | Key bind |
| Zoom In | "Detect Key" / "Clear" button | Key bind |
| Zoom Out | Same as above | Key bind |
| Volume Up | Same as above | Key bind |
| Volume Down | Same as above | Key bind |
| Back | Same as above | Key bind |
| Home | Same as above | Key bind |
| Play / Pause | Same as above | Key bind |
| Next Track | Same as above | Key bind |
| Previous Track | Same as above | Key bind |
| Enter | Same as above | Key bind |
| Scroll Up | Same as above | Key bind |
| Scroll Down | Same as above | Key bind |
| Split Ratio Left | Same as above | Key bind |
| Split Ratio Right | Same as above | Key bind |
| Sidebar Next | Same as above | Key bind |
| Sidebar Previous | Same as above | Key bind |
| Sidebar Select | Same as above | Key bind |
| Next Page | Same as above | Key bind |
| Open Accessibility Settings | Tap to open system settings. | Button |
Note: There are 19 assignable actions: Not Assigned / Volume Up / Volume Down / Next Track / Previous Track / Back / Home / Scroll Up / Scroll Down / Enter / Play/Pause / Zoom In / Zoom Out / Split Ratio Left / Split Ratio Right / Sidebar Next / Sidebar Previous / Sidebar Select / Next Page. Note: "Sidebar Next," "Sidebar Previous," and "Sidebar Select" let you select and press sidebar buttons using this key assignment (Next/Previous moves a thin gold focus frame between buttons, and Select presses the focused button). See 2.1 Using the Sidebar for details. Note: This screen does not have a "Steering Key Compatibility Mode" option.
3.5 Backup
Settings → Backup
3.5.1 Automatic Backup
Every time you launch NEXGIA DRIVE, it automatically backs up your settings inside the AIBOX unit itself. If nothing has changed since the last backup, it skips creating a redundant one. Up to 5 generations of backups are kept, from newest to oldest; once that limit is exceeded, the oldest one is deleted automatically. This automatic backup happens entirely within the AIBOX unit and is never sent anywhere external, such as Google Drive.
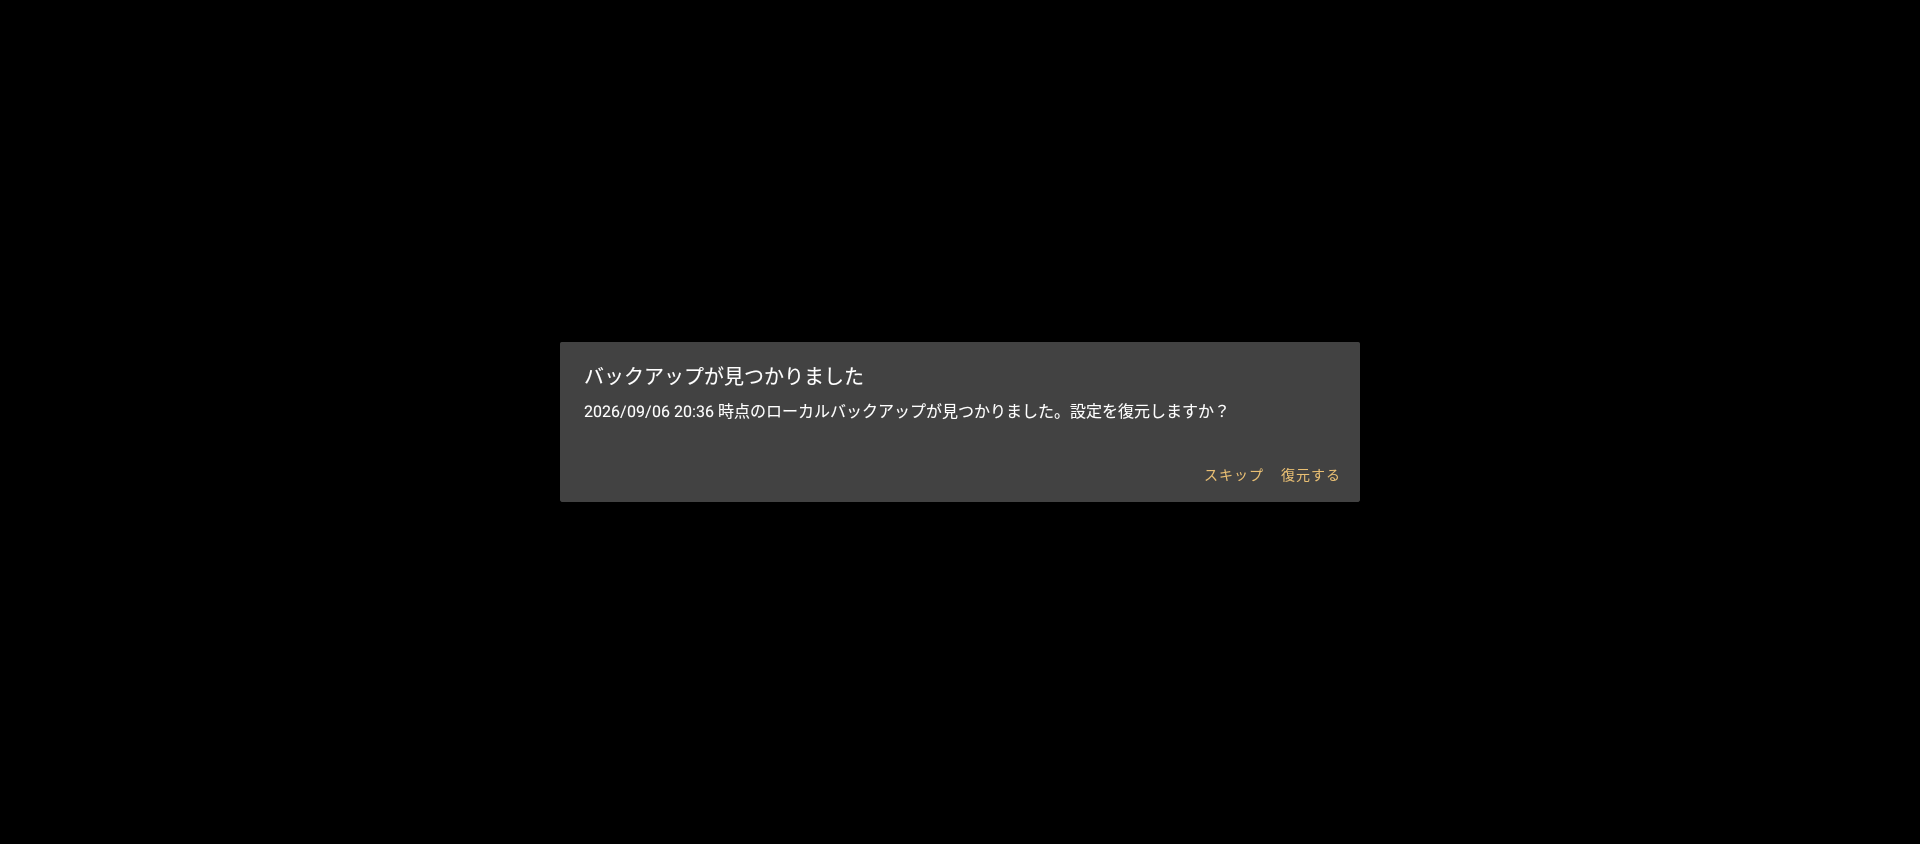
If NEXGIA DRIVE's first-time setup screen appears while an automatic backup still exists (for example, right after you delete and reinstall the app), a prompt like the following appears automatically:
- Title: "Backup found"
- Body: "A local backup from (date and time) was found. Restore these settings?"
- Pressing "Restore" restores your settings from that backup and restarts the app.
- Pressing "Skip" dismisses this prompt and proceeds to normal setup (language selection, etc.) without restoring.
Note: This automatic backup and restore prompt only covers files stored on that same AIBOX unit. If you switch to a different AIBOX model, it is not carried over automatically — use the method in the next section, "3.5.2 Manual Backup and Restore," to save it to Google Drive or similar, and then load it on the new AIBOX.
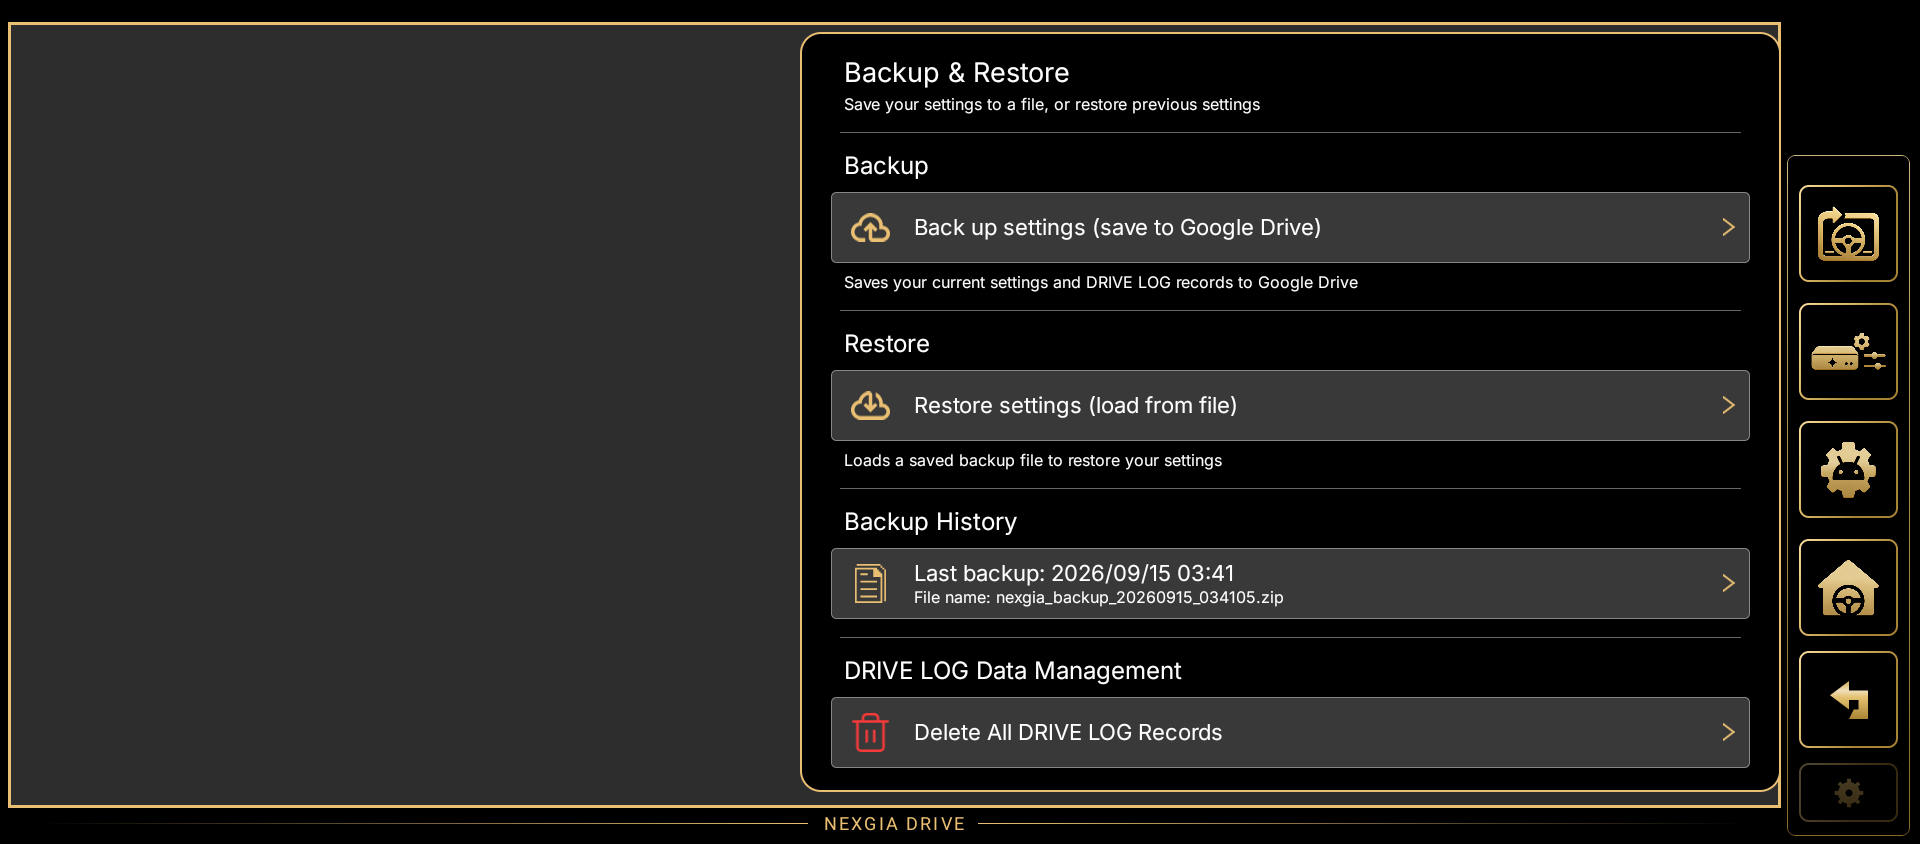
3.5.2 Manual Backup and Restore
| Item | Description | Type |
|---|---|---|
| Back up settings (save to Google Drive) | Saves your current settings and DRIVE LOG records to the location you choose (such as Google Drive) | Button |
| Restore settings (load from file) | Loads a saved backup file to restore your settings | Button → file picker → confirmation dialog → restore + restart |
| Backup History | "Last backup: yyyy/MM/dd HH:mm" or the file name, or "No backup yet" if none has been made | Status display |
| Delete All DRIVE LOG Records | Deletes all drive records, including saved ones. This action cannot be undone | Button → confirmation dialog → delete (irreversible) |
Note: The backup is a ZIP file (containing settings + finalized DRIVE LOG records). Restoring uses an "overwrite merge": only the items included in the backup are overwritten, and settings not included in it are left as they are.
Note: Pressing "Back up settings" creates a backup file and opens a save-location dialog. Choose where to save, such as Google Drive or the device storage, and tap Save. A copy of the backup file is also kept in the device's Download folder. Saving it to Google Drive or similar means that even if you switch to a different AIBOX model, you can carry over your settings and DRIVE LOG records by selecting that file from "Restore settings (load from file)" on the new AIBOX.
Note: The following items are not covered by backup/restore. If you switch to a different AIBOX model, set each of these up again on the new AIBOX.
- The API key used for navigation traffic/speed camera notifications
- Steering Key Compatibility Mode (since it's a setting tailored to compatibility with a specific model)
- Widgets from other apps added to the screen (since their registration differs per AIBOX, re-add them on the new AIBOX)
Note: Permissions such as Accessibility are granted to the AIBOX unit's OS itself, and are not covered by backup/restore. Grant them again during first-time setup on a new AIBOX.
3.6 Permissions
Settings → Permissions
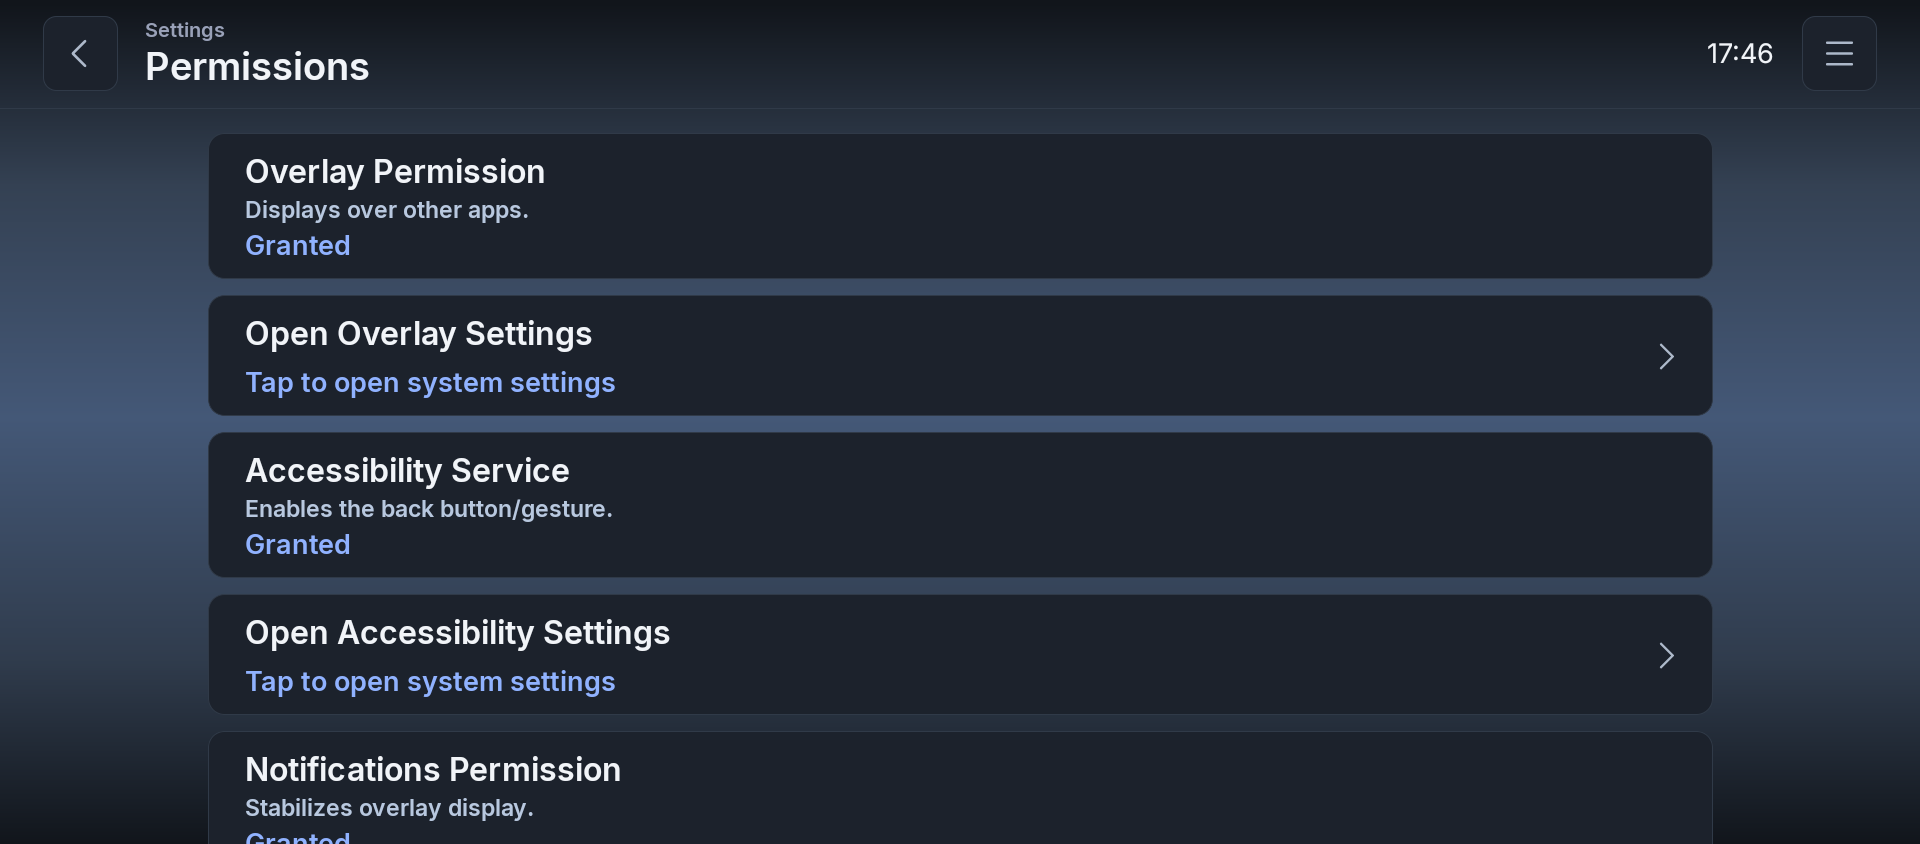
| Item | Description | Destination |
|---|---|---|
| Overlay Permission | Displays over other apps. | Status display |
| Open Overlay Settings | Tap to open system settings. | Android Settings (overlay permission) |
| Accessibility Service | Enables the back button/gesture. | Status display |
| Open Accessibility Settings | Tap to open system settings. | Android Settings (accessibility) |
| Notifications Permission | Stabilizes overlay display. | Status display |
| Request Notifications Permission | Tap to request permission. | Notification permission dialog |
| Location Status | Status of location permission. | Status display |
| Open App Info Settings | Location, calendar, Bluetooth, and other permissions. | App info screen |
Note: Each status item (orange "Granted" / "Denied") is re-evaluated every time you open the screen.
3.7 About
Settings → About
About is a single scrollable list (it does not have its own submenu). For reference, this section groups the items as: "Getting Started & Notes," "Version," "Privacy Policy & Terms of Use," "Open Source Licenses," and "Contact Us."
3.7.1 Getting Started & Notes
Settings → About → Getting Started & Notes
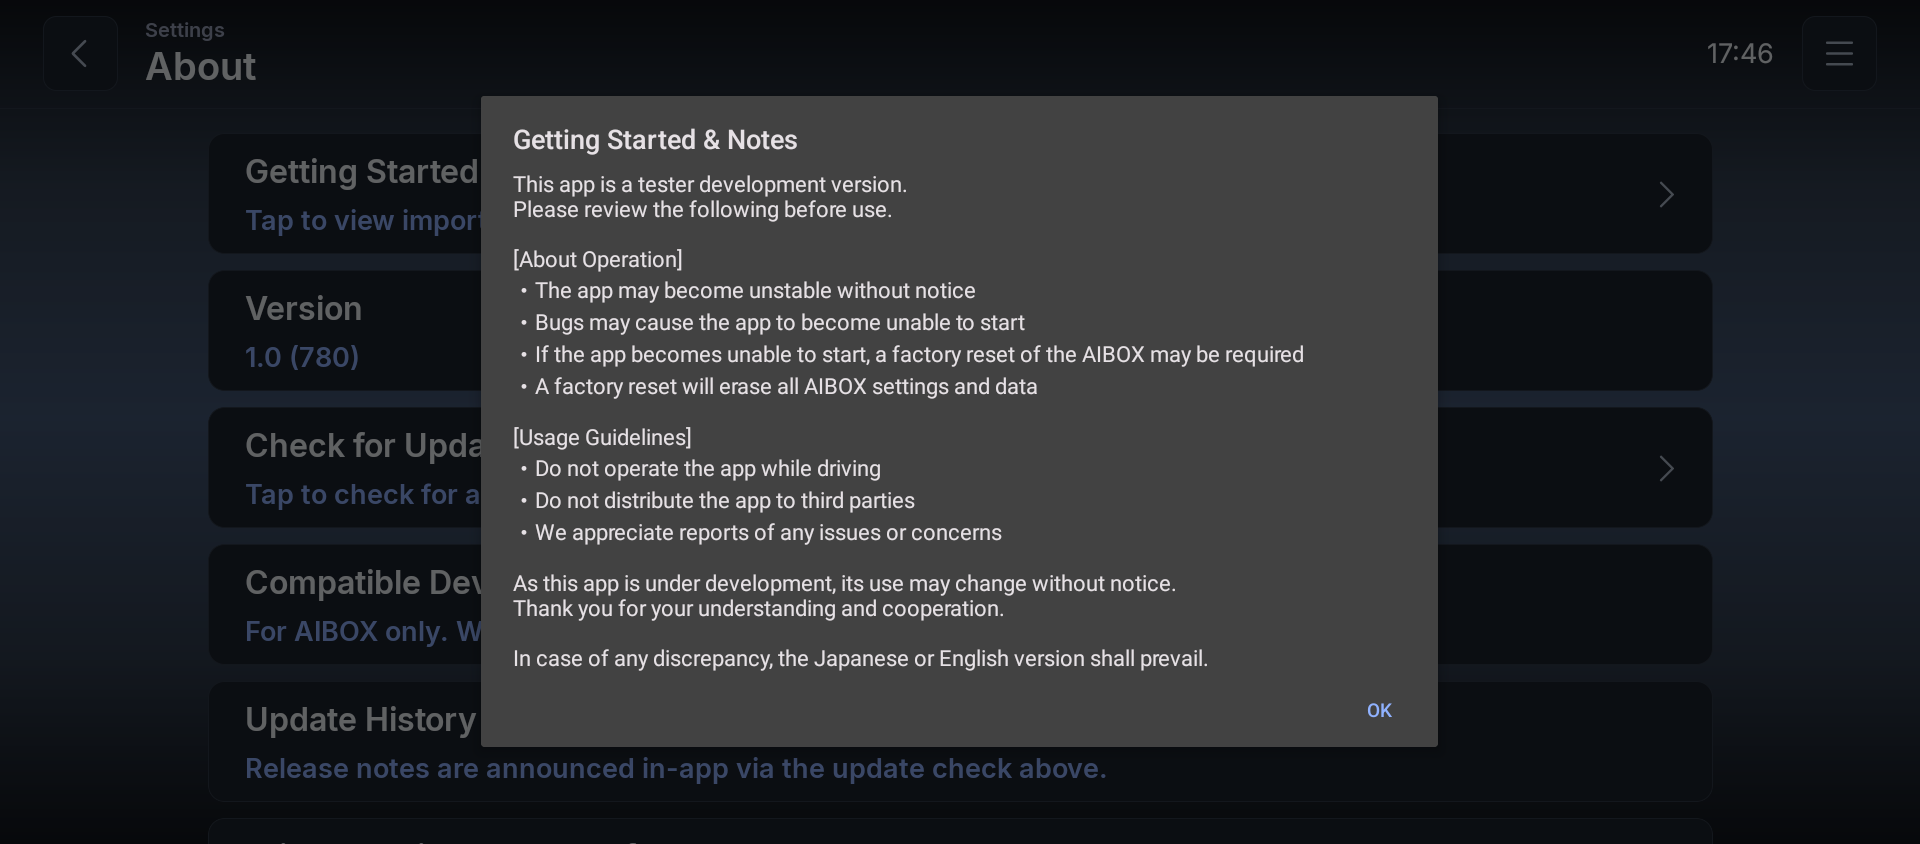
Tapping this row opens a dialog made up of a banner, a 4-item "[About Operation]" section, a 3-item "[Usage Guidelines]" section, and a footer.
3.7.2 Version
Settings → About → Version
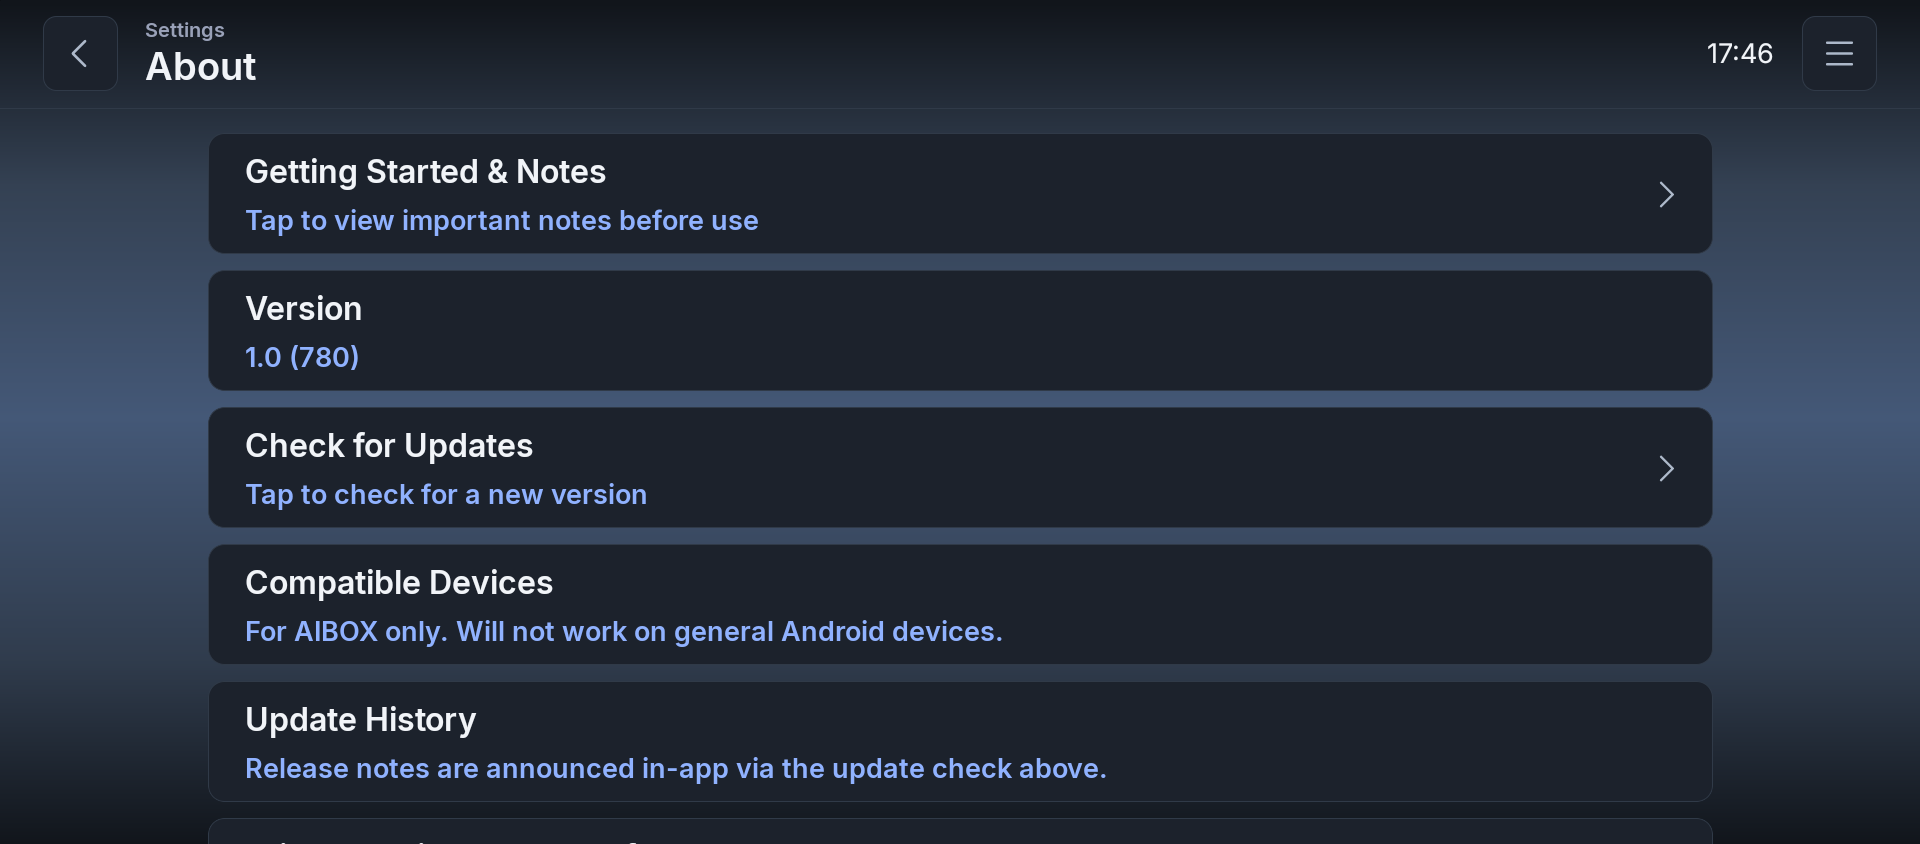
| Item | Description | Type |
|---|---|---|
| Version | Shows the current version number (fetched automatically at runtime) | Display |
| Check for Updates | Tap to check for a new version | Button |
| Compatible Devices | "For AIBOX only. Will not work on general Android devices." | Display |
| Update History | "Release notes are announced in-app via the update check above." | Display |
3.7.3 Privacy Policy & Terms of Use
Settings → About → Privacy Policy & Terms of Use

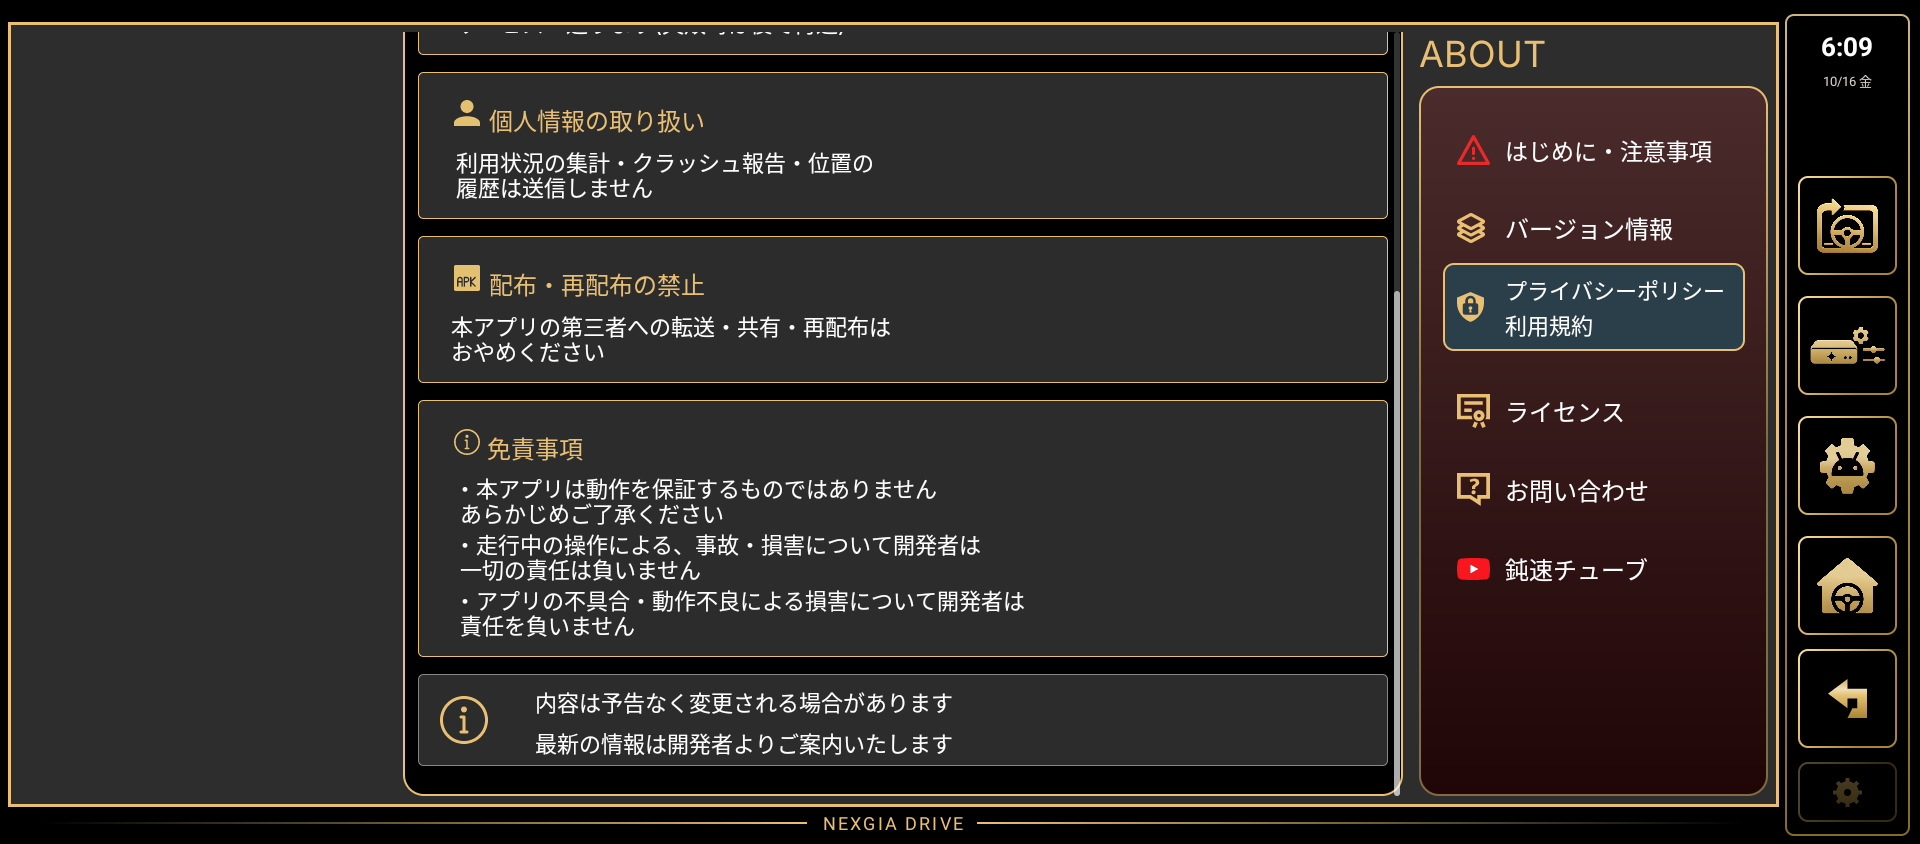
Tapping this row opens a dialog made up of sections on the information that is sent, handling of personal information, a disclaimer, a prohibition on distribution/redistribution, and a footer.
- Logs are sent only when you tap "Send Log" at Settings → About → Contact Us. Logs do not include your address or coordinates.
- Usage statistics, crash reports, and location history are not sent.
For details on the information that is sent, please check this screen.
3.7.4 Open Source Licenses
Settings → About → Open Source Licenses
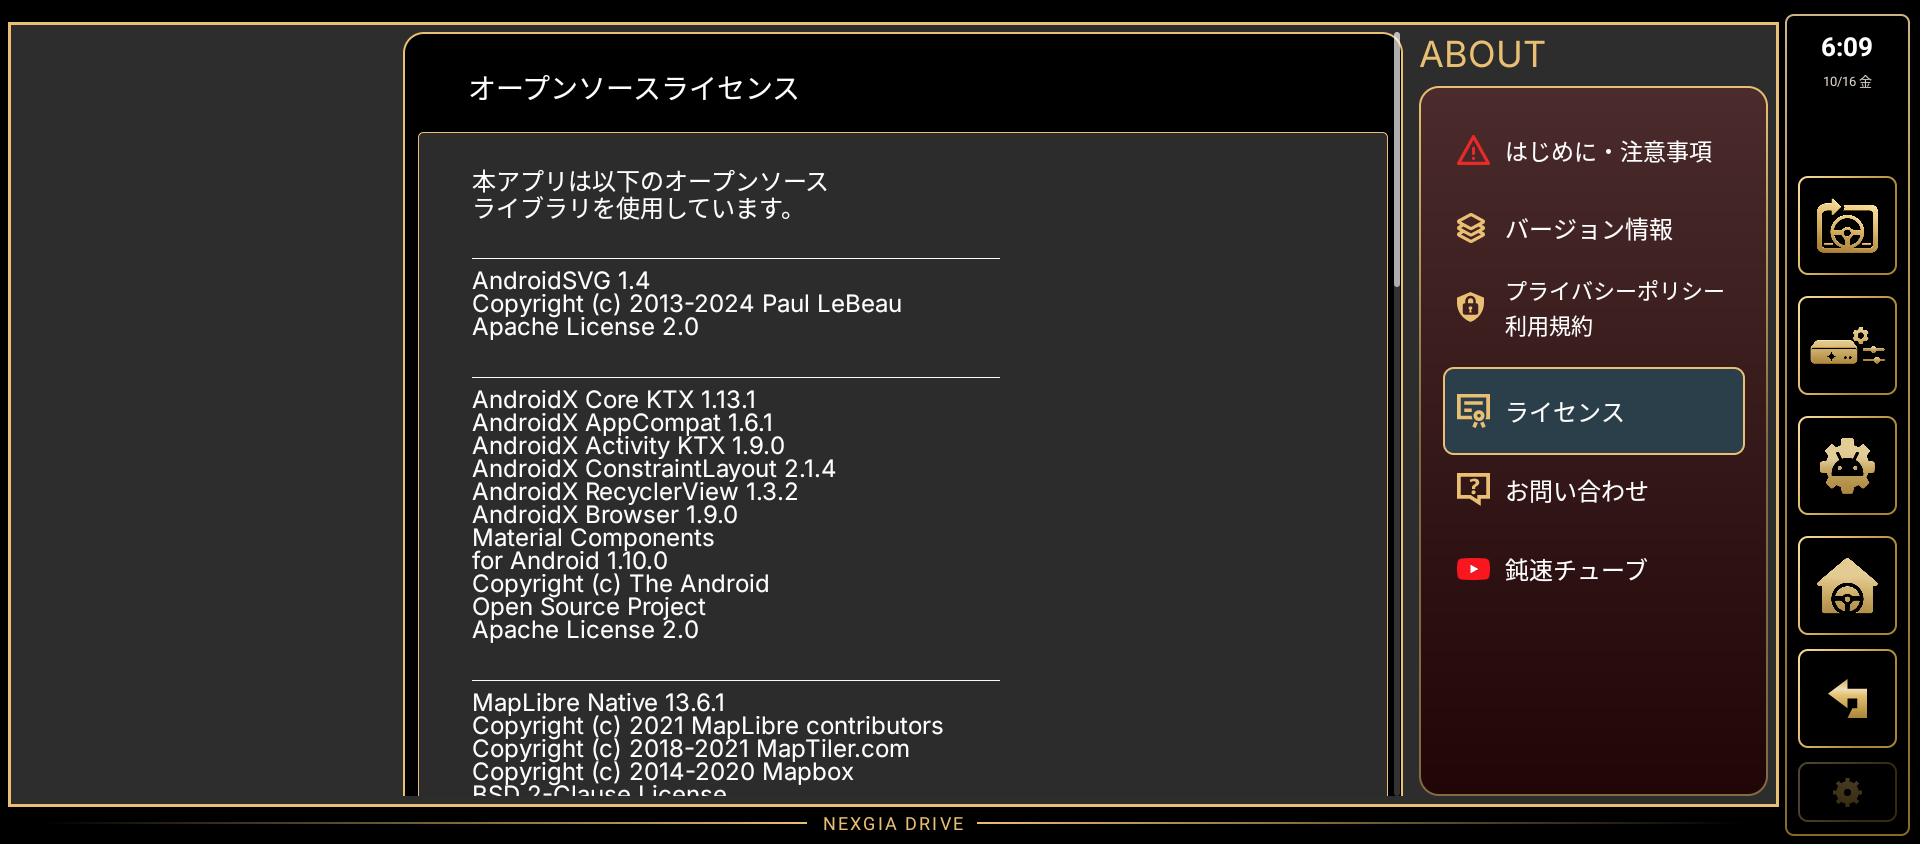
Tapping this row opens a dialog listing OSS licenses. The contents below are what the app's "Open Source Licenses" screen shows. This app uses the following open-source libraries.
OSS license list:
| Library | Copyright notice | License |
|---|---|---|
| AndroidSVG 1.4 | Copyright (c) 2013-2024 Paul LeBeau | Apache License 2.0 |
| AndroidX Core KTX 1.13.1 AndroidX AppCompat 1.6.1 AndroidX Activity KTX 1.9.0 AndroidX ConstraintLayout 2.1.4 AndroidX RecyclerView 1.3.2 AndroidX Browser 1.9.0 Material Components for Android 1.10.0 |
Copyright (c) The Android Open Source Project | Apache License 2.0 |
| MapLibre Native 13.6.1 | Copyright (c) 2021 MapLibre contributors Copyright (c) 2018-2021 MapTiler.com Copyright (c) 2014-2020 Mapbox |
BSD 2-Clause License |
| MapLibre Android Gestures 0.0.4 | Copyright (c) 2018 Mapbox Copyright (c) 2024 MapLibre contributors |
BSD 2-Clause License |
| MapLibre Java GeoJSON and Turf 6.0.1 | Copyright (c) 2018 Mapbox | MIT License |
| OkHttp 4.12.0 | Copyright 2019 Square, Inc. | Apache License 2.0 |
| Okio 3.6.0 | Copyright 2013 Square, Inc. | Apache License 2.0 |
| Timber 5.0.1 | Copyright 2013 Jake Wharton | Apache License 2.0 |
| Gson 2.10.1 | Copyright 2008 Google Inc. | Apache License 2.0 |
| kotlinx.coroutines 1.10.2 | Copyright 2000-2020 JetBrains s.r.o. and Kotlin Programming Language contributors | Apache License 2.0 |
| DSEG 0.46 (DSEG7 Classic) | Copyright (c) 2017, keshikan | SIL Open Font License 1.1 |
| Tomorrow | Copyright 2020 The Tomorrow Project Authors | SIL Open Font License 1.1 |
| Inter | Copyright (c) 2016 The Inter Project Authors | SIL Open Font License 1.1 |
| Oxanium | Copyright 2019 The Oxanium Project Authors | SIL Open Font License 1.1 |
Map data:
- Map data © OpenStreetMap contributors
Open Data Commons Open Database License (ODbL)
https://www.openstreetmap.org/copyright - Map tiles: OpenFreeMap
© OpenMapTiles
Data from OpenStreetMap
https://openfreemap.org
Apache License 2.0 full text: https://www.apache.org/licenses/LICENSE-2.0
SIL Open Font License 1.1 full text: http://scripts.sil.org/OFL
3.7.5 Contact Us
Settings → About → Contact Us
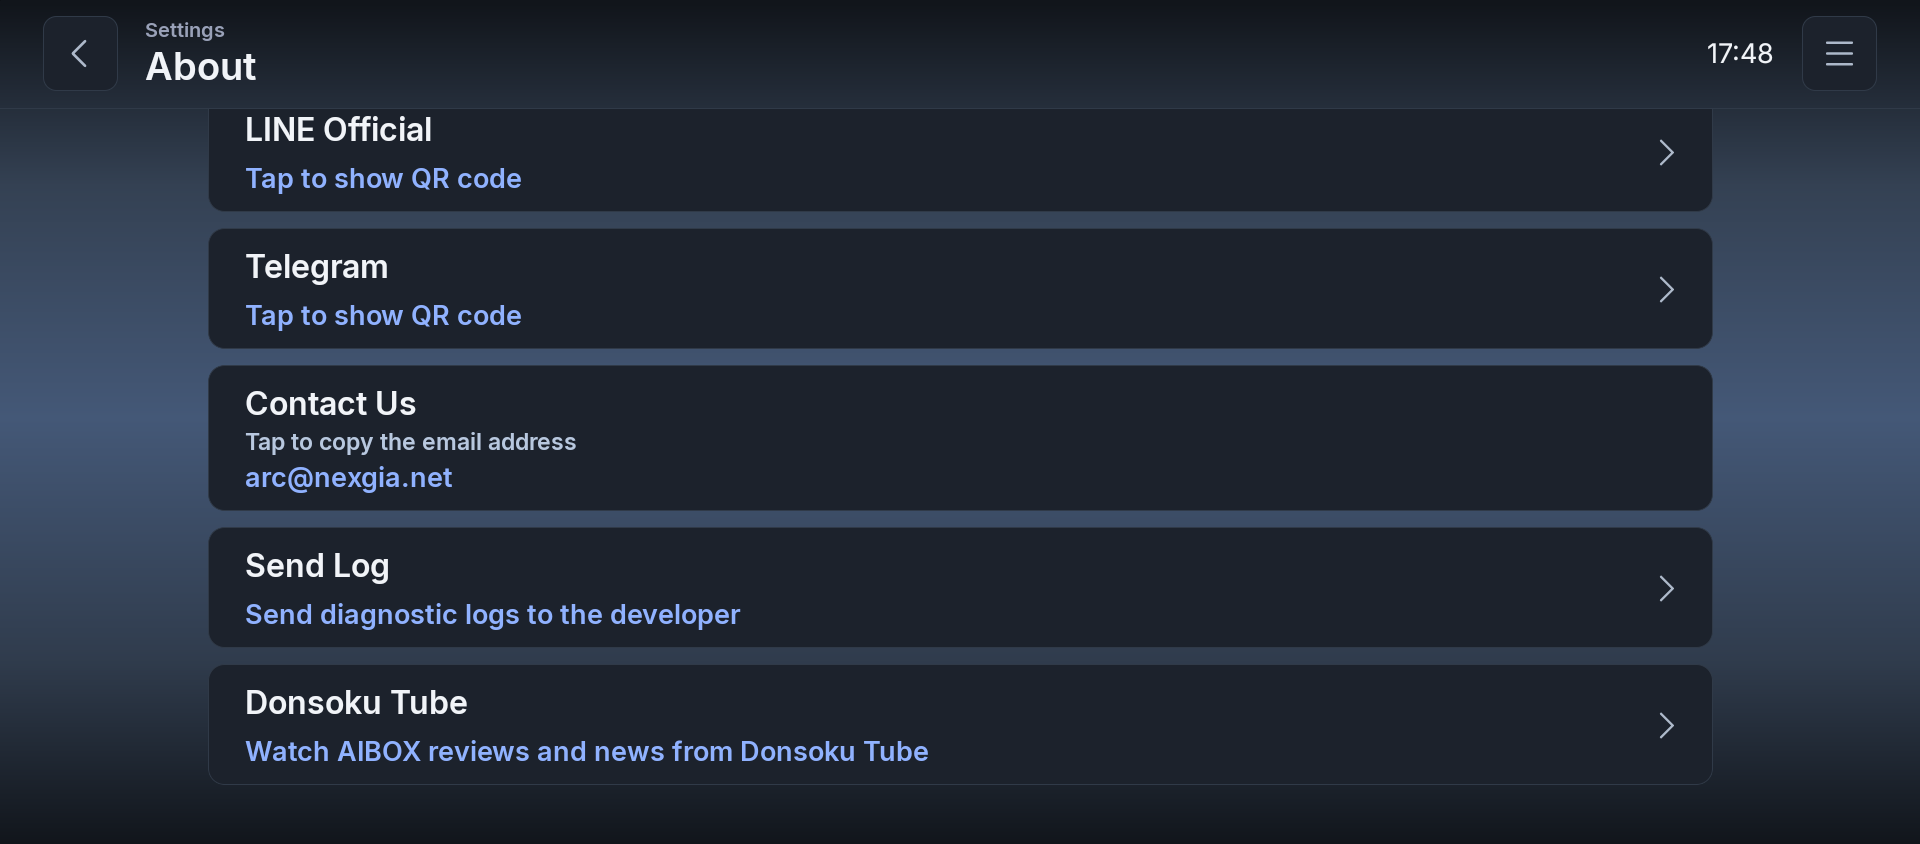
| Item | Description | Type |
|---|---|---|
| LINE Official | Tap to show QR code | Button → QR code dialog |
| Telegram | Tap to show QR code | Button → QR code dialog |
| Contact Us | Tap to copy the email address (arc@nexgia.net) | Display, tap to copy |
| Send Log | Send diagnostic logs to the developer | Button → sends directly to the developer |
Note: If you need to send a log when something goes wrong, you can send it from Settings → About → Contact Us → "Send Log."
4. Recommended Initial Settings
Once you start using NEXGIA DRIVE, we recommend checking and adjusting the settings below first. Any item not listed here can be left at its default value.
Open the settings screen via Settings (the gear icon on the sidebar, the shortcut bar, etc.) → each category, in that order.
4.1 AIBOX Running Android 13
| Setting | Path | Recommended Value | Why |
|---|---|---|---|
| Set the music app + turn on Auto-Resume Music | Settings → Widgets → Music → ① Choose your music app under "Preferred Music App" ② Turn on "Auto-Resume Music" | Set the music app first, then turn on Auto-Resume Music (off by default) | You can't operate the "Auto-Resume Music" toggle at all until a music app is set. Set the app first, then turn it on |
| Set the nav app | Settings → Navigation → Nav App → "Select the Nav App to Protect" | Set the nav app you normally use | Setting this means that app alone won't be killed at shutdown, and NEXGIA DRIVE will try to preserve its route (whether the route is actually restored depends on that app's own behavior) |
| Sidebar position | Settings → Display → Sidebar → "Sidebar Position" | The side closer to the driver's seat (right for right-hand-drive cars, left for left-hand-drive cars) | Placing it on the driver's side makes it easier to operate while driving (right is the default) |
| Steering Key Compatibility Mode | Settings → Controller → Short Press → "Steering Key Compatibility Mode" | Leave it off (default) in principle. Only turn it on for devices where pressing steering wheel buttons force-closes the launcher | Turning it on can make text input unstable in some apps (improved in recent versions), so leave it off on devices that don't show this symptom |
| Startup Delay | Settings → Display → Layout → "Startup Delay" | Off (default). Only set it to a few seconds or more if the app fails to auto-start when AIBOX boots | This setting is for devices where startup is too fast for the app to be ready in time. If you don't see this symptom, leave it at the default |
| Wait for Network Before Starting | Settings → Display → Layout → "Wait for Network Before Starting" | Turn on if you see the symptom (off by default) | Useful if the app fails to start properly because there's no internet connection right after startup. Even while waiting, turning it off lets the app start immediately |
| Turn On Tethering at Startup | Settings → Display → Network → "Turn On Tethering at Startup" | Only turn on if you use AIBOX as a Wi-Fi hotspot (off by default) | Turning this on while connected to the internet over Wi-Fi will disconnect that connection. Only enable this if you don't use Wi-Fi. Note that with SoftBank lines, tethering only works on devices sold by SoftBank or on iPhone, so this feature doesn't apply otherwise |
| Automatic Backup | No action needed (enabled automatically). For a manual save, go to Settings → Backup → "Back up settings (save to Google Drive)" | No settings change needed | Your settings are automatically saved locally on the device, so there's nothing to do the first time. If needed, you can restore from the "Backup found" prompt shown after reinstalling |
About AIBOX running Android 13: It's fine to use the recommended values above as-is. There's nothing else to note.
4.2 AIBOX Running Android 15
| Setting | Path | Recommended Value | Why |
|---|---|---|---|
| Set the music app + turn on Auto-Resume Music | Settings → Widgets → Music → ① Choose your music app under "Preferred Music App" ② Turn on "Auto-Resume Music" | Set the music app first, then turn on Auto-Resume Music (off by default) | You can't operate the "Auto-Resume Music" toggle at all until a music app is set. Set the app first, then turn it on |
| Set the nav app | Settings → Navigation → Nav App → "Select the Nav App to Protect" | Set the nav app you normally use | Setting this means that app alone won't be killed at shutdown, and NEXGIA DRIVE will try to preserve its route (whether the route is actually restored depends on that app's own behavior) |
| Sidebar position | Settings → Display → Sidebar → "Sidebar Position" | The side closer to the driver's seat (right for right-hand-drive cars, left for left-hand-drive cars) | Placing it on the driver's side makes it easier to operate while driving (right is the default) |
| Steering Key Compatibility Mode | Settings → Controller → Short Press → "Steering Key Compatibility Mode" | Leave it off (default) in principle. Only turn it on for devices where pressing steering wheel buttons force-closes the launcher | Turning it on can make text input unstable in some apps (improved in recent versions), so leave it off on devices that don't show this symptom |
| Startup Delay | Settings → Display → Layout → "Startup Delay" | Off (default). Only set it to a few seconds or more if the app fails to auto-start when AIBOX boots | This setting is for devices where startup is too fast for the app to be ready in time. If you don't see this symptom, leave it at the default |
| Wait for Network Before Starting | Settings → Display → Layout → "Wait for Network Before Starting" | Turn on if you see the symptom (off by default) | Useful if the app fails to start properly because there's no internet connection right after startup. Even while waiting, turning it off lets the app start immediately |
| Turn On Tethering at Startup | Settings → Display → Network → "Turn On Tethering at Startup" | Only turn on if you use AIBOX as a Wi-Fi hotspot (off by default) | Turning this on while connected to the internet over Wi-Fi will disconnect that connection. Only enable this if you don't use Wi-Fi. Note that with SoftBank lines, tethering only works on devices sold by SoftBank or on iPhone, so this feature doesn't apply otherwise |
| Automatic Backup | No action needed (enabled automatically). For a manual save, go to Settings → Backup → "Back up settings (save to Google Drive)" | No settings change needed | Your settings are automatically saved locally on the device, so there's nothing to do the first time. If needed, you can restore from the "Backup found" prompt shown after reinstalling |
About AIBOX running Android 15: On some units, the steering wheel buttons have been observed to stop responding after reinstalling the app. If this happens, don't redo your settings — instead, restart the AIBOX unit itself (see "5. Troubleshooting" for details).
5. Troubleshooting
5.1 Common Symptoms and Causes
Below are the representative symptoms confirmed so far. Most of these are due to the AIBOX unit itself or third-party apps, and are not bugs in NEXGIA DRIVE.
| Symptom | Cause | Solution |
|---|---|---|
| Kodi won't start, or the screen goes black | This is caused by the AIBOX unit's system setting (hostname), which makes the Kodi app itself force-close on launch. This is not a bug in NEXGIA DRIVE | There's currently no way to fix this from the app side. If this concerns you, please check with the AIBOX retailer or manufacturer |
| In dual-screen display, one side turns white, or the screen grows as you enlarge it | This happens because some older apps (e.g. "GPS Test Plus," which comes preinstalled on AIBOX) still use an old spec and don't support screen resizing. This is not a bug in NEXGIA DRIVE | Resize to the size you want to use (or slightly larger) first, then relaunch that app. If it turns white, shrinking the screen once will restore it |
| Can't do a fresh install on an AIBOX running Android 16 | On some newer Android (16) AIBOX units, OS-level install restrictions can prevent installing the app fresh | Use the A16 Edition (see 1.2 Installation) |
| Screen goes black, or the previous app stays on screen, when using another launcher app | When another launcher app launches Google Maps on a different screen, standard Android behavior can switch where the map is displayed. This is not a bug in NEXGIA DRIVE | Re-selecting the nav app from the app list restores it |
| DRIVE LOG records show the address as coordinates (numbers) instead of an address | This is most likely because the AIBOX unit's Google account authentication has expired (this can happen after removing or switching Google accounts) | Go to AIBOX's Settings → Apps → Google Play Services → Storage → "Clear Data" → restart AIBOX → open Google Maps or the Play Store once to redo authentication |
| CarPlay disconnects on the new RAV4 (actually the AIBOX unit is restarting) | The AIBOX unit's CarPlay mirroring feature can error out when communicating with the new RAV4, causing the AIBOX to restart repeatedly. This is not a bug in NEXGIA DRIVE | Restart the AIBOX unit. If it doesn't improve, check with the AIBOX retailer or manufacturer about a firmware update |
| On some AIBOX units, fade and other animations don't play and screens switch abruptly instead | On some AIBOX units, the system-wide animation setting is disabled, so transitions don't play smoothly (this is only cosmetic and doesn't affect functionality) | No action needed |
| Text input is difficult or behaves oddly while Steering Key Compatibility Mode is on | Compatibility mode is designed to prevent steering wheel button presses from force-closing the launcher, but turning it on comes with a known limitation: on-screen keyboard input can become unstable | If you type frequently, turn it back off. This has been improved in recent versions. Devices that don't experience the launcher crashing from steering wheel buttons don't need to turn this on in the first place |
| Music doesn't auto-play even after restarting the engine | There are a few possible causes. ① By design, a track you paused yourself is not eligible for auto-resume (to prevent accidental resume) ② It's also not eligible if it's been stopped for longer than the "Auto-Resume Time Limit" ③ A very brief power interruption when the engine turns off could momentarily restart the AIBOX, which could be mistakenly recorded as "stopped" (fixed in recent versions) | Go to Settings → Widgets → Music and check that a music app is set, Auto-Resume Music is on, and you're within the wait time. If it doesn't improve, please send a log and contact us (see 5.2) |
| Steering wheel buttons stopped responding after reinstalling the app | On some AIBOX units, the steering wheel button signal itself can stop arriving after the app is reinstalled (an issue on the AIBOX system side) | Don't redo your settings — you must restart the AIBOX unit itself. No other method will fix this |
| A widget you added disappeared or stopped showing | On some AIBOX units, the widget repositioning process could, in rare cases, lose its placement data and become hidden — a bug that's fixed in recent versions | Update to the latest version, then place that widget again from "+ Add" in the screen settings panel |
| Tapping an app shows "This app is already in use on another screen" | That app is already running on the other screen (the other side of dual-screen, or the other page among page ①/②) | Close that app on the other screen where it's in use, or choose a different app |
※With SoftBank lines, tethering only works on devices sold by SoftBank or on iPhone, so this feature doesn't apply otherwise. This feature can't be used with a SoftBank-line smartphone.
5.2 Sending Logs
If you experience a symptom, please send a log using the steps below as soon as possible afterward. This gives the developer an important clue when investigating the situation.
Settings → About → Contact Us → "Send Log"
Pressing the button sends the logs on your device directly to the developer. You don't need to attach the log contents to an email yourself.
Logs are sent only when you press this button. Logs do not include your address or coordinates. Usage statistics and crash reports are never sent automatically. Details of the information that is sent are given at Settings → About → Privacy Policy & Terms of Use.
5.3 Contact and Request Form
Questions, bug reports, and requests are welcome through the channels below (the same contact points are also available at Settings → About → Contact Us).
- Official LINE: via the QR code in the app
- Telegram: via the QR code in the app
- Email:
arc@nexgia.net(tapping this from the About screen opens your mail app with a pre-filled template) - Request Form: https://forms.gle/78qNQa1f5EvWTLt58
When reporting a bug, if possible, please send a log using the steps in 5.2 before contacting us — it makes investigation smoother.
6. Update History
6.1 Checking Your Current Version
Opening Settings → About → Version shows the currently installed version number (v0.0.0). When contacting us, letting us know the version number from this screen helps investigation go smoothly.
The same screen also shows the note "Compatible Devices: AIBOX only (*Does not work on general Android devices)."
6.2 How Automatic Updates Work
Since NEXGIA DRIVE is distributed through its own method rather than an app store, updates happen in the following flow.
- When the app starts, it automatically checks whether a new version has been released
- If a new version is available, a dialog titled "Update available" appears. Choosing "Update" starts the download
- Once the download finishes, the install process runs
- Restarting AIBOX (or the app) is required for the update to take effect
If you choose "Later," you'll be prompted again the next time the app starts.
To check manually: You can perform the same check from Settings → About → Version → the "Check for Updates" button.
6.3 If Updating Doesn't Work
If the download fails, or it stays stuck on "checking," please try the following.
- Press "Check for Updates" again while connected to a stable network such as Wi-Fi
- Wait a while and try again (depending on network conditions, the download can be held pending)
- If it still doesn't improve, you can manually download the latest APK file and reinstall it
Manual download of the latest version: https://drive.google.com/file/d/15bx557pzHBX2h2b6_v4i2y_wgjHpNkT3/view?usp=sharing
Installing a manually downloaded file also keeps all your existing settings intact.
6.4 Update History Page
The "Update History" section within the About screen may currently show content that differs from what actually changed in each version. The latest update details (what changed) will be provided below.
When a new version is distributed, we'll also announce the update details separately. If you have questions about specific changes, please contact us through the channels in 5.3.